This article is the first in a series of two, describing the steps to setup SSH tunneling for Java RMI. In this part, we focus on setting up SSH tunnel for interactions between (a) a RMI client and the RMI registry for looking up the remote reference; and (b) a RMI client and a RMI server for method invocations. The second part in the series will identify and address additional issues related to (a) SSH tunneling due to ability of an RMI programs to download code; and (b) presence of corporate firewalls between a RMI client and a RMI server.
Much like most of the early networking technologies, Java RMI was designed for a trusted distributed computing environment (with the exception of security from downloaded code, I should add). In Java RMI, there is no authentication of communicating end-points, meaning the server program does not refuse service to unknown client programs and vice-versa. There is no privacy or confidentiality of the data being exchanged, meaning anyone connected to the network and with access to the proper tools can see and analyze invocation parameters and return values. Additionally, there is no guarantee of message integrity, meaning an intermediate node or program can modify the messages being exchanged and the end-points won't suspect a thing.
These security issues do not pose serious problems within the safety of a protected network, but could be serious security threats within a large corporate intranet or over the open Internet.
A common approach to make RMI secure is to use RMI over SSL. SSL, as we know, is a layer over TCP/IP and supports end-point authentication, message integrity and confidentiality. Though RMI does not use SSL by default, it is fairly straight-forward to add this support using custom socket factories as explained in this example from RMI documentation and illustrated in my J2EE Security for Servlets, EJBs and Web Services book.
However, use of RMI over SSL is not a panacea for all RMI security problems:
In this article, we will describe how RMI applications can be secured within a network that
relies on SSH for security needs. SSH is a security protocol that can be used for end point
authentication, message integrity and confidentiality. It is already widely deployed and is used
by developers for a variety of purposes such as command execution on a remote machine,
remote login, file copy to remote machines and
tunneling for a large number of third-party applications. A typical SSH implementation consists
of a daemon program called sshd and clients ssh and
scp.
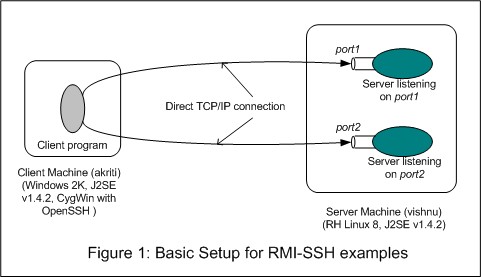
To understand and carry out the steps in setting up SSH tunneling, we will need two machines: one to run the client program and another to run the RMI Registry and server program. Both machines should have J2SE SDK. The client machine should have SSH client and the server machine should have SSH daemon. For testing purposes, it would be good if we are able to close all ports other than the port 22, where SSH daemon listens for incoming connections, on the server machine.
I used a Windows 2000 machine with J2SE SDK v1.4.2 and CygWin with OpenSSH (an open source implementation of SSH) as the client machine. For the server, I used a machine running RedHat Linux 8 and loaded with J2SE SDK v.1.4.2. Also, we will assume that an SSH daemon is running on the server machine (this is the case with normal Linux installation). This setup is shown in Figure 1.
RH Linux 8 is based on 2.4 kernel and allows control of open ports via iptables, a network packet filtering software for Linux. We will use it to shut off all ports but port 22 of the server machine in some of our experimentation.
SSH tunneling between the client and the server machines allows a client program to communicate with the server program without directly establishing a TCP/IP connection with the server program, as shown in Figure 2.
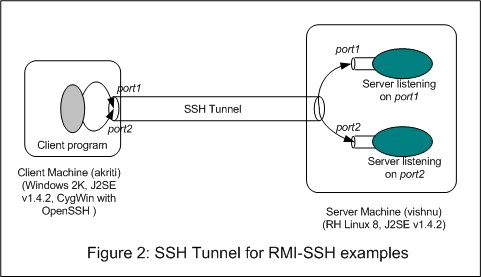
The process of establishing the tunnel essentially involves starting the SSH client program on the client machine with information about the local ports to be forwarded, corresponding remote ports and the remote host running the SSH daemon. The SSH client, after going through the end point authentication, informs the SSH daemon about remote connection addresses and starts listening for incoming connections on all the local ports.
Whenever this SSH client gets a connection request on port that has been forwarded for tunneling, it accepts the connection and informs the SSH daemon, which, in turn, establishes connection with the corresponding remote address. After that, all data exchange between the client and the server program flows through the SSH client and the SSH daemon and is encrypted to ensure privacy and message integrity.
Enough theory! Let us now establish a SSH tunnel between the client and the server machine for a specific port. For this purpose, we will use the default HTTP port, port 80. Let us assume that the server machine has Apache HTTP daemon running on this port. You can verify this by pointing your browser to the server machine. Now we will block all ports other than the SSH port 22 by running the following commands, while logged-in to the server machine as root:
    [root@vishnu /]# /etc/init.d/iptables stop
    [root@vishnu /]# iptables -A INPUT -p tcp --syn --destination-port 22 -j ACCEPT
    [root@vishnu /]# iptables -A INPUT -p tcp -i lo --syn -j ACCEPT
    [root@vishnu /]# iptables -A INPUT -p tcp --syn -j DROP
The first command clears all the current entries for processing network traffic. These
entries are created during system boot time by /etc/init.d/iptables script
file based on rules in the file /etc/sysconfig/iptables. To re-instate these
entries, simply issue the command:
[root@vishnu /]# /etc/init.d/iptables start
Rest of the commands essentially define the rules for processing incoming SYN packets (SYN packets initiate a TCP/IP connection), and hence rules for accepting incoming TCP/IP connections. The first command sets up the rule to accept SYN packets destined to port 22. The second command accepts all SYN packets on the loopback interface. This is required for the SSH daemon to establish connection with other programs on the same machine. The last rule drops all other SYN packets.
After all ports, except port 22, have been blocked, point your browser to the server machine. Are you able to fetch the HTML page? If yes, you are not successful in blocking the ports. If the browser times out, the ports are blocked.
Let us establish a SSH tunnel so that port 7550 of the client machine is forwarded to port 80 of the server machine. Why port 7550? Well, it could be any unused port on the client machine. For our illustrations, we simply chose this specific port.
     c:\>ssh -N -L7550:vishnu:80 -l pankaj vishnu
     pankaj@vishnu's password: ********
Notice that the client has been authenticated via a password. It is also possible to setup SSH for public and private key based authentication.
To test the correct functioning of the tunnel, point your browser to the URL
http://localhost:7550. This should
display the HTML page served by the HTTP daemon of the server machine. As you would guess,
under the hood, the browser talks to the local SSH client, the SSH client encrypts the message
and forwards it to the SSH daemon on the server machine, which forwards it to the port 80,
after decryption.
Now that we understand SSH tunneling, let us write a simple RMI program and see how this tunneling can be used for RMI.
This program consists of a Server program and a Client program. Source code for these
programs are assumed to be available within a directory tree rooted at ex1,
as shown below:
    ex1/server/EchoServerIntf.java
              /EchoServerImpl.java
              /Main.java
       /client/Main.java
The Server programs consists of Java interface EchoServerIntf, implementation
class EchoServerImpl and the main class Main. Their sources, along with
brief descriptions, are presented below:
The interface
EchoServerIntf has only one operation: String echo(String inp).
      package server;

      public interface EchoServerIntf extends java.rmi.Remote {
        public String echo(String args) throws java.rmi.RemoteException;
      }
The implementation class EchoServerImpl extends the RMI class
java.rmi.server.UnicastRemoteObject and implements the interface
EchoServerIntf.
      package server;
      public class EchoServerImpl extends java.rmi.server.UnicastRemoteObject
			implements EchoServerIntf {
        private static int counter = -1;
        public EchoServerImpl() throws java.rmi.RemoteException {
          super();
        }
      public String echo(String arg) throws java.rmi.RemoteException {
        counter++;
        System.out.println("[" + counter + "] EchoServerImpl::echo(" + arg + ")");
          return "[" + counter + "] EchoServer>> " + arg;
        }
      }
The Main class creates an instance of EchoServerImpl and binds it to an
RMI URL. Note that this URL assumes that the RMI Registry is running on the same machine
as the main program.
      // File: ex1\server\Main.java
      package server;
      public class Main {
        public static void main(String[] args) throws Exception {
          EchoServerImpl impl = new EchoServerImpl();
          System.out.println("impl = " + impl);

          String url = "rmi://localhost/EchoServer";
          java.rmi.Naming.rebind(url, impl);

          System.out.println("EchoServer bound to the rmiregistry.");
          return;
	    }
      }
To compile the .java files and generate the stub and skeleton
corresponding to the EchoServerImpl class, issue the following commands
(assuming the current directory to be ex1):
    c:>\rmi-ssh\ex1>javac -classpath . server\*.java
    c:>\rmi-ssh\ex1>rmic -classpath . server.EchoServerImpl
Leave the compiled .class files in the same directory as the corresponding
source files.
The client program consists of a single class with main() method. Within
this method, it takes the hostname of the machine running the RMI registry as commandline
argument, forms an RMI URL, retrieves the remote reference of the server RMI class by looking up
the registry and invokes the echo() method.
      package client;
      import server.EchoServerIntf;

      public class Main {
        public static void main(String[] args) throws Exception {
          String host = "localhost"; // host running the rmiregistry
          String arg = "Hello, Java";
          if (args.length > 0)
            host = args[0];
          String url = "rmi://" + host + "/EchoServer";
          System.out.println("RMI Service url: " + url);

          EchoServerIntf obj = (EchoServerIntf)java.rmi.Naming.lookup(url);
          System.out.println("RMI Service stub: " + obj);
          System.out.println();
          System.out.println();

          System.out.println("Calling: stub.echo(" + arg + ")...");
          String ret = obj.echo(arg);
          System.out.println("... returned value: " + ret);
        }
      }
Compile this .java file:
c:\rmi-ssh\ex1>javac -classpath . client\Main.java
To see the RMI in action, We will run the RMI registry and the Server program on the Linux Box. To do this, transfer the complete directory structure to the Linux box (assuming that the sources were compiled on the Windows 2000 machine). Also, make sure that the normal ports are not blocked.
Now, run the rmiregistry from directory ex1, in its own shell window:
    [pankaj@vishnu ex1]$ export CLASSPATH=.
    [pankaj@vishnu ex1]$ rmiregistry
It is worthwhile to mention that by default, rmiregistry accepts
connections on port 1099. Also, it needs access to the stub classes, either locally or by
downloading from another machine, for all the Remote
References that get registered with it.
We have set the CLASSPATH to the current directory so that rmiregistry
can find the stub classes in CLASSPATH. This way we are able to avoid the need to download
the stub classes. Note that some versions of JDK do not require explicit
setting of CLASSPATH but some do.
The next step is to launch the main server program from a different shell window:
    [pankaj@vishnu ex1]$ java -cp . server.Main
    impl = server.EchoServerImpl[RemoteStub [ref: \
    [endpoint:[192.168.1.105:33045](local),objID:[0]]]]
    EchoServer bound to the rmiregistry.
Pay attention to the displayed value of the impl variable, of type
EchoServerImpl. It indicates the IP address of the machine and a randomly
assigned port. The client program uses this address and port combination to communicate with
the server and hence has special significance for SSH tunneling.
Now that the server components are up and running, run the client program from the Windows 2000 machine, specifying the name of the server machine as a commandline argument.
    C:\rmi-ssh\ex1>java -cp . client.Main vishnu
    RMI Service url: rmi://vishnu/EchoServer
    RMI Service stub: server.EchoServerImpl_Stub[RemoteStub [ref: \
    [endpoint:[192.168.1.105:33045](remote),objID:[1ad086a:f7fad5260a:-8000, 0]]]]

    Calling: stub.echo(Hello, Java)...
    ... returned value: [0] EchoServer>> Hello, Java
You can see that the client displays the same endpoint address as the server.
Now use the iptables command, as explained in the
SSH Tunneling section, to block all ports but port 22. After
this, try running the client program. Does it succeed?
To create SSH tunnel for RMI calls, we need to forward two ports:
rmiregistry waits for incoming connection.
Doing this is fairly straight-forward.We can assign a fixed port to the RMI server program by adding an extra constructor
to the EchoServerImpl and slightly modifying the main class. The modified
sources can be found under directory ex2. The additional or modified code
is shown below:
      package server;
      ...
      public EchoServerImpl(int port) throws java.rmi.RemoteException {
        super(port);
      }
      public EchoServerImpl(int port, java.rmi.server.RMIClientSocketFactory csf,
          java.rmi.server.RMIServerSocketFactory ssf) throws java.rmi.RemoteException {
        super(port, csf, ssf);
      }
      ...
      }
The first constructor allows a programmer assigned port to be used by the RMI server
class for accepting connections. The second class allows not only specification of the port
but also the mechanism to create the client and server sockets. As it is possible to create
a ServerSocket tied with a specific address using the constructor
ServerSocket(int port, int backlog, InetAddress bindAddr), one may think that
it would be possible to specify special IP address "127.0.0.1", representing the loopback
address, as the IP address for the RMI server class. However, this didn't work for me.
For SSH tunneling to work, we need the loopback address in the remote reference for the client
program to connect to the SSH client on local machine. I was able to do this by modifying the
DNS entry for the server machine so that resolving the hostname vishnu always
returned the address "127.0.0.1" on machine vishnu. This is a hack which works
but is not very elegant.
Now let us look at the modified main class that makes use of fixed port 9000 to construct the remote object.
ex2\server\EchoServerImpl.java
    package server;

    public class Main {
      public static void main(String[] args) throws Exception {
        int inport = 9000;
        EchoServerImpl impl = new EchoServerImpl(inport);
        System.out.println("impl = " + impl);
        String url = "rmi://localhost/EchoServer";
        java.rmi.Naming.rebind(url, impl);
        System.out.println("EchoServer bound at port " + inport + " in rmiregistry.");
        return;
      }
    }
The compilation steps are same as in the last section and hence are not duplicated here.
To setup the tunnel for ports 1099 (for RMI registry) and 9000 (for RMI server), issue the following command on the client machine:
     c:\>ssh -N -v -L1099:vishnu:1099 -L9000:vishnu:9000 -l pankaj vishnu
     pankaj@vishnu's password: ********
Option -v directs the SSH client to print debug messages and helps in
understanding exchange of messages.
Start the RMI registry and the server programs the same way as in the last section. While
starting the client program, specify localhost as the commandline argument.
    C:\rmi-ssh\ex2>java -cp . client.Main localhost
    RMI Service url: rmi://localhost/EchoServer
    RMI Service stub: server.EchoServerImpl_Stub[RemoteStub [ref: \
    [endpoint:[127.0.0.1:9000](remote),objID:[1ad086a:f7fad5260a:-8000, 0]]]]

    Calling: stub.echo(Hello, Java)...
    ... returned value: [0] EchoServer>> Hello, Java
Congratulations! You got SSH tunneling for RMI working.
The next part of this series will talk about setup requirements for code downloadable by RMI registry and the RMI client and the issues that arise due to SSH tunneling. We will also talk about how to tunnel the SSH tunnel itself through HTTP so that an RMI client sitting inside a corporate intranet can talk to an outside server.
The basic motivation for this article came from this discussion thread at JavaRanch Security forum.