LegoTM meets JavaTM : RoboJDE vs. LeJOS
by Jessica Sant
Introduction
I recently took a Robot Building Lab as
part of my Master's degree program. The class was a mix of graduate and
undergraduate Computer Science students. The majority of the course was taught
using the HandyBoard controller programmed
with a C derivative called IC4. Being the
Java geek that I am, I was thrilled when my professor mentioned there was a Java
product out there that you could use to program the HandyBoard. Enter RoboJDE. All the graduate students had an
additional requirement to program an RCX
robot using leJOS. This article
is based on my experience of the two platforms. This is by no means a definitive
comparison of the two platforms.
Every language has its purpose,
and this may have not been the ideal application of Java due to the extremely
limited memory on the platforms (~12k for the JVM, program, and the execution
space), but trying to code java small was a very interesting (albeit sometimes
frustrating) exercise. Plus, I always get a kick out of writing a program that
"does something cool". And getting a robot to do stuff like following a flash
light, avoiding obstacles it encounters, and determining where it is along a
wall based on what it sees with its sonar definitely qualify as "cool".
Highlights
RoboJDE and leJOS both have strong aspects to their platform.
Some highlights include: leJOS's built in RotationNavigator
that performs both forward and inverse kinematics (basically knowing where it
is on a 1' x 1' grid and the ability to go to a particular point on that
grid); and RoboJDE's sensor
interaction that better encapsulates the behavior of different sensors.
Because both platforms are Java-based it is possible to create
stand-alone programs in order to test the needed functionality off-line and
without the use of the actual robot. Each of these aspects proved quite helpful
in the respective labs.
Each platform has their issues... the main
problem that sticks out for leJOS is its lack of Garbage
Collection. The extremely limited memory is hard enough to deal with, and
not having the ability to free the memory after its been allocated makes the
situation more challenging for significant programs. RoboJDE has a very
efficient built-in garbage collector. The main issue with RoboJDE is that its
only available on the Windows platform, leJOS is available on both Windows and
Linux.
Hardware comparison
I/O
ports
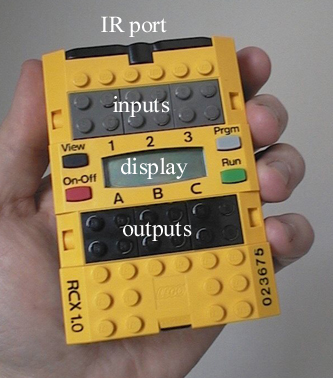
The Lego Mindstorm RCX board has a limited number of input and
output ports (three each). However the ability to overlap sensors allows the
programmer to use more sensors than there are ports available. Overlapping
sensors has the side effect that the readings from the sensors can be received
but it is often impossible to differentiate between which overlapped sensor is
sending the signal.
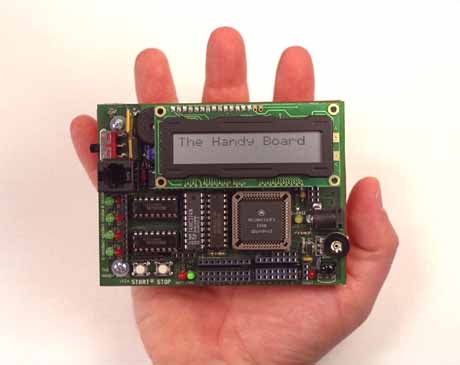
The HandyBoard had seven analog input ports, seven
digital input ports and two digital input / output ports. The limited number of
digital I/O ports became a problem during the 2nd half of the course because we
needed to use two encoders (used with kinematics
to determine where the robot is) and a sonar sensor. Each of these sensors
required the use of an individual digital input/output port. The HandyBoard does
not have the ability to overlap sensors, and so we were forced to use only one
encoder along with the sonar sensor.
*Note: as a
work around we could have written native code to allow one of the encoders to
run on a pure input port, but this proved too difficult given the time
constraints and my pathetic understanding of the Motorola M68HC11 assembly
language.
LCD
The RCX board has a severely limited
display. It allows only a total of 5 characters to be shown on the board whereas
the HandyBoard can display a total of 32 characters (2 lines, 16 characters in
length). The ability for the HandyBoard to display a more significant output
significantly aids in the process of debugging.
Robot
Interface
The Handyboard interfaces with the PC through the serial port,
which connects to a standard phone line, which connects to the robot. So, if
you'd like to get debug information sent back to the PC during the robot's run,
it must remain "tethered" via the phone cord.
The RCX on the other hand
uses a USB tower to send signals via IR (I believe the tower can also be
connected to the PC via a serial port, but we didn't have the appropriate
hardware in our kits). Whether it was due to the IR speed or the RCX loading
software's speed, the RCX took a significantly longer amount of time to download
programs to the robot than the HandyBoard software. The nice advantage about the
built-in IR capabilities of the RCX robots is that it doesn't need to be
tethered in order to send debug information back to the PC.
Software comparison
The Tools
RoboJDE is a commercial product
that compiles code for the Handyboard. It has a more elegant user interface and
cleaner out-of-the-box experience than the UI used with leJOS. RoboJDE runs only
on windows, but the installation is much cleaner, requiring only the execution
of a simple setup executable. The UI itself produces a significant amount of
statistics about the user's program during compilation (program size, number of
static variables, number of classes used, etc) and execution (free bytes
available, free blocks available, % CPU used, % memory used). This information
proved quite useful while coding and debugging the HandyBoard.
leJOS is
an open-source product and thus has several available interfaces that can be
used to compile and download programs. Bricxcc required several products to
be installed as well as multiple environment variables to be set, and I was
unable to configure it successfully. Instead, I used RCXDownload, which requires only
that the JDK and the USB Tower driver be installed. It provides none of the
helpful statistics provided by RoboJDE; it is simply a way to compile and
download the leJOS programs.
The API
Both RoboJDE and leJOS
are Java-based platforms, but they differ in the amount of the standard Java API
they implement and how they interact with the Robot.
- java.lang
leJOS implements more of the java.lang package
than implemented by RoboJDE. However the only significant piece of
functionality I found missing from RoboJDE was java.lang.Math.random(), a
simple random number generator. In order to simulate a random number generator
in RoboJDE when we needed to randomly choose from three different actions
(turn left, turn right, go straight) we performed a modulus operation on the
current system time. This method worked for our purposes, but one should note
that it is only effective if the call itself is made at random intervals.
- java.util
One significant piece of the standard Java API
that is implemented by leJOS and is missing from RoboJDE is the java.util
package. The Collection classes are the most useful parts of the java.util
package for the purposes of programming a robot. These data types are quite
useful when developing significant programs such as trying to find the optimal
path through a set of obstacles based on the sonar input. Because RoboJDE does
not implement any of these data types, simple arrays must be used to hold the
necessary data.
Robot
Interaction
One of the significant comparisons that need to be made
between RoboJDE and leJOS is how easily the two interact with and control the
robot.
RoboJDE provides specialized classes to handle a select set of
sensors. These classes encapsulate all the functionality of the particular
sensor. For example, the conversion of a sonar reading into a distance (see Figure
1) is handled by the RangeFinder class. If necessary, this class can also be
extended to support different brands of Range Finders other than the
DevantechSRF04.
Instead of providing specialized classes that handle
different sensors, leJOS provides a generic Sensor class which, when initialized
with different "Type and Modes", will behave differently. These types can range
anywhere from TOUCH to TEMP or LIGHT.
I find that RoboJDE's method of
interacting with sensors is more intuitive and easier to implement than the one
used by leJOS.
| Figure 1: Example of leJOS
and RoboJDE code to interact with sonar |
| leJOS |
//initialize the sonar
   Sensor.S2.setTypeAndMode (3, 0x80);
   Sensor.S2.activate();
//read the raw value of the sonar
   float value = Sensor.S2.readValue();
//manually convert sonar reading to distance in centimeters
float distance = (float)(12f+.53*a*2.54); | |
| |
| RoboJDE |
//initialize the sonar
   RangeFinder sonar = new DevantechSRF04(...);
   float distance = 0.0f;
//send out a ping and read the value within 100 milliseconds
   sonar.ping();
   long timeout = System.currentTimeMillis() + 100;
   do {
//RoboJDE automatically converts sensor reading to distance
      result = sonar.getDistanceCentimeters();
} while ((result < 0.0f) && (System.currentTimeMillis() < timeout)); | |
Both
RoboJDE and leJOS have a similar method of interacting with the Motors (see Figure
2). With both API's, you set the power levels of the motors their
directions.
Two very useful features that leJOS possesses that are
lacking in RoboJDE are the methods Motor.X.isMoving() and Motor.X.flt(). These methods tell the program if the
motor is currently being moved, and tells the motor to stop applying power to
the motor, respectively. The .flt() command is
different than stop in that it removes power, rather than bringing the motor to
an abrupt stop.
| Figure 2: Example of
controlling motors in RoboJDE vs leJOS |
| leJOS |
//Performs a left turn by moving the left motor (A) slowly
    Motor.A.setPower(1);
    Motor.A.forward();
//moving the right motor (C) quickly
    Motor.C.setPower(7);
    Motor.C.forward();
//pausing
    Thread.sleep (1000);
//stopping both motors
    Motor.A.stop();
Motor.C.stop(); | |
| |
| RoboJDE |
//initializes the motors
    Motor leftMotor = HandyBoard.getMotor(0);
    Motor rightMotor = HandyBoard.getMotor(1);
//performs the turn by moving the left motor slowly
    leftMotor.setPower( Motor.FORWARD );
//moving the right motor quickly
    rightMotor.setPower( Motor.FORWARD/10 );
//pausing
    Thread.sleep(1000);
//stopping both motors
    leftMotor.setPower( Motor.STOP );
rightMotor.setPower( Motor.STOP ); | |
Kinematics
LeJOS makes kinematics almost a
trivial task. LeJOS provides a class called RotationNavigator that uses two
encoders to calculate the distance the robot has traveled, and in what
direction. The RotationNavigator performs the desired move by using commands
such as RotationNavigator.gotoPoint() (inverse
kinematics). It also can calculate where the robot is currently located by using
commands such as RotationNavigator.getX() and
.getY() (hence forward kinematics).
When
using RoboJDE, all of the functionality provided by a class such as
RotationNavigator needed to be designed and coded. Granted, having to code this
myself gave me a renewed appreciation for high school geometry as well as a
better understanding of how the kinematics calculations were actually performed.
Bump detection
Due to the limited number of input ports
available on the RCX, the two bump sensors were stacked on a single input port
and it was not possible to determine if the bump occurred on the left or right
side of the robot. So, when avoiding a bump the robot always attempted to avoid
the obstacle by turning to the right. This caused a problem sometimes because
the robot would take several tries to completely avoid an obstacle, which would
in turn cause the robot to hit the obstacle more, and possibly collect more
error in the calculation of its position.
| Figure 3: RoboJDE vs leJOS
in detecting a bump. |
| leJOS |
Sensor.S2.setTypeAndMode (SensorConstants.SENSOR_TYPE_TOUCH,
    SensorConstants.SENSOR_MODE_BOOL);
if( Sensor.S2.readBooleanValue() ) {
    // avoids obstacle
} | |
| |
| RoboJDE |
DigitalInput leftBumper = HandyBoard.getDigitalInput(15);
DigitalInput leftBumper = HandyBoard.getDigitalInput(13);
if( leftBumper.isSet() && rightBumper.isSet() ) {
    //center hit avoid obstacle
}
else if( leftBumper.isSet() && !rightBumper.isSet() ) {
    // left hit avoid obstacle
}
else if( !leftBumper.isSet() && rightBumper.isSet() ) {
    // right hit, avoid obstacle
} | |
Debugging
Debugging
the robot's program for logical errors is a much easier task in the HandyBoard
due in large part to the RoboJDE UI as well as the large LCD on the HandyBoard.
Error messages, variable values and other helpful debugging statements can
easily be sent to the host machine (and simultaneously displayed on the LCD) by
simply calling System.out.println(). As mentioned before, the RoboJDE interface
that tracks the amount of memory and CPU used as well as program size etc is
incredibly helpful when debugging.
This type of helpful debugging is
much more involved with the Mindstorm. There is no simple way to print to the
host, and the limited size of the LCD prevents much useful information from
being displayed. We found that "debugging" is often reduced to adding different
sounds to be played at various points in the program and trying to interpret
these sounds to mean that the program has successfully reached a particular area
in the code. *In all fairness to the RCX and leJOS, because it has
an IR connection to the PC, you can send message through the IR in order to
debug problems -- but I didn't realize this at the time I was programming
it.
Garbage Collection
One
significant advantage that RoboJDE has over leJOS is its automatic Garbage
Collection. When an object or variable is no longer used it is removed and the
memory is freed in order to be used by other variables. In leJOS the programmer
must be diligent and not produce more objects than necessary because there is no
way to reclaim memory once it is used. The lack of a Garbage Collector is a huge
detriment due to the extremely small amount of memory on the RCX.
RoboJDE is also very efficient when it compiles your program. Any
methods or classes not used will not be compiled and built into byte code for
the HandyBoard. This also aids in significantly reducing the size of your
program.
Other Stuff
One significant advantage that leJOS has
over RoboJDE is that it has a Persistent memory area that can be used to store
calibration values from one program execution to the next. This functionality
would have proven useful during the first half of the course when we were
constantly calibrating and recalibrating the light and reflection sensors. If we
could have calibrated the robot once and stored these values in a Persistent
memory area, we could have saved time from one run to the next.
Simulating the Robot
Due to Java's object
oriented nature, it was easy to encapsulate much of the functionality of the
labs as individual classes that were not dependent on the Robot code itself.
This quality became very useful when writing and testing some of the major
pieces of the labs.
For example, in one of the final labs a map of the
world needed to be built and stored on the HandyBoard based on the Sensor
inputs. We were able to hard-code a simulated set of sonar readings into a main
class. These values were then manipulated and stored so that they could later be
used to find an optimal path to the goal. The ability to do all of this off-line
with the use of real debugging utilities such as those built into IntelliJ IDEA
significantly reduced the number of logical errors present in the program once
it was actually used by the Handyboard.
What I think
In the end, I found that using and debugging RoboJDE was
easier than leJOS. The UI provided by RoboJDE made it easier to identify memory
problems as well as logical errors, and as I mentioned before, I found the API a
bit more intuitive to use as well.
All that being said, for the average
robot geek (and particularly for the recreational robot geek), money is almost
always an issue. LeJOS is a free open source product, and the Mindstorm itself
costs about $200. The
HandyBoard costs about $300, and RoboJDE is
about $100 (there is a free Lite
version available as well). So, for the casual geek, RoboJDE may not be the most
cost-efficient path, but I believe for the academic arena, its certainly a
strong choice.
Links