The SCJP Tip Line
Looking "Under the Hood" with javap
by Corey McGlone
There's a utility that is included with the Java Development Kit that I find is seldom used but can be remarkably handy. In fact, I almost never used it until it came time for me to study for the SCJP exam. That utility is called javap and it is used to disassemble Java bytecode, which is in a binary format, into a readable form. Most people know that, when you compile your .java files, they become .class files but most people never bother to look at what is actually produced. Sometimes, what you can find in your bytecode can be quite enlightening.
Learning to Read Bytecode
Let's start with a simple Java program and see what the bytecode looks like. (Note that bytecode will vary from compiler to compiler - for the purpose of this article, I'm using Sun's compiler, javac 1.4.2). Once you've compiled your program, simply use the command javap -c [ClassName] to view the bytecode (The -c switch indicates that you want to disassemble the code). In my case, the command I used was javap -c SimpleProgram. There are other switches you can investigate on your own by using the command javap -help.
|
A simple Java program
|
public class SimpleProgram
{
    public static void main(String[] args)
    {
        System.out.println("Hello World!");
    }
}
|
|
The resulting bytecode
|
Compiled from "SimpleProgram.java"
public class SimpleProgram extends java.lang.Object{
public SimpleProgram();
  Code:
   0:	aload_0
   1:	invokespecial	#1; //Method java/lang/Object."":()V
   4:	return

public static void main(java.lang.String[]);
  Code:
   0:	getstatic	#2; //Field java/lang/System.out:Ljava/io/PrintStream;
   3:	ldc	#3; //String Hello World!
   5:	invokevirtual	#4; //Method java/io/PrintStream.println:(Ljava/lang/String;)V
   8:	return

}
|
Certainly, it's a simple program, but we can learn a lot about bytecode from just this little example. Notice that there are two methods in this bytecode, SimpleProgram and main. But where did that first method come from? We only defined one method in our program and that was main so why do we now have two? Well, that first method, named SimpleProgram, is the default constructor that is automatically supplied in the case that you don't provide a constructor. Just as you'd expect, that default constructor is public and takes no arguments. So, now if you've been told that default constructors exist, you can see it first hand - they're generated by the compiler and put directly into your bytecode.
Let's really get into the guts of this bytecode and look at the internal parts of these methods. Let's start with that default constructor by looking at the makeup of a line of bytecode. Let's start with the first line:
0: aload_0
The first value, 0, is the offset of the instruction from the beginning of the method. As you can see, the first instruction is marked with a 0 and, for what we'll be discussing here, that number is quite inconsequential. The rest of the line is a bit more interesting in that it contains an operator (sometimes called an opcode) and any arguments for that opcode, if applicable. In our first line, we're going to push a value from the "local variable table" onto the stack. In this case, we're really only pushing the implicit reference to "this" so it isn't the most exciting instruction.
So what do you think this next line does?
1: invokespecial #1; //Method java/lang/Object."":()V
Well, what do you know about constructors? What's the first thing a constructor does? It invokes the parent class' constructor. That's just what this line does - it invokes the constructor of the parent class (in this case, Object). What's with the #1? Well, that is really just an index into a constant table. Index #1 apparently references the constructor of Object.
Finally, the last line returns us from our constructor. Certainly, it's not a very exciting method, but it does help us along our way to understand bytecode. Let's look at the next method, our main method, to get a little more into bytecode.
Let's go through this bytecode line by line, much like we did above. When we're done with this, you should have a decent understanding of how to make heads or tails of bytecode.
0: getstatic #2; //Field java/lang/System.out:Ljava/io/PrintStream;
This line include the opcode getstatic. As you might guess, this opcode gets a static field (in this case, System.out) and pushes it onto the operand stack. As you might have guessed, that #2 refers to that field in our constant table. Let's go on to our next line.
3: ldc #3; //String Hello World!
This line uses the opcode ldc, which loads a constant onto the operand stack. At this point, we're going to load whatever constant is in index #3 of our constant table. That constant is our String, "Hello World!". Going forward, we run into this line:
5: invokevirtual #4; //Method java/io/PrintStream.println:(Ljava/lang/String;)V
This line invokes the method println of our object System.out. The process involved here is to pop the two operands off the stack and then execute the method. At this point, our method is over and we return.
Investigating Strings vs. StringBuffers
Well, there you have it, a quick introduction to reading some bytecode. Now let's see how this can actually be useful to you. You've probably all heard that you should use StringBuffer objects when you have to do String manipulation because Strings are immutable. Let's make our bytecode prove just how true this is. We'll start with a program that defines two method that both append Strings to one another. One method will use Strings while the other will use a StringBuffer.
|
Source Code
|
public class StringConcatenations
{
    public String concat1(String start, String end)
    {
        return start + end;
    }

    public void concat2(StringBuffer start, String end)
    {
        start.append(end);
    }
}
|
|
Bytecode
|
Compiled from "StringConcatenations.java"
public class StringConcatenations extends java.lang.Object{
public StringConcatenations();
  Code:
   0:	aload_0
   1:	invokespecial	#1; //Method java/lang/Object."":()V
   4:	return

public java.lang.String concat1(java.lang.String,java.lang.String);
  Code:
   0:	new	#2; //class StringBuffer
   3:	dup
   4:	invokespecial	#3; //Method java/lang/StringBuffer."":()V
   7:	aload_1
   8:	invokevirtual	#4; //Method java/lang/StringBuffer.append:(Ljava/lang/String;)Ljava/lang/StringBuffer;
   11:	aload_2
   12:	invokevirtual	#4; //Method java/lang/StringBuffer.append:(Ljava/lang/String;)Ljava/lang/StringBuffer;
   15:	invokevirtual	#5; //Method java/lang/StringBuffer.toString:()Ljava/lang/String;
   18:	areturn

public void concat2(java.lang.StringBuffer,java.lang.String);
  Code:
   0:	aload_1
   1:	aload_2
   2:	invokevirtual	#4; //Method java/lang/StringBuffer.append:(Ljava/lang/String;)Ljava/lang/StringBuffer;
   5:	pop
   6:	return

}
|
Well, we can safely ignore the default constructor, but take a look at those two methods, concat1 and concat2. Wow! What a difference!
If you look at concat1 as bytecode, you can see that we first create a StringBuffer object and append the first String to it and then append the second String to it, as well. Then, when we're all done with that, we create a String from that StringBuffer and return that new String. Seems like a lot of work to do something so simple - and wasteful, too. Notice that the final return is a full 18 instructions from the start of the method.
Now look at the second method. See how nice and compact that one is? Because we're already working with a StringBuffer, there's no reason to create a new one. We simply append the String to the one we have now and return from the method. In this case, our return method is a paltry 6 instructions from the beginning of the method.
Well, if someone telling you to use StringBuffer instead of String for maniuplation wasn't enough, I hope this proved why you should. However, there is one caveat to this. With the inclusion of "Just in Time" compilers, further optimizations can be made to your bytecode and it's possible that the first method will end up looking just like the latter. However, you have little to no control over this and it's in your best interest to practice good, conscientious programming techniques rather than to rely on some compiler.
Using the String Literal Pool
Let's look at one more example in which we can see something quite interesting by examining bytecode directly. Quite often, people in the SCJP forum ask about String literals and how they are handled. A String is an object, but the fact that it is immutable makes it a somewhat "special" case. Let's look at a simple program using String literals and see what the resulting bytecode looks like.
|
Source Code
|
public class StringLiterals
{
    public static void main(String[] args)
    {
        String one = "Test";
        String two = "Test";
        String three = "T" + "e" + "s" + "t";
        String four = new String("Test");
    }
}
|
|
Byte Code
|
Compiled from "StringLiterals.java"
public class StringLiterals extends java.lang.Object{
public StringLiterals();
  Code:
   0:	aload_0
   1:	invokespecial	#1; //Method java/lang/Object."":()V
   4:	return

public static void main(java.lang.String[]);
  Code:
   0:	ldc	#2; //String Test
   2:	astore_1
   3:	ldc	#2; //String Test
   5:	astore_2
   6:	ldc	#2; //String Test
   8:	astore_3
   9:	new	#3; //class String
   12:	dup
   13:	ldc	#2; //String Test
   15:	invokespecial	#4; //Method java/lang/String."":(Ljava/lang/String;)V
   18:	astore	4
   20:	return

}
|
Once again, let's skip over the default constructor - let's look at the main method. Take a look at lines 0 and 2:
0:	ldc	#2; //String Test
2:	astore_1
What is this doing? Well, we know that the opcode ldc is going to load a constant. We're grabbing a constant from our constant table and pushing it onto the stack. The next opcode, astore_1, pops that value off the stack and stores it in the local variable table. Now, the real kicker here is to compare these two lines against the next 4 lines. Here are all 6:
0:	ldc	#2; //String Test
2:	astore_1
3:	ldc	#2; //String Test
5:	astore_2
6:	ldc	#2; //String Test
8:	astore_3
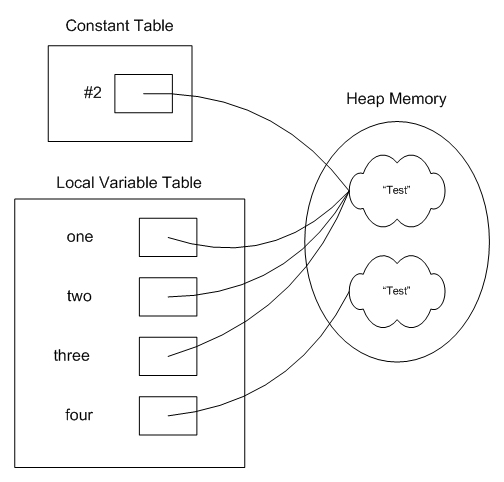
Well, take a look at that. All three sets look just about identical. The only difference is that each one is going into a different part of the local variable table (which only makes sense since we're using 3 local variables). So what does this tell us about how Strings are handled? This tells us that, in the constant pool, there is a reference to a String that contains the value "Test". That reference just got assigned to 3 different local variables. This means that all 3 local variables, one, two, and three, all reference the exact same String object. This is the sharing that is performed by the "String Literal Pool." Notice, also, that there is no use of the opcode "new" in those 6 lines. So when did the String get constructed? It was constructed when the class was loaded.
Now, let's look at the final few lines of the bytecode:
9:	new	#3; //class String
12:	dup
13:	ldc	#2; //String Test
15:	invokespecial	#4; //Method java/lang/String."":(Ljava/lang/String;)V
18:	astore	4
Why do these lines look so different? Well, take a look back at our main method. When we assigned a value to the String variable four, we used the keyword "new." This caused a new String to be created at runtime, rather than reusing the String that was created when the class was loaded. So, when we finish executing these four lines of our main method, we would have a situation that looks like this (a bit simplified, but you get the idea):
Conclusion
Well, that's it for my little intro to using javap to investigate Java bytecode. This is really just scratching the surface of all you can do. If you'd like to know more about the bytecode spec, be sure to check out the Java Virtual Machine Specification. (§3.11 Instruction Set Summary is especially useful for interpreting bytecode.)
I found that, especially when studying for the SCJP exam, when I was confused, it was often helpful to look at the bytecode directly to see what was really happening when my code was executing. I always find it interesting what little tidbits I can unearth when using javap to look at the bytecode directly. Hopefully, this will just add another tool to your bag of tricks as a software developer. Certainly, this isn't something I use every day but, when I find the need, it's a handy tool to have available to you.
Remember to tune in to the SCJP Tipline for more updates.