
It is difficult to maintain code and dangerous for long term usability when you utilize components at specific absolute locations. Different LookAndFeel packages may display components in unusable ways with hard coded size and positions. If someone were to change the wording on one of the labels of your interface, the entire look would become disjointed. Layout managers allow us to create code which, can easily be upgraded and utilized on different displays.
You can define your own layout managers, and you should do so for large applications demanding a consistent look, but for the purposes of this article we are going to look at utilizing some of the standard layout managers.
FlowLayout This manager places items left to right and slides the components to the next line when it runs out of horizontal space. This manager is not suitable for anything besides simple dialogs because of the uncertainty of final placement. JPanel uses FlowLayout as the default layout manager.
GridLayout This manager organizes all of its elements in a rectangular grid with equally sized cells. GridLayout will resize everything it can get its hands on to equally sized areas. Components can be separated with default spacing as specified in the call to the constructor.
BorderLayout This layout has NORTH, SOUTH, EAST, WEST, and CENTER regions. You can optionally use any subset of these regions making it a powerful organizer of relative elements. This is the most commonly used layout manager for straightforward relative positioning of components.
BoxLayout A perfect layout manager for organizing elements either vertically or horizontally, as designated by the constructor. Any series of components would be well served by utilizing this manager. Unlike the GridLayout, vertically arranged components are not resized horizontally, and vice versa.
The CardLayout is extremely useful for flipping between visible sets of components, and the GridBagLayout is tailored for components spanning multiple cells of a grid. SpringLayout is appropriate for specifying the corner relationships of many components, but the four layout managers above offer enough strength for complex user interfaces.
The first secret to working with the standard Layout managers is to utilize JPanel. Instead of looking at the screen as a number of widgets which belong at specific positions, imagine the screen as a number of organized sections, each of which is broken down into further organized sections. Each section is a JPanel.
In the design of your interface you should break down your initial paper sketch of your display into groups of associated components. If two components belong together both logically and physically they should be organized by a layout manager within a JPanel. Organizing your components into logical groups also makes the overall user interface easier to navigate.
The example below uses nested JPanels to control layout. Observe that there are two JPanels used for horizontal placement, and a single main JPanel into which both are placed.
| Source Code | |
|
In the above example the first name label and first name text entry are both added into a JPanel named topRowPanel with an horizontal BoxLayout manager. This places them side by side, left to right. Similarly the last name label and last name text entry are added into a JPanel named bottomRowPanel also with an horizontal BoxLayout. These two rows are then added into the mainPanel with a vertical BoxLayout which places one above the other. Utilizing different layout managers at different levels allows for sophisticated relative positioning.
The second secret of using the standard layout managers is to exploit the constraints each provide you.
FlowLayout This layout evenly spaces what it contains, so can be utilized as a centering tool for a single Component as an alternative to using the BoxLayout.
GridLayout In addition to allowing you to lay out components in a grid, it resizes components so they all match size. When you see your layout demanding a number of equally sized components, the GridLayout should be pulled out of your bag of tricks.
BorderLayout The north and south regions are given their preferred height and the east and west regions are given their preferred width. The center resizes based on available space. Thus, one can utilize just the north and center regions of this layout to have a fixed top label with an adjustable sizing text entry area beneath it.
BoxLayout Invisible filler components can be added to control spacing with this layout manager. This allows one to vertically center, horizontally center, or otherwise adjust the white space around components.
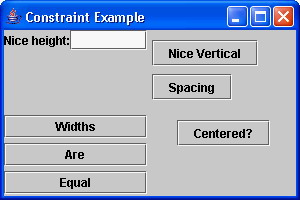
The example below uses some of these constraints to manipulate the layout. The main panel is a two by two GridLayout with four JPanels added to it. Each quadrant demonstrates a different usage of layout managers to achieve specific effects.
| Source Code | |
|
Try running the code and resize the frame. Observe how the components move as you resize, then experiment and change the code with alternate layout techniques to get a feel for how they work.
In the above example, a number of techniques are demonstrated. In the north west quadrant (top left), a label and a text area are placed within a row with a horizontal BoxLayout. This row is added to a JPanel with a BorderLayout. Only the NORTH region of this BorderLayout is utilized. This technique keeps the height of these two controls fixed, so that the text area does not resize vertically. The NORTH region of BorderLayout respects the preferred height of what it contains. An entire layout manager is being used here to constrain the height; all of the other regions of this BorderLayout are empty.
In the north east quadrant, two buttons are arranged with a BoxLayout manager. Notice the first and last component to be added here are calls to Box.createVerticalGlue(). Imagine that the glue spreads out, pushing anything it encounters away. In this case, the glue spreads out above the top component and below the bottom - centering the interior items vertically. A vertical strut is created between the two buttons to create some spacing.
In the south west quadrant, three buttons are created to have equal widths. This is a service provided by the GridLayout manager, and although the grid has only one column, each component within it shares the same width. Equal sizes are handily accomodated by the GridLayout manager.
In the south east quadrant, a single button is centered horizontally utilizing the FlowLayout manager. This manager only centers one component horizontally, its vertical position is a fixed offset. FlowLayout is best left in the drawer normally, but can be useful in a pinch.
getPreferredSize() method so the layout managers can find out how large your component should be displayed. getMinimuSize() and getMaximumSize() should also be overridden, if your layout manager considers them.
Make sure that when the user resizes your frame it meaningfully expands areas. Text entry areas should grow horizontally to allow more space to type. Fixed sized labels do not need to expand. When the user requests a larger view by resizing, make their space more useful for them.
Finally, be sure to test your user interfaces with a variety of LookAndFeel packages, and also test with a broad array of possibly displayed values. Test on any target systems where your code will be used and verify it operates correctly. If certain configurations make it impossible to read your interface, you will have some surly users knocking on your door late at night.