Volume 5, Number 2 (March, 2006)
Managing Editor: Ernest Friedman-Hill

|
by Paul Wheaton, trail boss As a contractor, I have now appeared at no less than six different companies beaming with pride that they have "unit tests". And, combined with that great pride is concern that these "unit tests" are turning out to be a hassle. "Other people talk about how great unit testing is, but this is really becoming painful. The tests take 45 minutes to run, and for every little change to the code, we break about seven tests!" What these folks have is a massive pile of functional tests. They fell into the popular trap of thinking that because they run the tests with JUnit, they must be unit tests. 90% of their problems could have been resolved with just a wee bit of vocabulary.
Quickie Testing Vocabulary
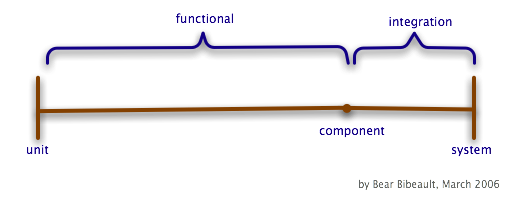
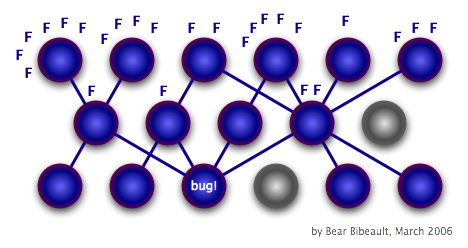
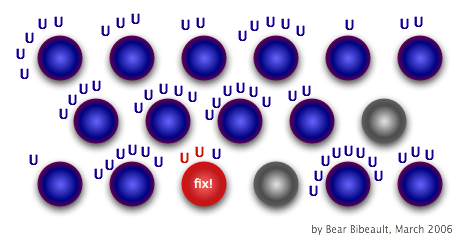
Do you endorse this vocabulary? Contest it? Wish to expand it? Click here to add your view and see the views of others.The Trouble With Too Many Functional TestsDon't get me wrong. Functional tests have great value. I think apps that are well tested would have a regression suite of functional tests and a collection of non-regression functional tests. Usually, for every pound of production code, I would like to see about two pounds of unit tests and two ounces of functional tests (a little bit goes a long ways). The problem I see in too many shops is zero unit tests and a pound of functional tests. The following two images demonstrate classes using classes that use classes. There are functional tests that exercise these classes working together. Fixing a bug in one class breaks many functional tests ....
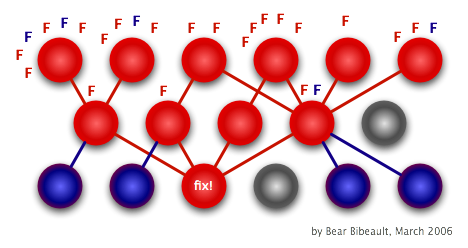
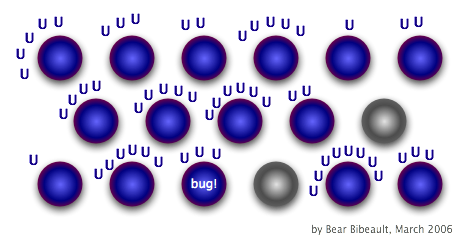
I have seen this happen many times. In one case, a small change broke 47 tests. Meetings were held to decide if the bug should just be left in the code! In the end, it was decided to turn off all tests until the time could be set aside to fix all of the tests. Months passed. Things got mighty stinky .... The solution is to use unit tests instead:
The result is that the project is more flexible. Functional Test Misnomers"By writing only functional tests, I write less test code and exercise more production code!" True! But at the price of making your project brittle. Plus, there are some finer points of your application that will be a lot harder to test without using unit tests. The best coverage and flexibility can only be found through a mix of unit and functional testing that is heavy on unit testing and light on functional testing. "My business logic is all of these classes working together, so testing just one method is pointless." I'm suggesting that you test all of the methods - just separately. Further, I am not suggesting that you have zero functional tests - they have their value. "I don't mind if my unit test suite takes a few minutes to run." But do the other people on your team mind? Does your team lead mind? Your manager? If it take a few minutes instead of a few seconds, do you still run the full suite a dozen times a day? At what point do people stop running the tests at all? "A unit test is anything run by JUnit." It is true that in our industry, the term "unit test" is subjective. I think that what I'm expressing here is the most popular interpretation of the term "unit test". Do you endorse this sentiment about unit tests vs. functional tests? Object to it? Click here to add your view and see the views of others.Creating Unit TestsHere is a really obvious form of unit testing. Trying all sorts of wacky stuff on one method that doesn't depend on other methods.
    public void testLongitude()
    {
        assertEquals( "-111.44" , Normalize.longitude( "111.44w" ) );
        assertEquals( "-111.44" , Normalize.longitude( "111.44W" ) );
        assertEquals( "-111.44" , Normalize.longitude( "111.44 w" ) );
        assertEquals( "-111.44" , Normalize.longitude( "111.44 W" ) );
        assertEquals( "-111.44" , Normalize.longitude( "111.44     w" ) );
        assertEquals( "-111.44" , Normalize.longitude( "-111.44w" ) );
        assertEquals( "-111.44" , Normalize.longitude( "-111.44W" ) );
        assertEquals( "-111.44" , Normalize.longitude( "-111.44 w" ) );
        assertEquals( "-111.44" , Normalize.longitude( "-111.44 W" ) );
        assertEquals( "-111.44" , Normalize.longitude( "-111.44" ) );
        assertEquals( "-111.44" , Normalize.longitude( "111.44-" ) );
        assertEquals( "-111.44" , Normalize.longitude( "111.44 -" ) );
        assertEquals( "-111.44" , Normalize.longitude( "111.44west" ) );
        // ...
    }
Sure, any putz can unit test that sort of thing. But most business logic uses other business logic:
    public class FarmServlet extends ActionServlet
    {

        public void doAction( ServletData servletData ) throws Exception
        {
            String species = servletData.getParameter("species");
            String buildingID = servletData.getParameter("buildingID");
            if ( Str.usable( species ) && Str.usable( buildingID ) )
            {
                FarmEJBRemote remote = FarmEJBUtil.getHome().create();
                remote.addAnimal( species , buildingID );
            }
        }

    }
Not only is this calling other business logic, it's calling an application server! Possibly across a network! Thousands of these are gonna take more than ten seconds. Plus, changes in the EJB stuff could break my tests here! So a mock object needs to be introduced. If I could just mock out all of the EJB stuff, I'd be sitting pretty. Hmmmm .... If the code were to somehow get my mock FarmEJBRemote, I'd be in fat city. First, to create the mock. If FarmEJBRemote were a class, I would extend it and override all the methods. But since it happens to be an interface, I'll just make a fresh class and implement all the methods:
    public class MockRemote implements FarmEJBRemote
    {

        String addAnimal_species = null;
        String addAnimal_buildingID = null;
        int addAnimal_calls = 0;
        public void addAnimal( String species , String buildingID )
        {
            addAnimal_species = species ;
            addAnimal_buildingID = buildingID ;
            addAnimal_calls++;
        }

    }
The mock is dumb. Really dumb. It just carries data between my unit test and the code I am trying to exercise. Does this class make you .... uncomfortable? It should. There are two things about this sort of class that bugged me the first time I was exposed to it: The class attributes are not private, and they have underscores in them. The first time I saw a mock object like this I was told "Your unit test code doesn't go into production, so it can cut a few corners." I dunno ... I want to only write first class code all the time! Not even an hour had passed and I needed to mock java.sql.Connection. 40 methods! Getters and setters for every parameter, return value and counter for every method? .... hmmmm .... thinking this through a little .... the reason we make the attributes private is for the sake of encapsulation - to hide how things are done on the inside so that we can change our business logic later without breaking a bunch of stuff that decided to tap into our innards. But that doesn't really apply to a mock, does it? By definition, a mock has zero business logic. Further, it doesn't really have anything that it didn't just copy from somebody else. All mock objects everywhere could easily be 100% generated at build time! ... So I sometimes still feel a little queasy about this, but in the end I always end up re-convincing myself that this is the best way. So it is still "first class code all the time" - it just smells a little off. But it smells better than if I did it the other way. Now I need to get the code to take in my mock object instead of firing up some application server. So here's that snippet of code again and I've highlighted the line of code where I want to use my mock.
    public class FarmServlet extends ActionServlet
    {

        public void doAction( ServletData servletData ) throws Exception
        {
            String species = servletData.getParameter("species");
            String buildingID = servletData.getParameter("buildingID");
            if ( Str.usable( species ) && Str.usable( buildingID ) )
            {
                FarmEJBRemote remote = FarmEJBUtil.getHome().create();
                remote.addAnimal( species , buildingID );
            }
        }

    }
First, let's separate that out a bit from the rest of the herd ...
    public class FarmServlet extends ActionServlet
    {

        private FarmEJBRemote getRemote()
        {
            return FarmEJBUtil.getHome().create();
        }

        public void doAction( ServletData servletData ) throws Exception
        {
            String species = servletData.getParameter("species");
            String buildingID = servletData.getParameter("buildingID");
            if ( Str.usable( species ) && Str.usable( buildingID ) )
            {
                FarmEJBRemote remote = getRemote()
                remote.addAnimal( species , buildingID );
            }
        }

    }
This is gonna hurt a little .... I will now extend my production class and override getRemote() so I can foist my mock into this operation. So I'll need to make one little change ...
    public class FarmServlet extends ActionServlet
    {

        FarmEJBRemote getRemote()
        {
            return FarmEJBUtil.getHome().create();
        }

        public void doAction( ServletData servletData ) throws Exception
        {
            String species = servletData.getParameter("species");
            String buildingID = servletData.getParameter("buildingID");
            if ( Str.usable( species ) && Str.usable( buildingID ) )
            {
                FarmEJBRemote remote = getRemote()
                remote.addAnimal( species , buildingID );
            }
        }

    }
If you are a good OO engineer, you should be hopping mad right about now! Oh sure, violating encapsulation in unit test code is mighty uncomfortable, but violating encapsulation in production code JUST AIN'T DONE! (in case you missed it, I took out the keyword "private", making the method "package private" - now, anything in the same package can see that method) Again, a long winded explanation might help smooth things over a bit. I'm going to save that for the forums and say for now: be ever vigilant about first class encapsulation in your production code ... but ... once in a while ... you might consider trading a dollar's worth of encapsulation for twenty dollars worth of testability. And to salve your pain/shame a bit, you might add a comment:
    public class FarmServlet extends ActionServlet
    {

        //exposed for unit testing purposes only!
        FarmEJBRemote getRemote()
        {
            return FarmEJBUtil.getHome().create();
        }

        public void doAction( ServletData servletData ) throws Exception
        {
            String species = servletData.getParameter("species");
            String buildingID = servletData.getParameter("buildingID");
            if ( Str.usable( species ) && Str.usable( buildingID ) )
            {
                FarmEJBRemote remote = getRemote()
                remote.addAnimal( species , buildingID );
            }
        }

    }
Now I just write the class so I can return the mock:
    class FarmServletShunt extends FarmServlet
    {

        FarmEJBRemote getRemote_return = null;
        FarmEJBRemote getRemote()
        {
            return getRemote_return;
        }

    }
Note the weird name: "Shunt". I'm not certain, but I think this word comes from electrical engineering/tinkering and refers to using a wire to temporarily complete a circuit. At first it sounded really stupid to me, but after a while I got used to it. A shunt is kinda like a mock, except you don't override all of the methods. This way, you mock some methods while testing others. A unit test could end up with several shunts all overriding the same class, each testing different parts of the class. Shunts are usually inner classes. Now for the grand finale! The actual unit test code!
    public class TestFarmServlet extends TestCase
    {

        static class FarmServletShunt extends FarmServlet
        {

            FarmEJBRemote getRemote_return = null;
            FarmEJBRemote getRemote()
            {
                return getRemote_return;
            }

        }

        public void testAddAnimal() throws Exception
        {
            MockRemote mockRemote = new MockRemote();
            FarmServletShunt shunt = new FarmServletShunt();
            shunt.getRemote_return = mockRemote();

            // just another mock to make
            MockServletData mockServletData = new MockServletData();
            mockServletData.getParameter_returns.put("species","dog");
            mockServletData.getParameter_returns.put("buildingID","27");

            shunt.doAction( mockServletData );
            assertEquals( 1 , mockRemote.addAnimal_calls );
            assertEquals( "dog" , mockRemote.addAnimal_species );
            assertEquals( 27 , mockRemote.addAnimal_buildingID );
        }

    }
Now that the basic framework is in place, I just need to add lots of assertions. TestFarmServlet vs. FarmServletTest: You gotta join one camp or the other. The folks from the latter camp make a damn good point: "FarmServletTest" sounds more like a noun and thus more OO. I am in the former camp. I have become addicted to my IDE and enjoy the way it can complete class names for me. When I get to the point that I have a rich suite of tests, and my test class names all end with "Test", then my IDE makes twice as many suggestions as I want it to. When my test class names all start with "Test", my IDE makes exactly the right number of suggestions. Do you agree with this technique? Do you loathe this technique? Click here to add your view and see the views of others.Directory StructureThis is the sort of directory structure I see all the time:
    projectname
      /src                 // production source
        /java              // java source.  First directory in here is "com"
        /db                // database DDL (or .sql) files.
      /test                // test source
        /unit              // every class in this directory that starts with
                           //       "Test" is run as a unit test
        /functional        // every class in this directory that starts with
                           //       "Test" is run as a functional test
        /nonregression     // run stuff here manually during development
      /lib                 // jar files and the like that the project uses
        /production        // stuff that will need to be copied into production
        /development       // stuff that is used only during development
                           //        and should not find its way to production
      /build               // this dir does not go in version control.
                           //        frequently deleted and re-created by ant
        /gen-src           // if your app generates any source, it goes in here
                           //        (generated source never goes in VC!)
        /classes           // compiled production classes
        /testclasses       // compiled unit test code, functional test code,
                           //        non-regression test code, mocks, shunts, etc.
        /dist              // the final artifacts destined for production.
                           //        Usually a war file, ear file or jar file.
      build.xml            // ant build file
Folks put their unit test stuff in the same package as the production code they are testing - BUT! in a different directory structure. So if you are testing com.javaranch.Str.java found in src/java/com/javaranch/Str.java, you might have a test class com.javaranch.TestStr.java found in test/unit/com/javaranch/TestStr.java. Is this the directory structure you use? Do you think this directory structure is stupid? Click here to add your view and see the views of others.FinThis is just a quick overview of this topic. But once you have your head wrapped around this, you're ready for
Return to Top |
|||||||||||||||||||||||||||||||
|
by Ulf Dittmer Imagine you've just published your first web service (WS henceforth) on your company web server, and it works like a charm. You've emailed a few business partners that it's released, and they tell you that everything is looking good. You're a little worried because this opens up the firewall to the world, but not too much, because you didn't publicize the access point to the world, after all. 24 hours later, after a virus-infected email client forwarded the endpoint URL to a mailing list and your server got slashdotted, you're having second thoughts: It's great that the whole world can connect to your service, but you don't actually want the whole world to connect to it - you need to make sure only authorized clients can connect, and you want to know who they are. Does this scenario sound unlikely? Well, it has happened to many people and many companies, and not just using WS. Security by obscurity (i.e., by hiding what you need protected) just doesn't cut it - real authentication is in order. Authenticating to a WS is a bit different than authenticating to a web site, because it's usually done by an automated system. That means there's no user who can read the instructions you provide, but instead the system has to use certain pre-arranged mechanisms. This article shows various ways of protecting different kinds of WS via authentication. It confines itself to username/password/role schemes, and does not delve into digital signatures and certificates. That will have to wait until some other time. We start out by examining how HTTP authentication can be used for both SAAj and JAX-RPC services. Then we move on to the authentication options provided by the WS-Security standard, and look at how it integrates with Axis. Finally, we beef up Tomcat a bit to integrate WS-Security with Tomcats realms. A Few Remarks Before We StartWeb Services: This is not an introduction to WS, or the software needed to run them. It is assumed that the reader is familiar with concepts like HTTP, web applications, XML, SOAP, SAAJ and JAX-RPC, Tomcat and Axis. To experiment with the example programs, Tomcat (or some other servlet container) must be running, and Axis must be installed and happy. Ant: It is not required that Ant is installed, although the examples use it. It's perfectly possible to run them without Ant. If you are using it, you need to adjust the properties tomcat.server and tomcat.dir in the build.properties file so that they reflect your Tomcat URL and installation directory, respectively. Examples: All examples in this article (download them here) use a single WS, which calculates Fibonacci numbers. If you don't know what that is, don't worry, it's not important. The only thing you need to know is that the Fibonacci function takes a single integer parameter, and returns an integer result, because that will be reflected in the code. If you're really curious, look it up in Wikipedia:Fibonacci. As standard example we'll calculate Fibonacci(15), the result of which is 610. If you're interested in the basics of how to get such a WS up and running in the first place, you can read up on it in this article, on which my examples were originally based. For running the examples, download and unpack the zip file mentioned in the at the end of the article, and open a command line in the newly-created directory. Note that for brevity's sake none of the examples do much -or any- kind of meaningful error handling and exception catching - that doesn't mean you shouldn't do any of that, either! TCPMon: For studying and debugging WS it is very useful to observe the SOAP requests and responses your client sends and receives. Axis ships with a Swing application called TCPMon that allows you to do just that. It can actually be used to monitor any kind of SOAP traffic, irrespective of the type of client or server. TCPMon works by listening to SOAP traffic on a particular port, and then simply sending it on to the "real" target port. E.g., if your servlet engine runs on port 8080, your client would send its SOAP to port 8079 (which is the default port TCPMon listens to), and TCPMon would then display it, and forward it to port 8080. Now execute "ant tcpmon" on the command line. A new window should appear called "TCPMonitor". That's where we'll monitor all SOAP traffic our examples generate. Check the "XML Format" checkbox, and we're ready to go. Setting up Axis to require HTTP authenticationFirst we're looking at HTTP authentication. For that, we need to set up Axis to require it for incoming WS. Add the following to the Axis web.xml file: <security-constraint> <web-resource-collection> <url-pattern>/services</url-pattern> </web-resource-collection> <auth-constraint> <role-name>wsuser</role-name> </auth-constraint> </security-constraint> <login-config> <auth-method>BASIC</auth-method> </login-config> <security-role> <role-name>webservice</role-name> </security-role> Add "wsuser" to your $TOMCAT_HOME/conf/tomcat-users.xml file this: <user username="wsuser" password="wspwd"
fullName="WS User" roles="webservice"/>
You'll also need to run "ant deploy" once, so that all WS classes and deployment information is available to Axis. HTTP Authentication with a SAAJ clientThe first client is a basic SAAJ client that uses HTTP authentication; you'll find the source in the file ClientSAAJ.java. It creates the various elements of a SOAP message, sends the request, and prints the results it receives. For our purposes, the only interesting lines of code are the following:
	String authorization = Base64Coder.encode("wsuser:wspwd");
	MimeHeaders hd = message.getMimeHeaders();
	hd.addHeader("Authorization", "Basic " + authorization);
Those lines add the username "wsuser" with its password "wspwd" as an HTTP header called "Authorization". That is the standard method of sending a username/password combination over HTTP. It's not sent in cleartext, but in Base-64 encoding, which is what the Base64Coder.encode method does. This is not an encryption: it is easily reversed, so it is not much better than cleartext. You may have used this kind of authentication for some web pages; in a web browser it pops up a little dialog asking for a username and a password. Let's see how that request looks like - execute "ant test-saaj -Dport=8079". A few lines will be printed, after which the result of Fibonacci(15) = 610 is shown. Now switch to TCPMon, where you'll see the request and the response on top of each other (or click the "Switch Layout" button to see them side by side. In the request you'll see the line Authorization: Basic d3N1c2VyOndzcHdk That's the authentication header added by the code shown above. (You can also examine the remainder of messages, although they're not really important at this point. Somewhere in the request it says "15", and somewhere in the response it says "610"). If you comment out the lines shown above and rerun it, the HTTP header will be missing, and the call will be rejected. HTTP Authentication with a JAX-RPC clientUsing the JAX-RPC API instead of SAAJ makes things a little easier, because it takes care of the HTTP and encoding details for us. Depending on which invocation style is used, the implementation details differ a tiny bit. The following code sets authentication for use with the Call and Stub interfaces, respectively. import javax.xml.rpc.Stub; Stub stub = (Stub) ...; stub._setProperty(Stub.USERNAME_PROPERTY, "wsuser"); stub._setProperty(Stub.PASSWORD_PROPERTY, "wspwd"); import javax.xml.rpc.Call; Call call = (Call) ...; call.setProperty(Call.USERNAME_PROPERTY, "wsuser"); call.setProperty(Call.PASSWORD_PROPERTY, "wspwd"); The Stub method is shown in action in the ClientJAXRPC.java example. If you run it through "ant test -Dport=8079" and look at the request in TCPMon, you'll see that the SOAP is a bit different, but the HTTP headers (and thus the HTTP authentication) is the same as in the SAAJ example. (It would be possible to use a JAX-RPC handler that adds the username/password data after the client call has been generated, thus facilitating a separation between function and authentication. But since that doesn't add anything new in functionality, this is left as an exercise for the reader, which means: there's no example for that.) Wrapping up HTTP AuthenticationWith the above web application security we have used a single security-constraint for allWS calls (because the associated url-pattern matches /services, which is the prefix for all WS URLs. There could be a special role just for the Fibonacci service (which is addressed as /services/fibonacci), and different roles for other WS. One could also designate several roles that all have access. In that case it might be important for the WS to know which role the incoming is in. Using Axis, it is possible to get at the HttpServletRequest object that carries the SOAP request, and use its getRemoteUser, getUserPrincipal, getAuthType and isUserInRole methods. This is done as follows:
	import org.apache.axis.MessageContext;
	MessageContext context = MessageContext.getCurrentContext();
	HttpServletRequest req = (HttpServletRequest)
            context.getProperty(HTTPConstants.MC_HTTP_SERVLETREQUEST);
The code is Axis-specific, but other servlet containers presumably have comparable facilities.
Now that we've seen HTTP authentication in action, what are its distinguishing features? For starters, since most or all SOAP engines are built on top of servlet technology, it reuses well-known concepts and mechanisms. Web application security is a mature, widely-deployed technology, that is even standardized to a degree by the servlet API. A variety of realms for Tomcat and other servlet containers are available to access user databases, LDAP directories and other sources of user information. So the learning curve is rather flat, and no new technologies or class libraries need to be mastered. On the other hand, it is based on HTTP, and while the vast majority of WS does use that protocol, SOAP does not stipulate a particular transport mechanism - WS over messaging channels or email are possible and have been implemented. HTTP is also just a transport mechanism - it is ill-equipped to deal with security aspects of an application precisely because of its simplicity. (Network aficionados who know the ISO/OSI network stack will note that HTTP is of course an application protocol, not a transport protocol. But as far as WS are concerned, it is just the transport; so I call it the transport mechanism.) WS-SecurityTo overcome many of the limitations of HTTP authentication and its other security features like SSL, a new security standard was created specifically for SOAP messages. It's called WS-Security, and has its home at the OASIS. Its major functionalities are authentication, digital signatures and encryption. To achieve this, it makes use of the XML-Signature and XML-Encryption standards, which are maintained by the W3C, like the XML standard itself. In Java, WS-Security is implemented by the WSS4J library. To use it with the following examples, download it, and copy all jar files from its lib directory into the WEB-INF/lib directory of your Axis installation. While it is possible to use WSS4J programmatically, i.e., allocate objects of its API and call their methods, we'll use it declaratively, by describing the desired security features in deployment descriptors. Thus we have a separation of functionality (in the Java code), and security (in external descriptor files). The first example is the same JAC/RPC client as before, but with a client-side deployment descriptor. You can run it by executing "ant test-sec -Dport=8079". (There'll be a lengthy stack trace starting with "Unable to patch xalan function table.", but you can ignore that - it does no harm.) Looking at the SOAP in TCPMon you'll that the body of the message is just about the same as before, but there is now a lengthy <soapenv:Header> element: All security information is transported in SOAP headers, the body of the message is unchanged. Inside the <wsse:Security> element is the child elements of interest to us, <wsse:UsernameToken>. It carries both the username and the password. A number of pieces are needed to make this happen.
Let's go through these one by one and examine the details. We'll omit the client, as it hasn't changed. The important part of the client deployment descriptor is this:
	<handler type="java:org.apache.ws.axis.security.WSDoAllSender">
		<parameter name="action" value="UsernameToken"/>
		<parameter name="user" value="wsuser"/>
		<parameter name="passwordCallbackClass"
                              value="fibonacci.handler.PWCallbackClient"/>
		<parameter name="passwordType" value="PasswordText"/>
		<!--
		<parameter name="passwordType" value="PasswordDigest"/>
		-->
	</handler>
It specifies that the request should be intercepted on the client -before it is sent- by a JAX-RPC handler of class WSDoAllSender, which is the standard WSS4J handler. The only action to be taken is the adding of a UsernameToken, which is WS-Security lingo for a username and a password. It also specifies which username should be sent, and which class will supply the corresponding password. The separation between user and password is useful, because we really shouldn't hardcode passwords in deployment descriptors. Lastly, it specifies that the password is sent in clear text. (The more secure alternative to clear text would be digested text, which is also available, but commented out. You can observe in TCPMon what difference it makes.) The PWCallbackClient class is rather simple. It only knows the wsuser user and his wspwd password, so if the requested user is indeed wsuser, it sets his password. In a production setting one would most likely not hardcode the password, but instead retrieve it from database or an LDAP directory. The server-side deployment descriptor is a bit simpler. The operative part is this (scroll down to the Fibonacci-sec service section) :
	<handler type="java:org.apache.ws.axis.security.WSDoAllReceiver">
		<parameter name="passwordCallbackClass"
                              value="fibonacci.handler.PWCallbackServer"/>
		<parameter name="action" value="UsernameToken"/>
	</handler>
It says that the WSDoAllReceiver class -which is WSS4Js standard server-side handler- is a JAX-RPC handler that should be invoked on incoming requests. It also specifies that a UsernameToken is expected, and which class to use to check any passwords. Finally, the PWCallbackServer class. Its purpose is to check whether the usernames and passwords supplied by the SOAP request match the expected ones. It is complicated a bit by the differentiation between cleartext passwords and digested passwords. A cleartext password can be compared directly to a known password, but a digested password can't be "undigested", like it is possible with the Base-64 encoding used for passwords in HTTP authentication. Instead, the known password must be passed to WSS4J, which digests it as well, and then compares the two results. In the deployment descriptors and handler source codes you'll find a couple of additional features, which I'm just going to mention briefly. A TimeStamp token is sometimes attached to security information. It specifies that the credentials that are sent along with it (e.g. the username/password combination) only have a limited time until they expire, and that WS-Security should reject them if the expiration time has been reached. The InfoHandler demonstrates how to get at additional information when processing a WS-Security request. E.g. it is sometimes useful to know which service and which operation is invoked, in order to handle different users which may have different rights on the various services. It also shows how programmatic access to timestamps, principals and client certificate information works. If you look at the server logs, you'll see that InfoHandler writes a bunch of information about each incoming call to the log files. Integration with Tomcat RealmsAfter having demonstrated PWCallbackServer class I can almost hear you scream: "What? Hardcoding passwords in a class? You have got to be kidding. That what I have my database/LDAP directory/... for!" And of course you're right. Unfortunately, for WS-Security and WSS4J there is no standard way of declaring how to access a particular repository of user information. So what follows is an adaptation of the Tomcat UserDatabaseRealm (which stores the user information in the conf/tomcat-users.xml file) so that it can be used in conjunction with a WSS4J WSPasswordCallback handler. UserDatabaseRealm is not recommended for a production setting, but once you've understood how it's done, you can implement something for your favorite realm type. A few things need to be set up in preparation. In deploy.wsdd, change the callback class to PWCallbackServerRealm: <parameter name="passwordCallbackClass"
value="fibonacci.handler.PWCallbackServerRealm"/>
In Tomcats conf/server.xml file, comment out the <Realm className="org.apache.catalina.realm.UserDatabaseRealm" ... >element, and instead add <Realm className="fibonacci.UserDatabaseRealmWSS" /> That class extends UserDatabaseRealm with a single method, which allows access to password information (which otherwise is not available from it, but which we need.) To install the realm so Tomcat can find it, copy the UserDatabaseRealmWSS.class file in its fibonacci directory to the server/classes directory. Lastly, Axis needs to be made a "privileged" web app, because it needs access to Tomcats server classes, namely the realm implementation. That can be done by adding the following as file conf/Catalina/localhost/axis.xml: <Context path="/axis" docBase="axis" debug="5" privileged="true">
</Context>
After a Tomcat restart you can now run the example again, and it will look in the tomcat-users.xml file for username and password information (you should have added user wsuser back at the beginning during the discussion of HTTP authentication). The PWCallbackServerRealm class only knows about the role the user needs to have in order to access the WS, which is as it should be. Wrapping up WS-Security AuthenticationHaving looked at both HTTP and WS-Security auth, which one should you choose? As mentioned before, HTTP authentication is widely deployed (every HTTP client and server supports it), and well understood. But WS-Security is relatively young, and will make headway in this regard (e.g., Axis 2 ships with WSS4J integrated). It also goes further, including digital certificates and encryption. Both of those are available for HTTP as well, but aren't integrated with it into a coherent whole. Considering that WS-Security is only marginally more involved to use, it is the recommended way to go forward. (It's also worth noting that HTTP security facilities operate on a lower level than WS-Security - once a SOAP request has found its way inside the SOAP engine, SSL no longer applies - everything is in cleartext. That's not the case with WS-Security.) An additional benefit is the independence from HTTP, although currently that will be of interest only to a very small number of users. (Answers to some common WS and WS-Security questions can be found in the Web Services FAQ and some useful code snippets are in the Web Services HowTo.)Return to Top |
|||||||||||||||||||||||||||||||
|
by Max Habibi Bear with me here, I have a point... Once upon a time, the fine gnomes that live under the silicon hills and valleys found a good, articulate, useful language. They called this language Java, and they saw that it was good. But being tinkerers, they could not stop pushing & probing. In Silicon Gnome culture, the measure of Gnomedom is not the usefulness of the tools built, but the cleverness which went into it's consideration. Thus, never mind that the language is able to do X,Y, and Z. It is much more impressive to make it do Z, Y, and X, because that's new. It's irrelevant that 90% of the actual work that needs to be done is X,Y, and Z. So the Gnomes one day decided that 'externalization' was a worthy goal: and so they set upon to externalize everything. Thus, they invented metalanguages that were interpreted by the common language to do things that the common language could have done well enough: but they did it in a way that was new! and complex! Never mind that it added convolution, increased overhead, offered advantages immaterial to the actual project at hand, and required specialized knowledge that had nothing to do with the actual business needs: it was new, and they read in a book that it was good. All things must be externalized in Silicon Gnome culture, because externalization is the word of the day from the current Gnome gods. Want to handle an HttpRequest? Don't just code up a JSP and have it defer the work to a servlet and/or BO: rather, it's more new to have an XML based framework {that you can't debug through}, that goes from the Dispatcher to the HandlerMapping, which returns a Controller, which returns a ModelAndView, which is fed to a View resolver, which finally returns the view, which must be named exactly such-and-such. What's that? you're complaining that you have to hard code a bunch of names into XML files in order to support all this artificial plumbing? big deal! It's new! Irritated that you have to make half dozen implicit calls in order to render a simple JSP? Whatsamatta, you're intimidated by a little complexity? aren't you a real engineer? Worried about building tech teams devoted to yet another fad? What, are you just not with it? And somewhere, a simple craftsman knew in his heart of hearts that simplicity was to be preferred over complexity; that good code looks like easy code; that things should be judged by the weight they bear-and not the bells & whistles they sprout. He wondered if there was something wrong with him because he could not force himself to like the loud sounds and flashing lights and stuff that everyone seemed to like. So he shook his head and acquiesced to a design that he knew was wrong: because it's not about the right technical choices: it's about the appearance of the right technical choices. It's not important that you do the correct thing: it's important that you look important. It's important that you sound important. But actually working well? That's quaint. The lesson seems to be this: If your code does not does not make high tech laser noises: but simply hums quietly along and works: well, you must doing it wrong. Return to Top |
|||||||||||||||||||||||||||||||
|
by Ajith Kallambella
Part I of a series
IntroductionThis January Ant celebrated its 6th year birthday. In January of 2000, the Ant tool, which was created by James Duncan Davidson to build his Apache project called Tomcat, was moved out of the Tomcat source and into a separate Apache project. Since then it has brought the words "build" and "manageability" closer than ever. Ant gained popularity because of its simplicity, extensibility and cross platform support and within a short span of time has become the build tool of choice for a large number of commercial and open source projects alike. Although Ant has been extremely successful as an enterprise build management tool, most Ant implementations do not use some of the advanced features provided by the tool. In this article, we'll look at a few advanced techniques that can unleash the true powers of Ant, and turn this mere build tool into an indispensable enterprise asset. Examples are provided where applicable, but lack of detailed code is intentional. It is important to focus on the concepts, not so much on the implementation. Software is a writing. Ideas expressed in software, just like in art, music, plays and other media, can be done in many unique ways. Familiarity with Ant tool and some experimentational spirit is all that you need to turn these techniques into real working code. Technique: Divide and Conquer, Chain and FailAs projects grow in size, Ant scripts follow the suit, and over a period of time become monolithic and unmanageable. As large efforts are broken into multiple parallel development efforts, multiple projects with a fair degree of dependency are born. The stake in a stable, reliable build tool across the enterprise becomes even more important. In this installment of "Advanced Ant Techniques," we will look at some methods that will help simplify the build scripts and strategies that allows the growth of your software development shop without compromising manageability. The theme is "divide and conquer": break up that single build file into multiple logical chunks before it becomes a maintenance nightmare. Once you have created these smaller build modules, the theme is to find ways to tie them together so that they work in synergy. Dividing and chaining are simple and powerful techniques that helps to keep the maintenance overhead down. Design by contract using <import>When you start to look across your build files, you'll invariably find some common structures: the ubiquitous <init> task, or the property setup tasks are some good examples. Move them into a common file and very soon you will end up with a build system consisting of multiple independent components, with some shared foundational code. With this, the need for the <import> task surfaces. Most people tend to overlook the additional features provided by <import> task beyond enabling text includes. In particular, I'm refering to the concept of task overrides. When a file is <import>-ed into another file, the importing file can see all the tasks in the imported file as if they were local. When the importing file redefines some of these tasks, it is called task overriding. The combination of task overriding and defining common tasks in a shared build file can be used to design build modules for controlled reuse. The strategy lends itself to the principles of design by contract with the shared file establishing the contract and the consumers of such shared files fulfilling the contract. Before it becomes too esoteric, lets' look at an example. Imagine a shared build file commontasks.xml:
<project name="CommonTasks">
    <target name="init" depends="cleanup, init-properties">
      <mkdir dir="${build.dir}/classes"/>
      <mkdir dir="${build.dir}/lib"/>
    </target>
    <target name="compile" depends="init">
      <javac srcdir="${src.dir}" destdir="${build.dir}/classes">
        <classpath refid="classpath"/>
      </javac>
    </target>
    <target name="jar" depends="compile" if="jar.name">
      <jar destfile="${build.dir}/lib/${jar.name}" basedir="${build.dir}/classes"/>
    </target>
    <target name="deploy" depends="jar"/>
</project>
If you observe carefully, this build file is defining multiple abstract entities, each one serving as a contract for the main file ie., the importing build file. First, the abstract targets <cleanup> and <init-properties> must be implemented by the importing file. As the name suggests, the <init-properties> is expected to initialize various property names used throughout this file. Next, the contract is verified by the <jar> target using the conditional if construct. The target will not be executed if the property jar.name is left undefined. Hopefully the importing file will have done this in the <init-properties> contract. Finally, the no-op <deploy> target acts as a stubbed-out contract. To get any work done by this build file, this target must be overridden by the main file. The main file can benefit on all the work done by the imported file, just by fulfilling a few contracts. When all contracts are fulfilled, the main file looks something like this:
<project name="MainProject" default="deploy">
      <import file="commontasks.xml"/>
      <target name="init-properties">
            <property name="src.dir"   value=".\src"/>
            <property name="build.dir" value=".\build"/>
            <property name="jar.name" value="myapp.JAR"/>
      </target>
       <target name="cleanup">
            ...
      </target>
        <target name="deploy" depends="jar">
            ...
      </target>
</project>
What have we learned? The combination of covariants (abstract targets) and invariants (concrete targets) lets you easily design reusable build modules. Generic targets can be built using deferred task definition and verification strategies to ensure that a particular contract has been fulfilled. Refactor using <macrodef>It is not uncommon to find same task being repeatedly invoked with a small variance. In many cases, if you parameterize the variance, then such tasks can be refactored and invoked with different argument repeatedly, just like a Java method call that is invoked with different arguments. Prior to Ant 1.6, the <Ant> and <antcall> tasks came in handy. For most part these two core tasks are similar, except the <Ant> task allows invoking targets in another build file whereas <antcall> restricted the invoked targets to the local file.
<target name="buildAllJars">
  <antcall target="buildJar">
    <param name="build.dir" value="tools"/>
  </antcall>
  <antcall target="buildJar">
    <param name="build.dir" value="moduleA"/>
  </antcall>
  <antcall target="buildJar">
    <param name="build.dir" value="moduleB"/>
  </antcall>
</target>
<target name="buildJar">
  <jar destfile="lib/${build.dir}.jar" basedir="${build.dir}/classfiles"/>
</target>
The problem is, <antcall> re-parses the build file and re-runs the targets, even though all that changes from one call to another is, in most cases, just the parameter values. Since Ant 1.6 a smarter alternative is available: the <macrodef> task. It offers all the benefits of <antcall> without the overhead of reparsing. It offers additional features such as ordered execution of nested tasks using the <sequential> construct. Optional attributes can be supplied with default values, and the caller may omit them.
<target name="buildAllJars">
  <buildJar build.dir="tools"/>
  <buildJar build.dir="module-A"/>
  <buildJar build.dir="module-B"/>
</target>

<macrodef name="buildJar">
  <attribute name="build.dir"/>
  <jar destfile="lib/${build.dir}.jar" basedir="${build.dir}/classfiles"/>
</macrodef>
We have now defined a macro and use that macro repeatedly within the same build file execution. And on top of it, it is more readable than the <antcall> approach. From what I have seen, most if not all uses of <antcall> in build files can be replaced by <macrodef>. Chain and auto discover using <subant>When you have multiple projects with a fair amount of dependency, and when new projects are initiated on a regular basis, extensibility becomes an important requirement. An ideal build system should allow painless growth. By doing a little extra work, new build participants should be able to benefit from the existing foundation modules. A robust build is system like an assembly line in a software factory: it should lend it self to new components and dependencies without breaking existing functionality. In reality, chaining works fine until it needs a change. Let's consider an example scenario. A large financial organization has multiple departments: banking, loans, insurance, customer service, etc., and each department initiates its own software development efforts. They create separate enterprise applications which need to be vaguely aware of each other. Each software group writes and owns their build scripts, test scripts and so on. We can easily conceive of an enterprise build system that builds "the application," chaining all individual projects, and then runs integration tests. Everything works like a well oiled machine until the banking groups starts a new project. How do we include the new project in the master build? Well, we can edit the chain, and include another <antcall>. Like me, you may see a problem here, if you have to do this over and over again, every time a new thing happens. This is where the concept of auto discovery plays in to the theme of chaining, and the usefulness of <subant> task. It allows pluggable build files without changing master build script. The master script can auto discover new build components and execute it in real time. Almost magically! <subant> comes in two flavors: one the build file with different base directories, and the other executes same target defined in multiple build files. The first flavor uses the concept of generic Ant file. If you name the build file consistently across your projects, it finds them, and executes the specific target in each. This is similar to executing <antcall> on a target, but on a list of stand alone build files, automatically setting the project's base directory each time. The following build looks for files named "build.xml" in each subdirectory of the current directory. For each such build.xml it finds, it runs the <main> target.
    <project name="MasterBuild" default="buildAllSubProjects">
        <target name="buildAllSubProjects">
            <subant target="main" genericantfile="build.xml" >
              <fileset dir="."/>
            </subant>
        </target>
The second mode of <subant> lets you omit the genericantfile attribute instead, lets you supply the list of build files to iterate over, calling a specific target in each build file. This mode works as if an <Ant> task is invoked within a loop.
    <project name="MasterBuild" default="buildAllSubProjects">
        <target name="buildAllSubProjects">
            <subant target="main">
              <fileset dir="." includes="scripts/project-*build.xml"/>
            </subant>
        </target>
This script will automatically discover the build files for all the modules, as long as they are named per the convention "project-*build.xml" and is located in a scripts directory. With the capability to automatic discovery build files, if you add a new project, all you need to do is to follow simple convention of naming, structuring and locating the build files in a specific directory. As may now be apparent to you, the use of <subant> indirectly enforces consistent project directory and build file targets across multiple projects. Being in the maelstrom of many large software development efforts, I have come to the realization that clean dependency is an oxymoron. In reality, the dependency tree across multiple projects looks more like a spaghetti ball than a tree. This is where the concept of horizontal dependency comes in to play. What is a horizontal dependency? If projectA needs classfiles of projectB to compile, and projectC needs classfiles of both projectA and projectB, then the projects A,B and C are horizontally dependant on the <compile> target. Although <subant> is typically used to sub build projects in entirety, it becomes an invaluable tool for addressing horizontal dependencies. Rather than executing in one <subant> task in the order -
projectB.<buildAll>, projectA.<buildAll>, projectC.<buildAll> ...
We could write two <subant> tasks. The first executes the horizontal <compile>:
projectB.<compile>, projectA.<compile>, projectC.<compile> ...
And the second one would build them:
projectB.<buildl>, projectA.<buildl>, projectC.<buildl> ...
FailingThe discussion on chaining is not complete without talking about failing. The technique of divide and conquer often results in a chained build system with dependencies manifesting as contracts, property definitions, build time artifacts (classfile dependencies as described above in the horizontal targets example), third party tools etc. A strategy for error detection and error handling is becomes essential to stop something bad from happening, before the negative effects are passed through the chain. This is no different than catching and throwing exceptions in Java. The use of failonerror attribute stops execution when a build exception is detected. It is prudent to make use of this attribute anywhere and everywhere possible in a chained structure.
      <target name="buildAllSubProjects" failonerror="true">
            <subant target="main">
              <fileset dir="." includes="*/build.xml"/>
            </subant>
        </target>
The <fail> task provides ways to flag errors. Preconditions, predicates and assertions can be implemented using the conditional constructs provided by Ant namely, the <condition> element, and if and unless attributes.
  <fail message="Logging tools missing. Cannot continue build proces">
     <condition>
      <not>
      <available classname="org.mycompany.tools.CustomLogger"/>
      <not>
     </condition>
   </fail>
Checking the availability of a build time dependency artifact, seeing if a property has been set, ensuring that the server has been stopped before attempting to deploy etc are all examples of error scenarios where early detection is preferred over late recovery. It is always a good practice to attach a meaningful error message to the <fail> task so that the Ant displays something more useful than "BUILD FAILED".
In the next installment of this series, we'll look at using Ant in agile development, especially in automating continuous integration processes.
Return to Top |
|||||||||||||||||||||||||||||||
|
by Bear Bibeault The code I wrote nine months ago sucks. And I'm happy about it. Of course back then I thought what I was writing was the bee's knees, and that the code that I had written nine months before that was what sucked. And at that time, I thought that it was the code written nine months prior to that was what sucked. And on and on and on back to the beginning of my programming career, when 110 baud teletypes were all the rage. So why am I so happy about it? Simple: if I can look back at code I had written previously and know that the code I am writing today shows significant improvement, it means that I am still learning and growing as a coder. The day that I look at my older code and think that it is perfect will be a sad day indeed, as it will mean either: (a) I have learned all that there is to learn (highly unlikely), or (b) that my brain has calcified and can accept no more information. Either of these would be a sad state of affairs. So as long as I keep finding that my current level of coding is better than my previous level, I know that I am continuing to improve my skills. And that makes me happy. So what's the point of that little story? As with our own personal development skills, the aggregate of skills and knowledge in the development community also progresses and improves with time. This most visibly manifests itself with the establishment of design patterns, which Wikipedia defines as: "a general repeatable solution to a commonly-occurring problem in software design". The "commonly-occurring problem" I wish to discuss in this article is how best to structure a web application for use with Scriptless JSP Pages; a problem whose solution we will find, like my own journey in the field of software development, has grown and improved over time. Where the Heck Are We?I first started writing JSP pages back in the late 1990's prior to even the first official release of the JSP 1.0 Specification. To give you an idea of how primitive this beta of JSP (0.9.2, if I recall correctly) was, what we now know as the <jsp:useBean> action was defined as just <BEAN> — the standard JSP actions did not at that time use XML syntax, and so the JSP actions looked just like any other HTML markup. Needless to say, not many people were yet writing web applications using JSP pages at that time, and so no common patterns had yet to emerge from the gestalt of the development community. So we winged it. And in hind-sight, not all that well. With the freedom to place Java code directly on the pages, we did. All of it. A lot of it. In droves. And boy, were we sorry. Not only was the code hard to read, embedded as it was amidst tons of Javascript and HTML markup, it was untestable, unable to be reused, difficult to refactor, and just a plain bear (in a bad way) to deal with. It didn't take us long to discover — as soon as we tried to modify, extend, maintain, or fix bugs in this application — that this "model" of just jumbling all the code — client-side markup as well as server-side Java — into the JSP page itself had some severe limitations. I dubbed this anti-pattern (if you could call it a pattern at all — even a bad one) either the Model 0 pattern of JSP Development, or the model-less pattern. Both monikers make a lot of sense: Model 0 is a good measure of the worth of this "pattern" (zero), and model-less can be abbreviated to the highly appropriate "mess". The following figure diagrams the simple interaction that takes place when a request is submitted to such a page. It is indeed a simple structure to create and envision, but the drawbacks vastly out-weigh any such benefit. 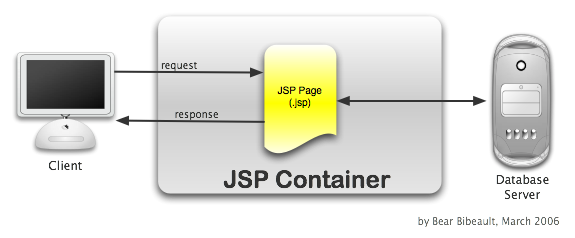
Figure 1: A request under the "Mess" anti-pattern
Use the Bean, Luke!There had to be a better way! Not alone in that thinking, patterns for getting things under better control soon emerged. With the emergence of a finalized JSP Specification, basic bean-manipulation standard actions were defined that still exist to this day. Across the JSP development community, people figured out that factoring the processing code out of the pages and into Java classes was a good way of eliminating some of the problems introduced by having on-page code. Moving code off-page and into classes afforded better testability and reuse, and reduced the complexity of the pages themselves. All of this helped make the code base more flexible, extensible and maintainable. Once means of doing so is to factor code off the pages and into Java classes that adhere to the JavaBean standards. These classes could then be used and controlled from the JSP page using the JSP standard actions, as well as by simplified scriptlet code. This pattern, known as "Model 1", retains the JSP as the unit of control, but delegates processing to the Java beans. The following figure diagrams how a request interacts with the various components in this pattern. 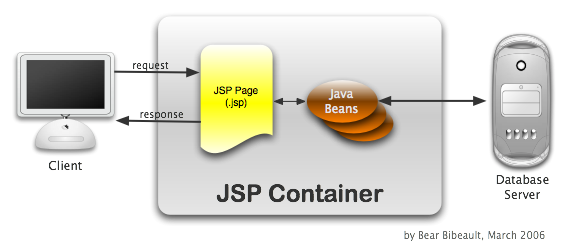
Figure 2: A request under the Model 1 pattern
I've Got a Bad Feeling About ThisFactoring out processing code into beans proved to be a great improvement to the structure of web applications using JSP, but there were still some problems and limitations. The primary purpose of a JSP is to serve as a template for rendering the presentation format (usually HTML) as the results of a request. By retaining the JSP as the unit of control (the unit to which submissions are directly made), the assumption is made that the view to be rendered is known prior to the submission. And this is not always true. In many cases, decisions need to be made, using the submitted data and other available information, before the most appropriate page to display can be determined. This means that sometimes the page that is the target of the submission is not the page that needs to be rendered. Such decisions need to made at an early stage in the request processing as anyone who has received the dreaded "response has already been committed" IllegalStateException can attest. This can lead to some design ugliness as pages would need to redirect or forward to each other, creating a rather messy network out of the control flow for the application. One can also end up writing pages that aren't pages at all -- they just do some processing before shifting off to another page. And that's just wrong. Why use a mechanism designed as a templating mechanism for rendering output if there's no output to be generated at all? Better patterns needed to emerge. Control, Control, You Must Learn ControlIt is apparent that submitting directly to a JSP page in order to make decisions about which JSP page to show is less than optimum. Something other than an output generation template should make such a decision prior to a JSP page being invoked. This line of thinking led to the concept of the Page Controller. Martin Fowler describes the Page Controller as: An object that handles a request for a specific page or action on a Web site. He also states that a page can act as its own controller (which puts us squarely back into Model 1 territory), but more often the Page Controller is a servlet that is invoked as a result of the POST or GET action. This servlet performs any setup or processing necessary to prepare the page for viewing prior to forwarding the request to the JSP page template for view rendering. When such processing involves business logic or database interaction, frequently such processing is delegated to other classes. This pattern, in which a controller servlet is the target of submission rather than the JSP pages themselves, has been dubbed the "Model 2" pattern and is generally considered a good approximation of the Model-View-Controller Pattern, more affectionately known as MVC, as applied to web applications. The following figure diagrams how a request interacts with the various components in this pattern. 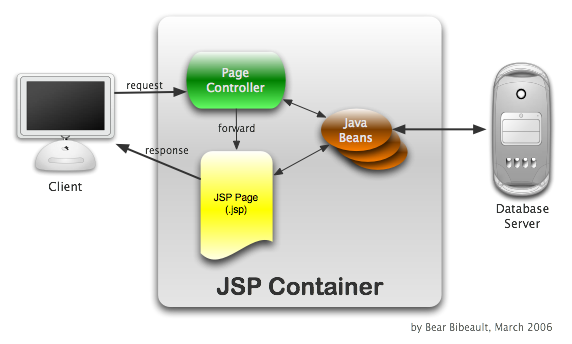
Figure 3: A request under the Model 2 Page Controller pattern
This pattern offers numerous advantages. Not only does it remove the previously mentioned messiness involved with JSPs being used for control rather than rendering, but by adhering to the principles of Separation of Concerns it "inherits" all the advantages attributed to that principle. Houston, We Have a ProblemA common problem that arises when employing the Model 2 pattern occurs when users start hitting that dang Refresh button on the browser. It sometimes seems that there are few forces in the Universe more powerful than the urge to hit Refresh when looking at a page of data. Why would that cause a problem? Let's examine a typical scenario:
It's also easy to imagine the problems that ensue when similar scenarios take place for inserting items, adjusting quantities, or other non-idempotent actions. In mathematics, the term idempotent means "relating to or being a mathematical quantity which when applied to itself under a given binary operation (as multiplication) equals itself". In computer science, it is take to mean an operation that causes no change in state. Therefore, a non-idempotent operation is one that causes the state (usually referring to the Model) to change; deleting an item from the cart, for example. The knee-jerk reaction of "How do I disable the Refresh button in the browser" is obviously not the appropriate solution to this problem. The problem actually lies in not recognizing that there are two distinct type of controllers in action here:
Look at step 4 in the above scenario. The same controller that deletes the item also prepares the page for redisplay. This is a frequent error in controller design. Not only does it give rise to the problem described above, it's a non-modular design that forces every cart controller to embed code to prepare the cart page for display. Rather, a Page Controller should handle preparing the request for display of the cart JSP separately from the Task Controllers that perform cart actions (such as deleting an item from the cart). Making this change, our new Step 4 would be:
By breaking the server-side activity into two pieces: one that performs the non-idempotent operation, and one that prepares the page for display, our refresh problem has been solved. The user can bang away on the refresh button to his heart's desire until the cows come home with no ill effects other than repeatedly hitting the server. Note that the key to making this scenario work as expected is not only that we broke the two pieces of the operation into logically separate units, we used a redirect to chain them together. This sequence of events, which was described in this older article, is a good one to follow for these types of operations. This technique has sometimes been referred to as the Post-Redirect-Get (or PRG) Pattern. But, if you've already read Paul Wheaton's article on the misuse of the term "Pattern", one could argue that this technique is not yet widely known enough to deserve the moniker of "Pattern". So we'll call it the PRG Technique. Web application operations generally fall into two categories:
The first of these type of operation follow the simple steps of:
The second of these type of operation follows the slightly less simple steps of:
The following figure diagrams how such a request interacts with the various components in this pattern. 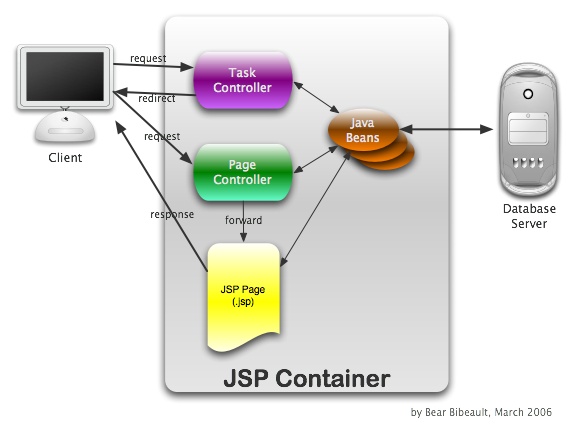
Figure 4: A request under the Post-Redirect-Get Technique
I Hope It Won't Be Too CrowdedThe Page Controller pattern has a lot going for it, but an issue that could be seen as a major drawback is the footprint it requires in the deployment descriptor (web.xml). Think about it for a moment. In the pattern described above, each Task Controller (one fronting each possible non-idempotent task) and each Page Controller (one fronting each page) is a separate servlet. As such, each must be declared in the deployment descriptor (unless you are doing something silly like using the appropriately much-maligned Invoker) by using a <servlet> element. Moreover, each also requires a <servlet-mapping> to specify the URL pattern to invoke the servlet. So for each controller in the web application, something along the lines of the following is required:
<servlet>
  <servlet-name>DeleteItemTaskController</servlet-name>
  <servlet-class>
    org.bibeault.some.project.controllers.DeleteItemTaskController
  </servlet-class>
</servlet>
...
<servlet-mapping>
  <servlet-name>DeleteItemTaskController</servlet-name>
  <url-pattern>/task/deleteItem</url-pattern>
</servlet-mapping>
And that's a minimum — if init parameters and other declarations are added, the footprint for each controller can be even more wordy. It's easy to see that for even a modest-sized web application, the controller declaration footprint in the deployment descriptor can become quite large and unwieldy. Is there something that can be done about that? The Front Man ComethEnter the Front Controller pattern. The Front Controller pattern uses a single servlet to field all requests for controllers, eliminating the need for each and every controller to be declared separately in the deployment descriptor. The front controller servlet only requires one <servlet> element and one <servlet-mapping> element to be declared to field requests for all the controllers. "Now wait just a minute!" you might be saying. "Isn't that exactly what the Invoker is? The Invoker that you just pointed out was evil?". Astute! Yes, the Invoker is an instance of a Front Controller. Just not a very good one for the various reasons pointed out in the linked article; one major issue being that it reveals the class path of servlets in the URL. Not the most smashing of ideas. But it's not always the case that one bad apple spoils the whole pattern. It's actually a simple matter to eliminate the need to reveal the class path of the controller servlets by abstracting what appears in the URL. The "unit of control" in a Front Controller environment is generally not a servlet at all, but rather a delegate class that implements an interface that the Front Controller uses to manipulate the controller unit. Because these delegate classes represent operations to be performed, they themselves are instances of a pattern known as the Command Pattern and are therefore usually termed Commands. Information on the URL used to invoke the Front Controller servlet is used to uniquely identify which Command class should be used to service the request. For example, the Front Controller employed by the Struts package typically uses a servlet mapping of *.do where whatever appears as the prefix of the ".do" is used to lookup the actual class path of the Command (called "actions" in Struts) in an internal configuration map. Another example, the pattern that I usually use, is to employ a servlet mapping such as /command/* where the prefix "command" triggers the front controller, and the rest of the path info is used to lookup the Command class in an internal map. It would be typical to see URLs along the lines of: http://some.server.com/webapp/command/deleteItem http://some.server.com/webapp/command/insertItem http://some.server.com/webapp/command/doSomethingWonderful Note that in both of these examples, the mapping of the abstracted controller id ("deleteItem", for example) to an actual Command class is handled by an internal configuration map. Which means, of course, that there must be configuration to set up that map on behalf of the Front Controller in the first place. The perspicacious reader may at this point be thinking "Well, that just moves the configuration of the controllers from the deployment descriptor to some other file!". And that reader would be correct. But... typically, the configuration notation for associating the controller id keys with the class path to their Commands is much simpler than the servlet and servlet mapping elements in the deployment descriptor (though Struts isn't necessarily a stellar example of this), and segregating the association declarations from the web.xml declarations keeps the latter from getting swamped by the former. This allows the Front Controller to create instances of the Command classes (without the need to reveal any class path information in URLs) and to manipulate them via a Front Controller-defined interface, which typically contains an "execute" (or "perform") method that the Front Controller calls to transfer control to the Command class instance. The following figure diagrams how a request interacts with the various components in this pattern. 
Figure 5: A request under the Model 2 Front Controller pattern
This diagram shows a simple idempotent request. The PRG Technique described previously also applies in the Front Controller scenario in which Commands can be Task Commands (typically non-idempotent, operational) or Page Commands (always idempotent, page preparatory). What's That Got To Do, Got to Do With It?You may be wondering at this point what an article on web application structure patterns is doing in a series on Scriptless JSP pages. Except for mentioning JSP pages as the end target of a request, JSP wasn't even much of a topic throughout this article! The answer is that the success of using Scriptless JSP Pages, by their very nature, depends greatly on the structure of the web application in which they are employed. In previous articles in this series it has been stressed how Scriptless JSP Pages should be completely devoid of processing and be pure view components. Previous articles have also stressed how the data structures sent to such pages should adhere to patterns that are EL-friendly so as to keep the pages themselves simple and straight-forward. Such considerations require that a suitable web application structure be employed in order to enable Scriptless JSP Pages to shine! It's easy to see that the Model 2 Pattern, which factors processing out of the JSP pages into controllers written as Java classes, is extremely well-suited to web applications that employ scriptless pages. Whether you employ a Front Controller or not in the Model 2 pattern is fairly immaterial as far the the pages themselves go, but it is a pattern that I highly favor in my own web applications. Pop Quiz!The sub-section titles in the article are all famous quotes, or take-offs of famous quotes, from movies, TV or music. Can you identify them all? This article has been slightly modified from its original published form to update some terminology choices based upon discussion in the forum topic for this article. Special thanks to Bruno Boehr and Ernest Friedman-Hill for their help in nailing this down. Return to Top |
|||||||||||||||||||||||||||||||
|
by Balaji Loganathan This article will explain how to use complex types in a web service with Apache Axis. Part I will cover a simple web service that uses complex types. Part II will cover a slightly advanced web service that uses an array of complex types.
The fundamentalsThe below questions are just to recap your knowledge; they're not a detailed introduction to Web Services. What are web services ?In simple terms a web service is an application or business logic that is accessible using standard Internet protocols What is Apache Axis ? The Apache Axis is a webservice implementation tool based on open source and the Apache standards. This article will use Apache Axis web services engine for its demonstration. Visit http://ws.apache.org/axis/java/ for more information about the Apache Axis. What are primitive types and complex types? In Java, primitive types includes data types like int, char,short, float, byte, boolean, long and byte array.Similarly complex types are objects created by the developer. For example, an object called Tree with the properties Stem and Leaves is a complex type.
This article will address publishing web services that employ these kind of complex types.
Getting readyWhat do you need to run this demo ?
Apache Axis and the resource files can be plugged-in with most of the servlet containers. Setting up the Apache Axis with a Servlet container is beyond the scope of this article. The process is explained very well here. The reader is encouraged to read the installation instructions of Apache Axis and try to deploy and run a simple web service before going any further. For this demonstration, the resource files will be hosted in Axis + Servlet container and the client will be a JSP page.
Using Complex Types in a Web Service: Part IWhat will this web service do ?This web service will have a single method/operation called getCompanyData. When a SOAP request is made it will return a complex type object "Company". The below diagram shows the structure of the object "Company"
The below diagram shows the raw SOAP response after the SOAP request was made (available here:)
This data might be displayed by a JSP page like this: 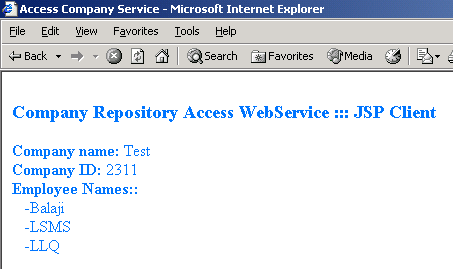 OK, now lets see how we can install and run this stuff.br>
Step 1: Create server side classesWe will need two classes:
The Axis context is the place where you have installed the Axis web context inside your servlet container.
Step 2: Deploy the web service using AdminClientApache Axis comes with a great utility called AdminClient, which can be used to deploy the web service and make it available to clients.To use the AdminClient you should have your classpath set up properly as described in the Apache Axis documentation. Now type the following command into the command prompt java org.apache.axis.client.AdminClient deployCompanyService.wsddAfter executing the above command, the command window should display "Done processing".
As compared to primitive datatypes, the complex type objects require an extra class specifier to properly encode the SOAP response when it sends complex type objects as response.
Step 3: Check the web service WSDLOnce Step 2 is completed successfully, your service should be available for clients to consume them. Lets see whether our web service is available by it name "CompanyRepository". First. launch your browser and type http://<servername:port>/<webcontext name>/services/CompanyRepository?wsdl. The browser should display you a WSDL file similar to CompanyRepository.wsdl. Note that the service endpoint may vary according to your servername and webcontext; some servlet containers may also expect you to restart the engine to recognize the new server classes. Invoking the web service in this crude way will help you to tell whether the web service method can perform the desired business logic and send response back or not. To test this, launch the broswer and type http://<servername:port>/<webcontext name>/services/CompanyRepository?method=getCompanyDataand check the SOAP response generated. A successful SOAP response will look like this getCompanyData_SOAPResponse.xml.
Step 4: Create and run the client to access the web serviceWe're using a JSP page as the web service client just for an example. It is quite possible to create clients as Java Servlets, standalone Java applications, or using non-Java plaforms like Microsoft.NET. The simplest way to create a client stubs files is by running a simple but great utility called "WSDL2Java". WSDL2Java will generate all the necessary Java stub files like the SOAPbinding file, Locator file, serializers and the deserializers files. Type the following command into the command prompt (all on one line): java org.apache.axis.wsdl.WSDL2Java \
-p com.client http://<servername:port>/<webcontext \
name>/services/CompanyRepository?wsdl
The option -p com.client in the above command will tell the WSDL2Java to create all the stub files with the package name and directory com.client respectively. Now compile the WSDL2Java generated client stubs. Move the compiled client stubs to the lt;web context>/web-inf/classes/com/client directory: we will use them in our JSP page. Prepare the JSP file and save it under the folder lt;web context>/ directory. As shown in the below diagram the JSP file will use the WSDL2Java generated classes instances to access the web service, which makes coding part very easier instead of writing your own client stubs and accessor methods.
Launch the browser and type http://<servername:port>/<webcontext>/AccessCompanyService.jsp. The browser should display the data as we predicted in the beginning.
Publishing An Array of Complex Types: Part-IIWhat will this web service do ?This web service will have a single method/operation called "getIndustryData".When a SOAP request is made it will return a complex type object "Industry" which in turn has a complex type array attribute "Product". The below diagram shows the structure of the objects "Industry and Product"
The below diagram shows the raw SOAP response after the SOAP request was made
If you want to see how the output will look like if a request is made from a JSP page, see the below picture. 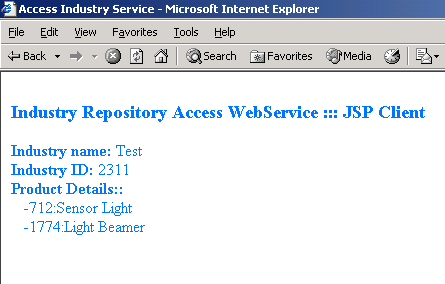 OK, now lets see how we can install and run this stuff: Step 1: Create server side classesWe will need three classes:
Step 2: Deploy the web service using AdminClientNow type the following command into the command promptjava org.apache.axis.client.AdminClient deployIndustryService.wsddThe command window should display "Done processing" after executing the above command. The deployIndustryService.wsdd is Web service deployment descriptor file that tells Axis web services engine
The complex type objects with arrays requires extra mapping details to properly encode the SOAP response. In Part I, the beanMapping tag was used in WSDD to specify the data mapping details of the object "Company". Here typeMapping tag is used just to show the option that it can also be used instead of beanMapping. The WSDD has three typeMapping tags. Note the new typeMapping 'ProductArray' whose serializer and deserializer were mapped to org.apache.axis.encoding.ser.ArraySerializerFactory and org.apache.axis.encoding.ser.ArrayDeserializerFactory.
Step 3: Check the web service WSDLOnce Step 2 is completed successfully your service should be available for clients to consume. Lets see whether our web service is available by it name "IndustryRepository". Launch the browser and type http://<servername:port>/<webcontext name>/services/IndustryRepository?wsdl. The browser should display you a WSDL file similar to IndustryRepository.wsdl. Note that the service endpoint may vary according to your servername and webcontext, and some servlet containers may expect you to restart the engine to recognize the new server classes. A successful SOAP response will look like this getIndustryData_SOAPResponse.xmlStep 4: Create and run the client to access the web serviceWe will again use a JSP page as the web service client as an example here. Type the following command into the command prompt (all on one line:)java org.apache.axis.wsdl.WSDL2Java \
-p com.client http://<servername:port>/<webcontext \
name>/services/IndustryRepository?wsdl
Compile the Java based client stubs and move the compiled client stubs to the <web
context>/web-inf/classes/com/client directory; we will use them in
our JSP file.
Prepare the JSP file and save it under the folder <web context>/ directory.
Running the JSP client by typing http://<servername:port>/<webcontext>/AccessIndustryService.jsp in the browser window should display a JSP page as shown below.
Step 5: Creating a VB.Net client (optional only)Create a new VB.Net project and create a VB form as shown in the picture (VB.NETSCreenShot_Industry.jpg). Name the TextBox as ResultBox with multi line property true. Name the button1 as GetData and caption as Get Data. Name the button2 as CloseME and caption as Exit. Now add a web references pointing to the wsdl url http://<server:port>/<context>/services/IndustryRepository?wsdl with the net.client as the class name. This will create the necessary proxy classes to access the web service, including the vb classes like Industry and Product. In the onClick event of GetData, paste the below code:
The output upon SOAP request will look like 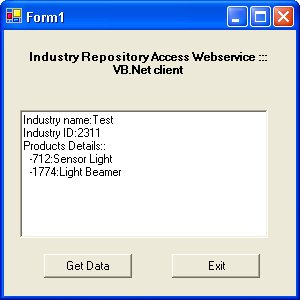
Additional tips and notes
Return to Top |
|||||||||||||||||||||||||||||||
|
by Paul Wheaton, trail boss I think patterns started off as generally recognized best solutions for common problems. But now that they have been around for a while and we have experienced applications being made ten times more complicated than they need to be because people try to cram in all they patterns that they have read about ("my application is well architected, because it is loaded to the gills with patterns.") my impression of the value of the pattern has shifted a bit. I now think that the primary purpose of patterns is to expand our vocabulary. I can say "singleton" and we all know what that means. There may be a dozen different ways to implement a singleton - it doesn't have to be done exactly like the GoF book or some web page. I think that any pattern being used in an application could/should(/must!) be trumped by "the simplest thing that could possibly work." And one last thing ... puh-leeze, let's not get suckered by some putz who creates his own web page declaring a pattern. It's only a pattern when it is generally recognized by the greater minds of computer science. And let's add to that there are a lot of intern engineers working for big companies that we trust that have the ability to post content ("IBM Department of Uber Genius Types Declare 'The Squeaky Duck Pattern'"). And there are some books that print some of this garbage too. Return to Top |
|||||||||||||||||||||||||||||||
|
by Carol Murphy In keeping with the hype surrounding the Academy Awards, I was contemplating writing this installment of the Cattle Drive Journal in the form of a movie script, but seeing as how March has come in like a wildcat and I'm hunkered down in the middle of a storm I figured I'd be lucky to get anything written at all before the wind decides to lob another tree into a power pole. Typing in the dark is tough. So no script. Despite the wild weather, there has been a lot of activity out on the trail these past few weeks. We've got 5 new drivers who are just workin' their way out of the chute, and possibly 6. Seems we have a shadow rider, or Stealth Driver, who has left signs in the cattle drive forum, but has yet to post her actual position in the assignment log. One driver is gettin' near the end of the line, and a whole slew of 'em are stretched out somewheres in the middle. Let's see now, if I can just move this sleeping cat a little bit to the left without getting scratched I can get down to particulars. Newbies!Let's give a rowdy JavaRanch welcome to our new drivers. These folks have been out slogging through the mud and ridin' through the rain when they could be sittin' in some comfy saloon. They must be plumb loco, or just crazy about learning Java! Say hello to:
Then there's our mystery rider, Susan Brown. No one knows where she comes from, or even what kind of pony she's ridin', but she's bagged her first Moose and has been raisin' some dust in Oop-1. Keep an eye out for that one! Stout Hearts and Bruised HeadsDeb Wright is currently banging her head on Say-4b. She got through the first part of the trail pretty quickly, but seems to have hit a brick wall on the trail. I have faith in the hardness of Deb's head, and keep in mind that almost everybody else who has been where she is now did exactly what she's doing. Adam Price has bagged his first Moose, after implementing a novel approach to clearing up space on the wall. And he has found his GeekWatch! Way to rope, Adam! Strung Out and BlazingStuart Goss is currently ropin' Oop-2, NaturalLanguageMultiply, which ain't all that natural if you ask me, and then there's a vast stretch of open trail, with drivers we haven't heard from for awhile strung out all along it. I wonder it they even noticed the fiery ball that blazed past them, driving a herd of wild-eyed skinny cattle who haven't had a chance to stop and eat because the pace was so fast? Yep, I'm talkin' about Kelly Loyd, the comet. He's blazed his way to JDBC-2 already and I don't think he's even broken a sweat. Honorable MentionTommy Leak has just resurfaced, after fighting his way through a rain-swollen river, only to be reminded he's working on Say 4-b. (Maybe Deb will make room for him on that wall.) Now that's fortitude! Well, that's about all the action on the drive, and the storm is startin' to kick it up a notch. Better get this sent off. I'm going to traverse my own bit of trail, Servlets-3b. Yep, still struggling up that Ant hill. My pony thinks it's hilarious, the way I can make a mountain out of an Ant hill. It's hard to get in the saddle when your horse is laughing so hard... See ya out on the trail! (Fade to black) Return to Top |
|||||||||||||||||||||||||||||||
Return to Top |
|||||||||||||||||||||||||||||||