java hosting


JavaRanch Journal
October 2008, Volume 7, Issue 3
Managing Editor: Ulf Dittmer

JavaRanch Newsletter Articles in this issue :
JavaScript's class-less objects Stoyan Stefanov
Printable Version
Apache Wicket - Using labels and links Martijn Dashorst and Eelco Hillenius
Printable Version
Dependency Injection - What is Scope? Dhanji R. Prasanna
Printable Version
Web Services Security, Part 2: Encryption Ulf Dittmer
Printable Version

WIRE
JavaScript's class-less objects

JavaScript's class-less objects

by Stoyan Stefanov

Java and JavaScript are very different languages, although the similarity in the names and the similar C-like syntax confuses people sometimes. Let's take a look at one pretty major difference and that is how objects are created. In Java, you have classes. Then objects, a.k.a. instances, are created based on those classes. In JavaScript, there are no classes and objects are more like hash tables of key-value pairs. Then what about inheritance? OK, one step at a time.

JavaScript objects

When you think about a JavaScript object, think a hash. That's all there is to objects - they are just collections of name-value pairs, where the values can be anything including other objects and functions. When an object's property is a function, you can also call it a method.

This is an empty object:

var myobj = {};

Now you can start adding some meaningful functionality to this object:

myobj.name = "My precious";
myobj.getName = function() {return this.name};

Note a few things here:

  • this inside a method refers to the current object, as expected
  • you can add/tweak/remove properties at any time, not only during creation

Another way to create an object and add properties/methods to it at the same time is like this:

var another = {
  name: 'My other precious',
  getName: function() {
    return this.name;
  }
};

This syntax is the so-called object literal notation - you wrap everything in curly braces { and } and separate the properties inside the object with a comma. Key:value pairs are separated by colons. This syntax is not the only way to create objects though.

Constructor functions

Another way to create a JavaScript object is by using a constructor function. Here's an example of a constructor function:

function ShinyObject(name) {
  this.name = name;
  this.getName = function() {
    return this.name;
  }
}

Now creating an object is much more Java-like:

var my = new ShinyObject('ring');
var myname = my.getName(); // "ring"

There is no difference in the syntax for creating a constructor function as opposed to any other function, the difference is in the usage. If you invoke a function with new, it creates and returns an object and, via this, you have access to modifying the object before you return it. By convention, though, constructor functions are named with a capital letter to distinguish visually from normal functions and methods.

So which way is better - object literal or constructor function? Well, that depends on your specific task. For example, if you need to create many different, yet similar objects, then the class-like constructors may be the right choice. But if your object is more of a one-off singleton, then object literal is definitely simpler and shorter.

OK then, so since there are no classes, how about inheritance? Before we get there, here comes a little surprise - in JavaScript functions are actually objects.

(Actually in JavaScript pretty much everything is an object, with the exception of the few primitive data types - string, boolean, number and undefined. Functions are objects, arrays are objects, even null is an object. Furthermore, the primitive data types can also be converted and used as objects, so for example "string".length is valid.)

Function objects and prototype property

In JavaScript, functions are objects. They can be assigned to variables, you can add properties and methods to them and so on. Here's an example of a function:

var myfunc = function(param) {
  alert(param);
};

This is pretty much the same as:

function myfunc(param) {
  alertparam);
}

No matter how you create the function, you end up with a myfunc object and you can access its properties and methods.

alert(myfunc.length);     // alerts 1, the number of parameters
alert(myfunc.toString()); // alerts the source code of the function

One of the interesting properties that every function object has is the prototype property. As soon as you create a function, it automatically gets a prototype property which points to an empty object. Of course, you can modify the properties of that empty object.

alert(typeof myfunc.prototype); // alerts "object"
myfunc.prototype.test = 1; // completely OK to do so

The question is how is this prototype thing useful? It's used only when you invoke a function as a constructor to create objects. When you do so, the objects automatically get a secret link to the prototype's properties and can accees them as their own properties. Confusing? Let's see an example.

A new function:
function ShinyObject(name) {
  this.name = name;
}

Augmenting the prototype property of the function with some functionality:

ShinyObject.prototype.getName = function() {
  return this.name;
};

Using the function as a constructor function to create an object:

var iphone = new ShinyObject('my precious');
iphone.getName(); // returns "my precious"

As you can see the new objects automatically get access to the prototype's properties. And when something is getting functionality "for free", this starts to smell like code reusability and inheritance.

Inheritance via the prototype

Now let's see how you can use the prototype to implement inheritance.

Here's a constructor function which will be the parent:

function NormalObject() {
  this.name = 'normal';
  this.getName = function() {
    return this.name;
  };
}

Now a second constructor:

function PreciousObject(){
  this.shiny = true;
  this.round = true;
}

Now the inheritance part:

PreciousObject.prototype = new NormalObject();

Voila! Now you can create precious objects and they'll get all the functionality of the normal objects:

var crystal_ball = new PreciousObject();
crystal_ball.name = 'Ball, Crystal Ball.';
alert(crystal_ball.round); // true
alert(crystal_ball.getName()); // "Ball, Crystal Ball."

Notice how we needed to create an object with new and assign it to the prototype, because the prototype is just an object. It's not like one constructor function inherited from another, in essence we inherited from an object. JavaScript doesn't have classes that inherit from other classes, here objects inherit from other objects.

If you have several constructor functions that will inherit NormalObject objects, you may create new NormalObject() every time, but it's not necessary. Even the whole NormalObject constructor may not be needed. Another way to do the same would be to create one (singleton) normal object and use it as a base for the other objects.

var normal = {
  name: 'normal',
  getName: function() {
    return this.name;
  }
};

Then the PreciousObject can inherit like this:

PreciousObject.prototype = normal;

Inheritance by copying properties

Since inheritance is all about reusing code, yet another way to implement it is to simply copy properties.

Imagine you have these objects:

var shiny = {
   shiny: true,
   round: true
};

var normal = {
  name: 'name me',
  getName: function() {
    return this.name;
  }
};

How can shiny get normal's properties? Here's a simple extend() function that loops through and copies peoperties:

function extend(parent, child) {
  for (var i in parent) {
    child[i] = parent[i];
  }
}
extend(normal, shiny); // inherit
shiny.getName(); // "name me"

Now this property copying may look like overhead and not performing too well, but truth is, for many tasks it's just fine. You can also see that this is an easy way to implement mixins and multiple inheritance.

Crockford's beget object

Douglas Crockford, a JavaScript guru and creator of JSON, suggests this interesting begetObject() way of implementing inheritance:

function begetObject(o) {
  function F() {}
  F.prototype = o;
  return new F();
}

Here you create a temp constructor so you can use the prototype functionality, the idea is that you create a new object, but instead of starting fresh, you inherit some functionality from another, already existing, object.

Parent object:

var normal = {
  name: 'name me',
  getName: function() {
    return this.name;
  }
};

A new object inheriting from the parent:

var shiny = begetObject(normal);

Augment the new object with more functionality:

shiny.round = true;
shiny.preciousness = true;

YUI's extend()

Let's wrap up with yet another way to implement inheritance, which is probably the closest to Java, because in this method, it looks like a constructor function inherits from another constructor function, hence it looks a bit like a class inheriting from a class.

This method is used in the popular YUI JavaScript library (Yahoo! User Interface) and here's a little simplified version:

function extend(Child, Parent) {
  var F = function(){};
  F.prototype = Parent.prototype;
  Child.prototype = new F();
}

With this method you pass two constructor functions and the first (the child) gets all the properties and methods of the second (the parent) via the prototype property.

Summary

Let's quickly summarize what we just learned about JavaScript:

  • there are no classes
  • objects inherit from objects
  • object literal notation var o = {};
  • constructor functions provide Java-like syntax var o = new Object();
  • functions are objects
  • all function objects have a prototype property
  • And finally, there are dozens of ways to inmplement inheritance, you can pick and choose depending on your task at hand, personal preferences, team preferences, mood or the current phase of the Moon.

Author and credits

Stoyan Stefanov is a senior Yahoo! developer, YSlow tool lead, open-source contributor, blogger and technical writer, most recently the author of "Object-Oriented JavaScript" published by Packt.

The theme for the shiny object examples are inspired by Jim Bumgardner's Theory of the Precious Object

Douglas Crockford's beget object - article here

Discuss this article in The Big Moose Saloon!

WIRE
Return to Top
Using Wicket Labels and Links

Using Wicket Labels and Links

by Martijn Dashorst and Eelco Hillenius

This article is taken from the book Wicket in Action by Martijn Dashorst and Eelco Hillenius and published by Manning Publications. This segment covers Wicket labels and links. For the table of contents, the Author Forum, and other resources, go to http://www.manning.com/dashorst/.

Apache Wicket is an open source Java component oriented web framework. With Wicket you build web applications using just Java and HTML. This article is an excerpt from the Wicket in Action book where we take a closer look at two types of components that are provided by the Wicket framework. First we'll look at components that render text: labels. Next we'll look at components that allow you to provide navigation in your application: links. If you want to learn more about Wicket or Wicket in Action see the list of resources at the end of this article. Let's take a closer look at displaying text with labels.

Displaying text with label components

Displaying text with label components} As we mentioned earlier, the first incarnation of the web was static: all pages consisted of hard-coded text, with links between the pages. Soon people wanted to show dynamic text on their websites, such as visitor counters, the current date, news headlines, product data from a database, and so forth. In this section, you'll see different components that display dynamic text. The first component is one you've seen already on numerous occasions: the Label.

Using the Label component to render text

The Label component is used to display text. The text can be anything: for example, the name of a customer, a description of a cheese, the weight of a cheese, the number of items in a shopping cart, or a fully marked up Wikipedia article. In previous chapters, we've presented many examples that show the Label in action. For instance, the front page of our cheese store contains many labels. Figure 1 identifies the labels on a screenshot of that page.


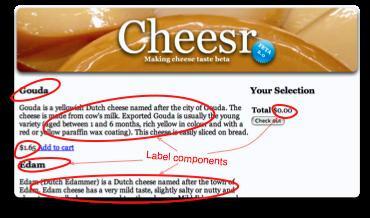
Figure 1: Identifying Label components on the front page of chapter 3's cheese store. Each label is responsible for displaying asingle aspect: the cheese's name, description, or price.

As a reminder of how labels work in code, let's return to the Hello World example shown in listing A

Listing A: Rendering the Hello World example with a Label component
<!-- markup file -->
<span wicket:id="message">text goes here</span>

// java code
add(new Label("message", "Hello, World!"));

<!-- final rendered markup -->
<span wicket:id="message">Hello, World!</span>

The Label component is bound to the span tags in our markup using the component identifier message. The contents of the span tags are replaced by the text we provide in the Java code, as evidenced by the final markup. In this example, we provide the label directly with a string, but this isn't the only way for a label to obtain the text to display. You can pass in any model implementation? for example you could use the compound property model which would use the component identifier to give the label access to the display text (see also section 4.2.3). When the model value isn't a String, Wicket will convert the model value to a String using the registered convertors. When no convertor could be found Wicket will call the model value's toString method to convert the model value to a String. See chapter 12 for more information on convertors.

In our examples, we often use the span tag to create a label, but labels aren't limited to the span tag. You can add a label to almost any tag in your markup. The only caveat is that the markup must have a content body. For instance, it doesn't make much sense to attach a Label component to img tags. Listing B shows some possible markup choices for a Label component.

Listing B: Examples of markup with a Label component attached
<!-- markup -->
<span wicket:id="label1">Will be replaced</span>
<td wicket:id="label2">[name]</td>
<h1 wicket:id="label3">title goes here</h1>
Name: <span wicket:id="name"></span>
<div wicket:id="label4"></div>

/* Java code */
add(new Label("label1", "Hello, World!"));
add(new Label("label2", new PropertyModel(person, "name")));
add(new Label("label3", "Wicket in Action"));
add(new Label("name"));
add(new Label("label4", new ResourceModel("key", "default")));        #A

<!-- output -->
<span wicket:id="label1">Hello, World!</span>
<td wicket:id="label2">John Doe</td>
<h1 wicket:id="label3">title goes here</h1>
Name: <span wicket:id="name">Parmesan</span>
<div wicket:id="label4">standaard waarde</div>                        #B

#A Internationalized text
#B Dutch for "default"

As you can see, the label works the same way even when attached to different markup tags. The Label component replaces anything inside it with the text that comes from the provided model (in this example, the provided strings). Listing B also shows several ways to provide the text to display: a static string, a property model, a compound property model, and a resource model (used to provide internationalized messages, as discussed in chapter 12).

NOTE: You can nest example markup for preview purposes within a label's tags, but you can't nest Wicket components inside a label. If you do, it will result in an exception. At render time, the label replaces everything between the start and end tags, including any markup if present.

A Label component is great for displaying short amounts of text such as names, weights, dates, and prices. But how do you display longer text, such as descriptions, and preserve multiple lines?

Displaying multiple lines using a MultiLineLabel

Often, you'll get text from a user (for instance, through a comment form on a blog) that contains basic formatting created using newlines. As you may know, HTML ignores most whitespace if it isn't contained in <pre> tags. How can you display strings that aren't HTML but that contain basic formatting in the form of newline characters? Listing C shows a page that exhibits this problem.

Listing C: Displaying a preformatted message that spans multiple lines
/* java code */
public MyPage extends Webpage {
    public MyPage() {
        add(new Label("message", "Hello,\nWorld!\nI'm super!"));
    }
}

<!-- markup -->
<html>
<body>
    <span wicket:id="message">Text goes here</span>
<body>
<html>

In this example, we want to display the text "Hello, World! I'm super!" across three lines. If you run the example, you'll see that this doesn't happen. Your browser reformats the text and puts it all on the same line. To solve this problem, Wicket has a special Label component that takes into account multiple text lines: the MultiLineLabel.

The MultiLineLabel inserts line breaks (br tags) for single-line breaks in your text and paragraph tags (p tags) for multiline breaks in your text. In our example, the code renders as follows:

<span wicket:id="message"><p>Hello,<br/>World!<br/>I'm super!<br/></p></span>

This gives the desired result, as shown in figure 2, which displays the output of a normal label and a multiline label next to each other.


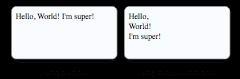
Figure 2: Comparing the output of a normal label and a multiline label when using Java formatting inside the model text

Now that you know how to render plain text containing basic formatting, how can you render text that needs to be bold or italic, or a heading inside a label?

Displaying formatted text using labels

Sometimes, you want to display more than just the name of a cheese. You may want to stress part of your message or display user-generated formatting. Because you're working in a web environment, and the lingua franca for controlling formatting is HTML, it's logical to provide the label with HTML markup inside the text.

What happens when you give the label some markup in its model? Look at the following snippet:

<!-- markup -->
<span wicket:id="markup"></span>

/* Java code */
add(new Label("markup", "<h1>Hello!</h1>"));

Using this code, we expect the text "Hello!" to be displayed in big, bold letters. But this isn't the case. Figure 3 shows the undesired result together with the desired output.


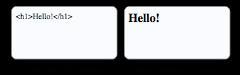
Figure 3: Label with and without escaped markup. Using setEscapeModelStrings, you can tell Wicket not to escape markup tags and to display formatted HTML the way it was intended.

The left screenshot isn't what we expect: instead of big, bold text, we get the cryptic markup we put in the label. The tags we put into the label have been escaped, presenting us with the verbatim contents instead of the properly formatted value. In the following, you can see how Wicket has rendered the contents in the final markup:

<span wicket:id="markup">&lt;h1&gt;Hello!&lt;/h1&gt;</span>

Wicket has escaped the < and > characters and replaced them with their corresponding XML entities (< and > respectively). By setting a flag on the component, you can tell Wicket to render the contents without escaping. Look at the next Java snippet:

add(new Label("markup", "<h1>Hello!</h1>").setEscapeModelStrings(false));

The call to setEscapeModelStrings tells Wicket not to escape the contents of the provided string, and to render the contents into the resulting markup. This did the trick, as you can see in the right screenshot in figure 5.4. Note that this setting is available on all Wicket components, but it's primarily useful on labels.

Beware of script injection attacks

When you give your users the ability to enter HTML markup into your application, through either a text input field or a text area, and you render this directly back to the client, the users can play dirty tricks by injecting JavaScript into your pages. Such tricks can range from opening pages on other websites (spam) to more dangerous exploits like key loggers recording credit-card information and passwords. Most browsers prevent cross-site scripting (XSS), but you can't be careful enough when it comes to security.

As an example, if we change the model of our label to the following, and escaping is turned off, clicking the message results in a pop-up:
"<h1 onclick='alert(\"clicked!\");'>Click me</h1>"

Be careful when you open up this possibility, and filter the markup to remove any scripting before you store it.

Displaying text on the web is rewarding in its own, but if your users are unable to navigate to the page that contains the text, it's virtually useless. Let's return to table 5.1 and continue with the next category of components: navigational links.

Navigating using links

Taking a stroll down memory lane, the internet was once called the information superhighway (yes, we're that old). If we use that term, it isn't hard to imagine that the exits are formed by links. On a normal highway, an exit takes you off the highway to places where you stop to do things: shop, work, relax, or see a movie. The same holds for links: they may take users to our cheese store, where they can buy cheese for lasagna; to an administrative system that will help them work; or to YouTube for some Friday afternoon entertainment.

Wicket provides several abstractions for links. There are links suited to perform an action (and navigate afterward), links that navigate only to another part of an application, and links that navigate to another website. In this section, we'll take a closer look at the navigation links listed in table 5.1. Let's first discuss static links to external websites.

Linking to documents using static links

In plain markup, you typically link between pages using the <a href> tag. This tag contains the URL of the document you're linking to. For instance, Wicket is an example of a link to the Wicket home page. You can use this type of link directly in your Wicket pages.

Static links can be useful in web applications or websites. Perhaps you want to link to the Wicket website by displaying a 'Powered by Wicket' logo, or provide a link to your corporate intranet site or another web application. As long as the link is static, in the sense that you don't need to retrieve the link from a database or construct it using Java code, you can add the link directly to the markup of your page. Let's see how that looks on our Hello World page by adding a Powered by Wicket link. Listing D shows the corresponding markup.

Listing D: An example of a static link in the markup of a Wicket page
<!-- markup -->
<html>
<body>
<h1 wicket:id="message">[text goes here]</h1>
<a href="http://wicket.apache.org">Powered by Wicket</a>
</body>
</html>

/* Java code */
public HelloWorldPage extends WebPage {
    public HelloWorldPage() {
        add(new Label("message", "Hello, World!"));
    }
}

As you can see, the <a href> tag doesn't contain a Wicket component identifier, and it's seen by Wicket as static markup. The Java code for this page only adds the Label component: there is no Java counterpart for the static link. This is fine when you know the exact URL up front and the URL remains static, but how can you create links to an external site when the URL comes from an external data source (such as a database)?

Using ExternalLink to render links programmatically

To enable our plan for world cheese domination, wouldn't it be nice to link to recipes using each cheese? This would definitely increase sales, because our customers could immediately see ways to use a particular cheese. Say we find a partner that already has a recipe website with many recipes containing cheese. All we need to do is link our cheeses to the recipes. We add a recipe concept to our domain model, including a name and the URL to the recipe.

Now that we have a way to store a URL to the recipe, how can we render it into our page? Using the ExternalLink component, we can link to any URL on the web and have the URL come from anywhere. The next snippet shows how to link to recipe that uses a cheese:

add(new ExternalLink("link", recipe.getUrl(), recipe.getName()));

In this example, we generate the URL and the contents of the link. For a good lasagna recipe, this would generate the following:

<a href="http://recipes.com/lasagna">lasagna</a>

If you don't provide contents for the link, it keeps what is in the original markup template. It's also possible to use models with the external link for both the URL and contents:

add(new ExternalLink("link", new PropertyModel(recipe, "link"),
                             new PropertyModel(recipe, "name"));

The external link is an easy way to create links to external content from within your Java code. Static links are handy to link to externally available resources, but how do you link to pages inside your Wicket application? Several possibilities exist for navigating between pages, including BookmarkablePageLinks.

Linking to Wicket pages with BookmarkablePageLinks

Imagine a highway on which you can create your own exits – exits that take you directly to your destination, without detours. The links you've seen thus far give you access to predefined locations, usually outside your control. With the BookmarkablePageLink component, you can give others direct access to locations inside our application.

When you create a BookmarkablePageLink to point to a Wicket page, it renders a link that enables Wicket to create the page later, without having any previous knowledge of where the user has been. The link can be shared with other people and can be retrieved at any time, even when the user hasn't visited the site in a long time. For example, your home page, the details page for a cheese, a blog entry, and a news article are all prime examples of good pages to link to. Basically, anything your customers want to share with one another?typically by sending a link over e-mail? or want to remember for future reference is a good candidate to be accessed through a BookmarkablePageLink.

Generating a link to a page for use in emails

When you want to send a user a link to a page in your application you can use the urlFor method to generate the URL to the page. The next snippet generates a link to a registration confirmation page:

String url = urlFor(ConfirmRegistrationPage.class, new PageParameters("id=" + registrationId));
String msg = "Click on the following link:\n\n" + url + "\n\nto confirm your registration.";

The urlFor method is also used to generate URLs to event listeners or resource listeners. It is a method on the Component class so you can use it almost anywhere.

As an example, we'll add a details link to each cheese on the front page. The link will point to a details page for each cheese; this page will show information about the linked cheese. Using this example, we'll show the various ways of creating links to Wicket pages.

We need a link tag in our markup file and a corresponding BookmarkablePageLink component in our Java file. Listing E shows how to create a bookmarkable link to the details page.

Listing E: Creating a bookmarkable link
<!-- markup -->
<a href="#" wicket:id="link">more information</a>

/* java code */
add(new BookmarkablePageLink("link", CheeseDetailsPage.class));

The <a href> tag has an href attribute containing #. This is done to show a proper link in the document when we preview it in the browser; Wicket will replace it with the URL of the page the link is pointing to. The Java code adds the link to the component hierarchy and tells Wicket to create the CheeseDetailsPage page when the link is clicked. Figure 4 shows how our front page looks after we've added the More Information link


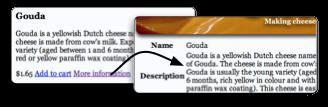
Figure 4: Adding a bookmarkable link to the front page of our cheese store. It links to a details page for each cheese. The screen on the right shows the details page after we clicked the link.

Our current implementation of the link has one problem: we haven't specified the cheese for which we want to show details! When the cheese details page is created, how do we know which cheese's details should be shown? We need to provide the details page with more information. The link generates a URL that contains all the information needed to create the page. URLs can contain request parameters that are passed to the page, so the page can react to that information. Wicket encapsulates those request parameters in PageParameters.

Adding parameters to a bookmarkable page link

First we need to consider what you can put into URL parameters. According to internet standard RFC-1738, a URL may consist only of alphanumerics: 0-9, a-z, and A-Z. Special characters and whitespace must be escaped. This means that we have to convert Java objects into string representations before we can use them as URL parameters.

Given the URL's limitations, we can't just put a cheese object into the URL. Even if it were possible to pack all the details of the cheese into the URL, doing so wouldn't be appropriate, considering that the URL can be bookmarked and stored for a long time. If someone bookmarks a cheese with a discount price of, say, $1 and then opens the bookmark two months later when the price has returned to $2.50, that would be a bummer. Plus, a malicious user could attempt to modify the URL and change the price directly. Instead of storing the whole object into the URL, you can store a unique property based on which you can reconstitute the object. The object identifier is a good candidate, as is a more businesslike key such as a customer number or, in our case, the name of the cheese.

Let's assume we can load a cheese based on its name. We add the parameter to the URL in the following code:

PageParameters pars = new PageParameters();
pars.add("name", cheese.getName());
add(new BookmarkablePageLink("link", CheeseDetailsPage.class, pars));

Because the parameters are stored and rendered as strings, you can only add string values to the parameters. You can add as many parameters to the link as you want, as long as you don't exceed the maximum URL length (depending on the browser, about 2,000 characters for Internet Explorer and 4,000 for other browsers). Without any specific configuration, Wicket generates the URL shown in figure 5.


Figure 5: The URL as generated by the bookmarkable link. The URL contains all the information needed to create the details page and retrieve the cheese object based on its name.

This is by many standards an ugly URL. It looks complicated, it's long, and it shows information we'd rather hide from our users, such as the package name. In chapter 14, we'll look at ways to generate prettier URLs.

Now that we have the link side covered, what happens when someone clicks the link? As you can see in figure 5.5, the class name of the page is contained within the URL. Wicket tries to create that page. For this to work, the page needs to be bookmarkable.

Getting your page to work with BookmarkablePageLinks

A page is considered bookmarkable if

  • It has a constructor that has no arguments (also known as a default constructor), or
  • It has a constructor that takes a PageParameters instance as the only argument

These are the only two constructors Wicket can invoke on its own. A page can have both constructors and additional constructors with other parameters. But when called upon to instantiate a page, Wicket prefers the constructor with PageParameters if it's available. The next example shows a page with three constructors where two fall into the bookmarkable category:

public class CheeseDetailsPage extends WebPage {
    public CheeseDetailsPage() {                                  #1
    }
    public CheeseDetailsPage(PageParameters parameters) {         #2
    }
    public CheeseDetailsPage(Cheese cheese) {                     #3
    }
}
#1  Bookmarkable constructor
#2  Bookmarkable preferred constructor
#3  Non-bookmarkable type-safe constructor

In this example, Wicket doesn't use the default constructor #1, because Wicket always prefers the constructor with PageParameters #2. But the default constructor is still useful inside your code, because it makes it (a bit) easier to create the page yourself. As long as the page has either of these two constructors, it can be used successfully in a bookmarkable link.

If the page had only the constructor with a Cheese parameter #3, it wouldn't be possible to reference it in a bookmarkable link or, to be more precise, Wicket wouldn't know how to create a new instance of the page with only the Cheese constructor, and would generate an error. This is the case because Wicket can't determine which cheese needs to be passed in as a parameter. You can still use this constructor if you know how to get a cheese instance based the page parameters. Listing F shows how to parse PageParameters and use the type-safe constructor.

Listing F: Parsing page parameters to retrieve a Cheese objectA
public class CheeseDetailsPage extends WebPage {
    // bookmarkable constructor
    public CheeseDetailsPage (PageParameters parameters) {        #1
        super(parameters);
        Cheese cheese = null;
        if (parameters.containsKey("name") {                      #2
            String name = parameters.getString("name");
            CheeseDao dao = ...;
            cheese = dao.getCheeseByName(name); 
        }
        createComponents(cheese);
    }

    // non-bookmarkable constructor
    public CheeseDetailsPage (Cheese cheese) {                    #3
        createComponents(cheese);
    }

    private void createComponents (Cheese cheese) {
        // do cheesy stuff with the cheese
    }
}
#1  Bookmarkable constructor
#2  Retrieve cheese using name
#3  Non-bookmarkable type-safe constructor

When the CheeseDetailsPage is created using the constructor with PageParameters #1 we parse the parameters and retrieve the value for the parameter name #2. We call the createComponents method to create the component hierarchy. This method is also called in our non-bookmarkable constructor #3 to avoid code duplication.

Parsing PageParameters

The PageParameters class lets you get converted parameters from the URL. For example, PageParameters has a getInteger(key) method that looks up the key in the URL and tries to convert its value to an integer. If this fails, it throws a conversion error.

People like to modify the URLs in their browser bar, so you may get strange requests to your pages. Wicket shows a default error page if it encounters such malice. To show a friendlier page at a local level, you should surround the querying of the page parameters with a try-catch block. In our example, we could show a page that proposes, "Sorry we couldn't find the cheese you were looking for, but how about this Beenleigh Blue for just $10?

We've covered a lot of ground and let many concepts and components pass by. Let's take a break and let Wicket do all the heavy lifting for us. All the links we've discussed so far require you to add links in both the markup and the Java file. For simple links to pages and resources, it would be nice to automate this process.

Adding bookmarkable links automatically with wicket:link

Previously, we showed you how to create bookmarkable links to pages in your web application. To make this work, you have to add the links to the markup and add a BookmarkablePageLink component to the page class. If you have many pages that are accessible through bookmarkable links, this is a lot of work to do by hand. The special wicket:link tags in a markup file instruct Wicket to automatically create bookmarkable link components for the links inside the tags.

Let's see how this works with auto-linking to two pages. First, look at the markup file in the next example:

<html>
<body>
    <wicket:link>                                               |#A
    <ul>
        <li><a href="package1/Page1.html">Page1</a></li>        |#B
        <li><a href="package2/Page2.html">Page2</a></li>        |#C
    </ul>
    </wicket:link>
</body>
</html>
#A  Auto-link block
#B  Links to com.wia.package1.Page1
#C  Links to com.wia.package2.Page2

Wicket automatically creates components for these links when they point to existing pages based on the value of the "href" attribute. In this example, Wicket auto-creates two bookmarkable links one to com.wia.package1.Page1 and the other to com.wia.package2.Page2 when the current page is in package com.wia.

Note that a link is rendered as disabled when it would point to the current page. Figure 6 shows how this might look in your browser.


Figure 6 Auto-linking in action. The link to the current page is rendered as disabled by replacing the link tag with a span, and rendering the text using an em-tag (this is configurable).

You can also use this auto-link facility to add links to packaged resources such as style sheets and JavaScript files (you can learn more about this subject in chapter 9).

wicket:link saves manual labor: you don't have to add the bookmarkable links yourself. Note that wicket:link is not refactoring safe: when you move pages between packages, you should modify the links inside the wicket:link section in your markup as well. wicket:link is merely a convenience rather than an all encompassing solution to your linking problems – especially when the links have to respond to user actions.

In this article, we looked at a some Wicket components: the basic ingredients that enable you to build web applications using Wicket. You learned how to render plain text, formatted text, and text containing HTML to the browser. Although rendering text containing HTML is handy and gives you and your users great power, you shouldn't ignore the safety concerns that stem from this approach. Your site won't be the first to fall prey to insertion attacks.

Displaying content is important for any web application, but an application is more than a set of pages without relationships. Using links, you can navigate to other websites with ExternalLinks or within your own application. With BookmarkablePageLinks, you let users store a bookmark to a particular spot of interest in the application or site (for instance, an article).

We hope that this article has interested you into learning more about Wicket and its components. You can learn more about Wicket by reading the first chapter of Wicket in Action for free, and by using the links provided in the resources.

Resources

Discuss this article in The Big Moose Saloon!

WIRE
Return to Top
Dependency Injection - What is Scope?

Dependency Injection - What is Scope?

by Dhanji R. Prasanna

This article is excerpted from the upcoming book Dependency Injection by Dhanji R. Prasanna and published by Manning Publications. It introduces the concept of scope and the role it plays in application design. For the table of contents, the Author Forum, and other resources, go to http://www.manning.com/prasanna/.

In one sentence, scope is a fixed duration of time or method calls in which an object exists. In other words, a scope is a context under which a given key refers to the same instance. Another way to look at this is to think of scope as the amount of time an object's state persists. When the scope context ends, any objects bound under that scope are said to be out of scope and cannot be injected again in other instances.

State is important in any application. It is used to incrementally build up data or responsibility. State is also often used to track the context of certain processes, for instance, to track objects in the same database transaction.

In this article we'll talk about some of the general purpose scopes: singleton and no-scope. These are scopes that are universally applicable in managing state. We'll also take a look at managing state in specific kinds of applications, particularly the Web. Managing user-specific state is a major part of scoping for the web, and this is what the request, session, flash and conversation scopes provide. We'll look at a couple of implementations of these with regard to Guice and Spring, and how they may be applied in building practical web applications. First, a primer on scope.

Understanding Scope

The real power of scope is that it you can model the state of your objects declaratively. By telling the injector that a particular key is bound under a scope, you can move the construction and wiring of objects to the injector's purview. This has some important benefits:

  • Let the injector manage the latent state of your objects
  • Ensure that your services get new instances of dependencies as needed
  • Implicitly separate state by context (for example, two HTTP requests imply different contexts)
  • Reduce the necessity for state-aware application logic (which makes code much easier to test and reason about)

Scope properly applied means that code working in a particular context is oblivious to that context. And it is the injector's responsibility to manage these contexts. Not only does this mean that you have an added separation between infrastructure and application logic, but also that the same services can be used for many purposes simply by altering their scopes. Take this example of a family bathroom and their toothpaste:

family.give("Joanie", injector.getInstance(Toothpaste.class)); 
family.give("Jackie", injector.getInstance(Toothpaste.class)); 
family.give("Sachin", injector.getInstance(Toothpaste.class)); 

Simply looking at this code we can say that the Toothpaste is used by Joanie first, then Jackie and finally by Sachin. We might also guess that each family member receives the same tube of toothpaste. If the tube were especially small, Sachin might be left with no paste at all (as per figure 1).


Figure 1: The injector distributes the same instance of toothpaste to all family members

This is an example of context: all three family members use the same bathroom, and therefore have access to the same instance of Toothpaste. It is exactly the same as the following program, using construction by hand:

Toothpaste toothpaste = new FluorideToothpaste(); 
 
family.give("Joanie", toothpaste); 
family.give("Jackie", toothpaste); 
family.give("Sachin", toothpaste); 

If this were the whole life of the injector, then only one instance of Toothpaste is ever created and used. In other words, Toothpaste is bound under singleton scope. If however, each family member had their own bathrooms (each with its own tube of toothpaste) then the semantics would change considerably (as shown in figure 2).


Figure 2: The injector now creates a new toothpaste instance for each family member

 
family.give("Joanie", injector.getInstance(Toothpaste.class)); 
family.give("Jackie", injector.getInstance(Toothpaste.class)); 
family.give("Sachin", injector.getInstance(Toothpaste.class)); 

Nothing has changed in code, but now a new instance of Toothpaste is available to each family member. And now there is no danger of Sachin being deprived of toothpaste by Joanie or Jackie. In this case, the context under which each object operates is unique (that is, their own bathrooms). You can think of this as the opposite of singleton scoping. Technically this is like having no scope at all.

The No-scope (or default scope)

In a sense, no-scope fulfills the functions of scope, as it:

  • provides new instances transparently,
  • is managed by the injector, and
  • associates a service (key) with some context

Or does it? The first two points are indisputable. However, there arises some difficulty in determining exactly what context it represents. To get a better idea of no-scope's semantics, let's dissect the example of the toothpaste from earlier. We saw that it took no change in the use of objects to alter their scope. The family.give() sequence looks exactly the same for both singleton and no-scope:

 
family.give("Joanie", injector.getInstance(Toothpaste.class)); 
family.give("Jackie", injector.getInstance(Toothpaste.class)); 
family.give("Sachin", injector.getInstance(Toothpaste.class)); 

Or, expanded using construction by hand (modeled in figure 3):

 
Toothpaste toothpaste = new FluorideToothpaste(); 
family.give("Joanie", toothpaste); 
 
toothpaste = new FluorideToothpaste(); 
family.give("Jackie", toothpaste); 
 
toothpaste = new FluorideToothpaste(); 
family.give("Sachin", toothpaste); 

Figure 3: Each member of the family receives their own instance of Toothpaste

In no-scope, every reference to Toothpaste implies a new toothpaste instance. We likened this to the family having three bathrooms, one for each member. However, this is not exactly accurate. For instance, if Sachin brushed his teeth twice:

 
family.give("Joanie", injector.getInstance(Toothpaste.class)); 
family.give("Jackie", injector.getInstance(Toothpaste.class)); 
family.give("Sachin", injector.getInstance(Toothpaste.class));  
family.give("Sachin", injector.getInstance(Toothpaste.class)); 

...you would end up with a total of four Toothpaste instances (see figure 4).


Figure 4: There are now four instances of Toothpaste, for each use

Now, in our conceptual model, there were only three bathrooms. But in practice there were four tubes of toothpaste. This means that no-scope cannot be relied on to adhere to any conceptual context. No-scope means that every time an injector looks for a given key (one bound under no-scope), it will construct and wire a new instance. Furthermore, let's say Sachin took Joanie on vacation and only Jackie was left at home. She would brush her teeth once, as follows:

 
family.give("Jackie", injector.getInstance(Toothpaste.class)); 

And this would mean only one instance of Toothpaste was ever created for the life of the application. This was exactly what happened with singleton scoping, but this time it was purely accidental that it did. Given these two extremes, it is difficult to lay down any kind of strict rules for context with no-scope. You could say, perhaps, that no-scope is a split-second scope where the context is entirely tied to referents of a key. This would be a reasonable supposition. Contrast singleton and no-scope in figure 5.


Figure 5: Timeline of contexts, contrasting singleton and no-scopes

No-scope is a very powerful tool for working with injector-managed components. This is partly because it allows a certain amount of flexibility in scaling upward. Dependents that exist for longer times (or in wider scopes) may obtain no-scoped objects as they are required, safely. Granny obtained new instances of an Apple on each use (see listing 1, modeled in figure 6).


Figure 6: Granny obtains instances of Apple (bound to no scope) from a provider

Listing 1: An example of no-scope using the provider pattern
 
public class Granny { 
 
 public Provider appleProvider;  
 
 public void eat() { 
  appleProvider.get().consume();  |#1 
  appleProvider.get().consume();  |#2 
 } 
} 

(Annotation) <#1 Two new apples created>

In listing 1, the eat() method uses a provider to retrieve new instances, just as we did for Toothpaste earlier. Here Apple is no-scoped.

Guice and Spring differ in nomenclature with regard to the no-scope. Spring calls it as the prototype scope. The idea being that a key (and binding) is a kind of template (or prototype) for creating new objects. In the following example, no-scoping enabled multiple threads to see independent instances of an object (modeled in figure 7):

 
<beans> 
 <bean id="slippery" class="Slippery" scope="prototype"/> 
 <bean id="shady" class="Shady" scope="prototype"/> 
 
 <bean id="safe" class="UnsafeObject" init-method="init" scope="prototype"> 
  <property name="slippery" ref="slippery"> 
  <property name="shady" ref="shady"> 
 <bean> 
<beans> 


Figure 7: UnsafeObject and both its dependencies were no-scoped

This object was actually safe, because any dependents of key safe were guaranteed to see new, independent instances of UnsafeObject. Like singleton, the name prototype comes from the Gang of Four book on Design Patterns. I prefer to refer to it as no-scope, largely because it is a more descriptive name. Like Guice, PicoContainer also assumes the no-scope if a key is not explicitly bound to some scope:

 
PicoContainer injector = new DefaultPicoContainer(); 
injector.addComponent(Toothpaste.class); 
 
family.give("Joanie", injector.getComponent(Toothpaste.class)); 
family.give("Jackie", injector.getComponent (Toothpaste.class)); 
... 

Almost no difference at all.

NOTE

You will sometimes also hear no-scope referred to as the default scope. This is a less descriptive name, and typically connotes either Guice or PicoContainer (since they default to the no-scope).

Discuss this article in The Big Moose Saloon!

WIRE
Return to Top
Web Services Security - Encryption

Web Services Security - Part 2: Encryption

by Ulf Dittmer

In a previous article I wrote about providing authentication for web services (WS) using the WS-Security standard as implemented by the Apache Axis SOAP stack. Besides authentication, WS-Security also provides encryption and digital signatures. In this article, I'll describe how to secure WS calls by encrypting their payload.

This is facilitated by way of the XML-Encryption standard –the details of which need not concern us–, which can be used to encrypt part or all of any XML document, not just SOAP.

As in the authentication article, the example I'm using is the Fibonacci calculator, a mathematical function whose deeper meaning isn't relevant here. All you need to know is that it takes a single integer parameter and returns a single integer result, e.g. Fibonacci(15) = 610.

Setting up the environment

The accompagnying zip file has everything you need to run the examples on the client side, but you'll also need Axis2 and its WS-Security module (called Rampart) installed and working. I also recommend that you at least glance at the previous article, which goes into a bit more detail on how to set up Axis and Rampart.

Start by copying the FibonacciService.aar and FibonacciServiceSymmetric.aar files in the build directory into the services directory of your Axis installation.

We'll also need to install the encryption libraries. While Java has built-in encryption (in the shape of the JCE API), suitable versions of that aren't available everywhere due to export restrictions for cryptological code. So instead of relying on the built-in, we'll use the BouncyCastle crypto provider, which implements JCE without any restrictions. The relevant library is part of the zip file; it's called bcprov-jdk15-141.jar. You'll need to copy that to the lib directory of the Axis web app. Now it's possible to tell the JVM to use that instead of Sun's crypto provider by calling:

java.security.Security.addProvider(
	new org.bouncycastle.jce.provider.BouncyCastleProvider());

It's also possible to install the BouncyCastle permanently in your JRE. That's done by changing the lib/security/java.security file within the JRE's directory. It contains a section that looks somewhat like this:

security.provider.1=sun.security.provider.Sun
security.provider.2=sun.security.rsa.SunRsaSign
security.provider.3=com.sun.net.ssl.internal.ssl.Provider
security.provider.4=com.sun.crypto.provider.SunJCE
security.provider.5=sun.security.jgss.SunProvider
security.provider.6=com.sun.security.sasl.Provider

If you add a line to it like the following (with the number before the equal sign being one higher than the highest existing one in the list), then it's not necessary to use the line of code shown above:

security.provider.7=org.bouncycastle.jce.provider.BouncyCastleProvider

Now there's one last step to do. Due to a bug in Axis2 SAAJ clients can't use WS-Security. The axis2-saaj-1.4.jar file in this distribution fixes the bug; you need to copy that into the lib directory of the Axis web app. Hopefully, the next version of Axis2 will include this fix.

Public and Private Encryption Keys

We can't avoid to talk briefly about how encryption works in general. There are broad kinds of encryption algorithms –or ciphers–, symmetric and asymmetric. Symmetric ciphers use the same key for encryption and decryption. That means both sides need to have it, and it needs to be kept secret, because anyone knowing the key can decrypt all messages encrypted with it. The standards DES (now obsolete) and AES are examples of symmetric ciphers. Asymmetric ciphers use two keys, a public one for encryption and a private one for decryption. The advantage is that there's no harm in communicating the public key to anyone, because it can't be used to decrypt anything. The private key, on the other hand, doesn't need to be sent to anyone, and is thus easier to keep secret. RSA is an example of an asymmetric cipher. These ciphers are generally much more compute-intensive (orders of magnitude slower), so they're rarely used to encrypt large messages.

The JRE includes the keytool executable to create and manage encryption keys; keys are stored in files called keystores. The keytool.sh script creates the keystore files we need for client and service. In its first lines it defines the encryption algorithm, the key length and how long the keys should be valid. The script runs on Unix-based operating systems, but a similar Windows batch file shouldn't be hard to create.

The Examples

The first example can be run by the command

ant test-axis2 -Dn=15

or by

ant test-axis2 -Dn=15 -Dport=8079

if you want to watch request and response with the tcpmon tool (which you need to start through ant tcpmon first). Here are examples what the request and response might look like. The specifics will differ for your installation, but it will be very similar.

The SOAP body of the request contains a big blob of incomprehensible data – the encrypted version of the request data, which is all of:

<ns1:calculateFibonacci xmlns:ns1="http://fibonacci/xsd">
	<in0>15</in0>
</ns1:calculateFibonacci>

The response is very similar; it contains the encrypted version of the response, which is really just:

<ns:calculateFibonacciResponse xmlns:ns="http://fibonacci/xsd">
	<ns:return>610</ns:return>
</ns:calculateFibonacciResponse>

How is this set up? It's the same conf/client.axis2.xml file used for the authentication. But this time, there's no UsernameToken action, but an Encrypt action (both can be used together, by the way). Here we have both OutflowSecurity (for service requests) and InflowSecurity (for service responses), because both directions should be encrypted. The details for both directions differ slightly, but they both tell Rampart which user and which key to use, and where to find those.

<parameter name="OutflowSecurity">
	<action>
		<items>Encrypt</items>
		<encryptionUser>service</encryptionUser>
		<encryptionPropFile>conf/client.properties</encryptionPropFile>
	</action>
</parameter>

<parameter name="InflowSecurity">
	<action>
		<items>Encrypt</items>
		<passwordCallbackClass>fibonacci.PWHandlerClient</passwordCallbackClass>
		<decryptionPropFile>conf/client.properties</decryptionPropFile>
	</action>
</parameter>

If you look at the transmitted SOAP closely (namely, the <xenc:EncryptionMethod> tags), you'll notice that for both request and response, the SOAP header is encrypted using RSA, while the SOAP body is encrypted using AES. This goes back to the earlier point about asymmetric algorithms (like RSA) being much slower than symmetric algorithms (like AES): RSA is used to encrypt an AES key, and nothing else. Then the AES key is used to encrypt the actual payload data.

There's also a very similar code example that uses a SAAJ client instead of an Axis2 client; (it can be run via ant test-saaj -Dn=15), but it works the same with respect to WS-Security, so I won't discuss it here.

Using a pre-determined encryption key

The second example uses a pre-determined key that both sides know in advance. It's run via

ant test-prekey -Dn=15 -Dport=8079

In this case, the encryption key is actually in the Java code, in the shape of the key[] array in the PWHandlerClient and PWHandlerServer classes. Here are the entries to set this up from the conf/client.axis2-prekey.xml file. The details of the outflow security are a bit different, because we're not using the service side's public key, but the key from the PWClientHandler class:

<parameter name="OutflowSecurity">
	<action>
		<items>Encrypt</items>
		<user>service</user>
		<encryptionPropFile>conf/client-prekey.properties</encryptionPropFile>
		<EmbeddedKeyCallbackClass>fibonacci.PWHandlerClient</EmbeddedKeyCallbackClass>
		<EmbeddedKeyName>SessionKey</EmbeddedKeyName>
	</action>
</parameter>

<parameter name="InflowSecurity">
	<action>
		<items>Encrypt</items>
		<passwordCallbackClass>fibonacci.PWHandlerClient</passwordCallbackClass>
		<decryptionPropFile>conf/client-prekey.properties</decryptionPropFile>
	</action>
</parameter>

If you look at the request and response, you'll see that the response is much shorter in this case. That's because the key needed for decryption is already known by the client (it's pre-determined, remember?), so the service doesn't need to send it.

When you run either of these example, you may be surprised about how long it takes until you get the response. There's no reason to worry about it in a production setting, though – for the first call, the JVM isn't warmed up, and especially the security code needs a lot of one-time setup. If you run several service calls in a row you'll notice that subsequent calls are much faster.

If –for some reason– you prefer to use encryption only in one direction, and not the other, it's perfectly possible to use only, say, inflow security for the service, and outflow security for the client. That would be an unusual setup, though – if the data is important enough to be encrypted in one direction, it's probably important enough to encrypt what is sent the other way, too.

Conclusion

Just like it was possible to replace HTTP authentication with WS-Security authentication, it's possible to replace the use of HTTPS with WS-Security encryption, thus moving it from the transport layer to the application layer. While it may seem that there's a lot of setup to do –especially if compared to simply using an HTTPS URL instead of HTTP URL– there are other benefits. HTTPS encryption ends the moment the request arrives at the server – it's gone by the time the request is being processed. With WS-Security, on the other hand, the data can be decrypted when appropriate. For instance, there may be several SOAP actors working on the message that don't need to see the contents; in that case it needn't be cleartext. Or the message can be stored and forwarded safely, because it's still encrypted.

In any case, applying XML-Encryption to web services isn't hard to set up, and it's the wave of the future. If data security is required, it should be considered for any service that's being put into production.

Discuss this article in The Big Moose Saloon!

WIRE
Return to Top