Driving On CruiseControl - Part 1
Driving On CruiseControl - Part 1
Lasse Koskela
Accenture Technology Solutions
Continuous Integration is one of the buzzwords most people have probably
heard of but surprisingly few are actually following this XP best practice.
Keeping this in mind, I'll begin this tutorial by briefly describing what
Continuous Integration actually means, why you should consider doing it, and
finally, showing step by step how to do it using one of the most used
Continuous Integration products, the open source
CruiseControl developed
by a bunch of ThoughtWorkers.
Technically, the term "Continuous Integration" means that everyone on the team
integrates their changes back into the source repository frequently,
verifying that the changes didn't break anything. These days, most people
associate Continuous Integration to be highly automated as well, i.e. having
an automatic build system in place to continuously verify that the
code in the repository compiles and passes all its tests. The exact definition
for "frequently" and "continuously" depends on the team but it serves as a
pretty good rule of thumb to say that the frequency should be at least
multiple times a day. Personally, I prefer running the integration build at
least once an hour.
When I'm referring to the term "Continuous Integration" in this article, I'm
talking about running a fully automated build over and over again throughout
the day, day after day, against the latest version of the source code and
having each developer integrate their changes into the repository as frequently
as necessary for keeping your team going fast.
You also may have heard of Daily Builds or Nightly Builds.
Continuous Integration is not the same thing as Daily or Nightly Builds. The
main differences being three-fold:
- Continuous Integration happens throughout the day while Nightly
Builds happen once a day.
- Nightly Builds aim to produce a stable distributable for use whereas
Continuous Integration aims to also produce fast feedback on integration
failures (and successes) while pushing out those (mostly) stable
releases.
- Nightly Builds don't say anything about how often developers should
check in, Continuous Integration with its fast feedback goal
promotes frequent check ins to facilitate that fast feedback.
"Once an hour, huh?", you might say. "That sounds like a lot of work to
integrate up to 7-8 times a day. I mean, we all know how merging one's
changes can be a real pain in the behind, right?"
There are some very convincing benefits a development team can gain from
using Continuous Integration. Some of those benefits can really be
understood only by experiencing it for real, but I'll try my best to
convey the most important ones right now, before we get into the "how"
part and get our hands all dirty.
Remember when I just said that Continuous Integration aims to provide
fast feedback? Let me tell you a little story to explain what I'm
talking about.
A friend of mine joined a small software development team that had a
relatively long history behind it, having produced a number of bi-yearly
releases of an in-house project management software. The codebase was
relatively big and messy, the developers were unfamiliar with some of the
worst spider webs, the build process took ages, and the testing team was
often faced with a broken build that couldn't be tested beyond the
first screen or so.
Fortunately, the team had gotten a configuration manager, another friend
of mine, with enough energy and will to make things better and the team
decided to try something new. That something was Continuous Integration.
The configuration manager set up an automated build system that periodically,
once every hour, checked out the latest version of all files in the version
control and ran the build script, effectively attempting to compile all code
and run any automated tests it could find. The build system would send an
email to each and every member of the development team whenever the automated
build failed.
Obviously the build system was constantly sending out those build failure
emails to the whole team as people repeatedly forgot to check in all their
changes, failed to compile the source code locally after a small edit, and
neglected running the automated tests before checking in.
What was the team's reaction to this new stream of nasty emails complaining
about even the smallest error they could make? Yes, you guessed correctly.
The team members asked the configuration manager to stop running the automated
build so frequently, arguing that their mailboxes were so full of "build failed"
emails that they couldn't do any real work from deleting all that spam.
After all, they knew the build is broken already from the first copy of
that email so there was no need to send another one.
This reaction was no surprise, considering how annoying it is to get the same
whining email an hour after hour. So, how did the configuration manager react
to this sudden burst of dissatisfaction? He scheduled the automatic builds to
run twice as often as they used to.
My friend -- not the configuration manager, the other one -- told me that that
was the moment when he realized how wonderful Continuous Integration actually was.
The revelation he had at that time was that the purpose of a Continuous
Integration system is not just to inform the developers about the build being
broken but to keep the build from being broken for extended periods of time.
Keeping the build green.
Eventually, after a day or two of constant nagging about the annoyance, it all
suddenly stopped. No "build failed" messages twice in an hour, no whining about
getting "spammed", no nothing. The build had started to stay green.
Of course the build broke every now and then, but it had become an exception
instead of the rule and the developers started to value those "build failed"
messages as valuable feedback instead of worthless spam. I've heard of
developers initially creating mail filters to send anything coming from the
build machine to the trash folder only to find themselves addicted to the
invaluable feedback a Continuous Integration system can provide.
To me, all this seems to be convincing evidence about there being something
about Continuous Integration that is worth exploring further. If you feel the
same, please continue reading.
So, how can we automate this Continuous Integration thing? Are there any
tools I can use or do I need to come up with my own home-grown solution?
Building your own piece of software for the job could be a lot of fun.
The end result just might be a perfect fit for your project. However, since
there are some existing products -- both commercial and open source -- that
can do the job and do exhibit a certain degree of configurability, I'm
pretty sure you'll be better off starting with an established product. Let's
take a brief look at some of them, shall we?
CruiseControl
is the clear winner in mind share among CI products for Java
developers. It's an open source project run by a bunch of
ThoughtWorks employees and remains fairly active. CruiseControl is
the product I've chosen to use in this article and it is probably
the safest choice for most Java projects to use, considering its
significant user base.
AntHill,
developed by Urbancode is
another reasonably popular alternative for CruiseControl. AntHill
comes in two editions, commercial and open source. The commercial
version adds a wide array of features but the open source version
should be more than enough to get you going. AntHill is not as
common as CruiseControl, but it is often quoted as being significantly
easier to set up and use than CruiseControl.
CruiseControl.NET is more or less a port of the original Java
version for the Microsoft.NET platform. The feature set is pretty close
to what the Java version provides.
Draco.NET
makes sure that CruiseControl.NET is not the only option for
.NET projects either. It's another open source Continuous Integration
server for .NET and is definitely a good candidate along with
CruiseControl.NET.
DamageControl
is the lone wolf among other Continuous Integration servers. It is
developed by the CodeHaus open
source community (although the developers are currently working for
ThoughtWorks). DamageControl earns its lone wolf title by being
implemented in Ruby, and
provides a fresh alternative for Continuous Integration that should
fit both worlds (Java and .NET) equally well.
Tinderbox
by the Mozilla project represents
a distributed approach to automated, continuous builds on
multiple platforms and is worth a look if you're dealing with
platform-dependent functionality.
This is not quite all, however. Aslak Hellesoy from ThoughtWorks/Codehaus
has started a nice
matrix for comparing different CI products, including
the ones listed above.
So we have some choices but how do these products differ from each
other? Well, generally speaking, not much. They all employ the same overall
approach of integrating with a source control repository to get the latest
sources, compiling the code and running tests using a build tool like
Ant or
NAnt, and finally publishing
the results via email, a web page, or both. Some tools also provide handy
system tray utilities for pushing the green/red information directly to
the developers' desktops!
Here's a little diagram for illustrating how these Continuous Integration
servers are typically set up in a project environment. Notice how the
build server is just another "client" for the repository server.
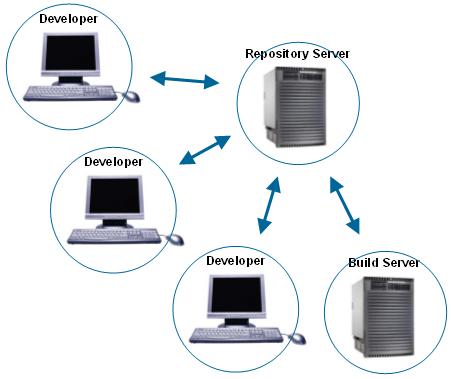
Next, we're going to set up a Continuous Integration system following
the overall architecture illustrated above. In order to solve that puzzle,
we need to have all the parts available:
- The repository server
- The build server
- The developer machine(s)
...and, of course:
Since I'm sure not everyone has 4 machines just waiting for their next
experiment, we're going to set up all of these "virtual" machines on one
box. Here's a screenshot of the directory structure on my Windows box:
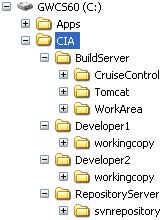
As you can see, I've created a separate directory structure for each
of our four virtual machines. The build server needs to have CruiseControl
installed, a web container (I'm using
Jakarta Tomcat 5.0) for
CruiseControl to publish its build results with, and a working area where to
check out the projects to put on CruiseControl. The developer machines only
need to have a checked out copy of the project so the "workingcopy" folder is
all they need. Finally, the repository server needs to have the source control
repository installed. I've used Subversion for the purposes of this article but
any SCM system supported by CruiseControl would do (i.e. one of
CVS,
Subversion,
ClearCase,
MKS,
Perforce,
PVCS,
Starteam,
Visual SourceSafe).
There's one piece of software I left out. You need to have
Ant installed and available for at
least the build server. I've installed mine under "C:\Apps" but yours could
be anywhere as long as Ant's "bin" directory is in your PATH.
The Sample Project
Something to build, right? Since this article is about setting up
CruiseControl, we're going to use a very simple project with only
a couple of classes, a couple of tests, and a trivial Ant build script.
See the Resources section for downloading the
sample project as a .zip file.
The project's directory structure is essentially as follows:
| src/main |
Production source code. All we need is a single class,
com.javaranch.journal.cruisecontrol.Calculator.
|
| src/test |
Unit tests. All we need is a single JUnit TestCase,
com.javaranch.journal.cruisecontrol.CalculatorTest.
|
| lib |
3rd party libraries. In our case, this includes only
junit.jar.
|
| build.xml |
The project's Ant script, build.xml, is located in
the project's root directory.
|
| build-cc.xml |
This is a "wrapper" build script for CruiseControl to
use during the build cycle. It's good practice to
separate the CruiseControl stuff into a separate file
in order to keep the project's main build script as
clean as possible. Basically, this script is called
by CruiseControl to 1) update the project from the
repository, and to 2) build the project. Step 2 is
achieved by delegating to appropriate targets
inside the project's build.xml.
|
The two pieces of this sample project we're really interested of are the
build script and the Calculator class.
Here's the source code for the Calculator class:
package com.javaranch.journal.cruisecontrol;

/**
 * The most unimaginative class one could come up with for demonstrating
 * continuous integration.
 *
 * @author Lasse Koskela
 */
public class Calculator {

  public int add(int x, int y) {
                return x + y;
  }

  public int subtract(int x, int y) {
    return x - y;
  }
}
And here's the accompanying test class, CalculatorTest:
package com.javaranch.journal.cruisecontrol;

import junit.framework.TestCase;

/**
 * Just a sample test case for demonstrating how the automated build runs unit
 * tests and acts according to the results.
 *
 * @author Lasse Koskela
 */
public class CalculatorTest extends TestCase {

  private Calculator calculator;

  protected void setUp() throws Exception {
    calculator = new Calculator();
  }

  public void testAddition() throws Exception {
    assertEquals(3, calculator.add(1, 2));
  }

  public void testSubtraction() throws Exception {
    assertEquals(1, calculator.subtract(3, 2));
  }
}
For our purposes, this is really all we need. The fact that we have two
tests will help us to experiment with how CruiseControl's Continuous
Integration process reacts to failing tests (we can make one of them
temporarily fail on purpose), or possible compilation errors.
Setting Up the Repository and Working Copies
Since we most definitely need a repository to put our project into, we need
to do some more installing. As I mentioned earlier, I've chosen to use
Subversion. The free
online book about Subversion
includes a nice little
quick start section for getting you up and running in minutes of
downloading Subversion in case you can't make sense of my admittedly brief
instructions below.
Assuming you have unzipped/installed Subversion somewhere and added its
"bin" directory into your PATH environment variable, these are the steps
you need to do to set up the repository for our sample project (if you
installed the "virtual machines" under a directory different from "C:\CIA",
adjust the paths in these examples according to where you decided to
place the "buildserver", "repositoryserver", etc. directories).
First, we need to create the repository itself:
C:\> svnadmin create c:\cia\repositoryserver\svnrepository
Next, we need to create our project into the repository. That's a bit
trickier thing to do so follow the instructions carefully.
Create a temporary directory somewhere, e.g. "C:\tmp\project", and create
the Subversion-specific directory structure as follows (don't worry about
the meaning of these directories -- just think of them as something
Subversion needs for doing its job).
C:\> mkdir tmp\project
C:\> cd tmp\project
C:\tmp\project> mkdir branches
C:\tmp\project> mkdir tags
C:\tmp\project> mkdir trunk
C:\Tmp\project> dir
 Volume in drive C is GWCS60
 Volume Serial Number is E472-052C

 Directory of C:\tmp\project

12.09.2004  11:53    <DIR>          .
12.09.2004  11:53    <DIR>          ..
12.09.2004  11:53    <DIR>          branches
12.09.2004  11:53    <DIR>          tags
12.09.2004  11:53    <DIR>          trunk
               0 File(s)              0 bytes
               5 Dir(s)   7?198?642?176 bytes free
C:\tmp\project>
At this point, you need to copy the project's contents under the newly
created "trunk" directory as follows:
trunk\build.xml
trunk\src\...
trunk\lib\...
After creating this "skeleton" of our project, we need to import
the directory structure into our repository with the following command:
C:\tmp\project> svn import C:\tmp\project file:///c:/cia/repositoryserver/svnrepository -m "Initial import"
Adding         C:\tmp\project\trunk
Adding         C:\tmp\project\trunk\lib
Adding  (bin)  C:\tmp\project\trunk\lib\junit.jar
Adding         C:\tmp\project\trunk\src
Adding         C:\tmp\project\trunk\src\test
Adding         C:\tmp\project\trunk\src\test\com
Adding         C:\tmp\project\trunk\src\test\com\javaranch
Adding         C:\tmp\project\trunk\src\test\com\javaranch\journal
Adding         C:\tmp\project\trunk\src\test\com\javaranch\journal\cruisecontrol
Adding         C:\tmp\project\trunk\src\test\com\javaranch\journal\cruisecontrol\CalculatorTest.java
Adding         C:\tmp\project\trunk\src\main
Adding         C:\tmp\project\trunk\src\main\com
Adding         C:\tmp\project\trunk\src\main\com\javaranch
Adding         C:\tmp\project\trunk\src\main\com\javaranch\journal
Adding         C:\tmp\project\trunk\src\main\com\javaranch\journal\cruisecontrol
Adding         C:\tmp\project\trunk\src\main\com\javaranch\journal\cruisecontrol\Calculator.java
Adding         C:\tmp\project\trunk\build.xml
Adding         C:\tmp\project\trunk\build-cc.xml
Adding         C:\tmp\project\branches
Adding         C:\tmp\project\tags

Committed revision 1.

C:\tmp\project>
If you're seeing output similar to the above, you've successfully imported
our sample project under Subversion's control. You're now free to delete the
temporary directory, "C:\tmp\project", since everything is safely stored in
the repository.
Now, let's check out some working copies for our developer machines!
You check out a project from a Subversion repository using the
"svn checkout" command. Here's an example of how you can check out a
working copy for a "developer machine" located at "C:\Developer1":
C:\Developer1> svn checkout file:///c:/cia/repositoryserver/svnrepository/trunk workingcopy
A  workingcopy\lib
A  workingcopy\lib\junit.jar
A  workingcopy\src
A  workingcopy\src\test
A  workingcopy\src\test\com
A  workingcopy\src\test\com\javaranch
A  workingcopy\src\test\com\javaranch\journal
A  workingcopy\src\test\com\javaranch\journal\cruisecontrol
A  workingcopy\src\test\com\javaranch\journal\cruisecontrol\CalculatorTest.java
A  workingcopy\src\main
A  workingcopy\src\main\com
A  workingcopy\src\main\com\javaranch
A  workingcopy\src\main\com\javaranch\journal
A  workingcopy\src\main\com\javaranch\journal\cruisecontrol
A  workingcopy\src\main\com\javaranch\journal\cruisecontrol\Calculator.java
A  workingcopy\build.xml
A  workingcopy\build-cc.xml
Checked out revision 1.

C:\Developer1>
Well that wasn't too difficult, was it? Repeat the "svn checkout" command for
the second developer machine.
Now that we're on the roll with Subversion checkouts, why not create
a working copy for our build server as well:
C:\BuildServer\WorkArea> svn checkout file:///c:/cia/repositoryserver/svnrepository/trunk SampleCCProject
A  SampleCCProject\lib
A  SampleCCProject\lib\junit.jar
A  SampleCCProject\src
A  SampleCCProject\src\test
A  SampleCCProject\src\test\com
A  SampleCCProject\src\test\com\javaranch
A  SampleCCProject\src\test\com\javaranch\journal
A  SampleCCProject\src\test\com\javaranch\journal\cruisecontrol
A  SampleCCProject\src\test\com\javaranch\journal\cruisecontrol\CalculatorTest.java
A  SampleCCProject\src\main
A  SampleCCProject\src\main\com
A  SampleCCProject\src\main\com\javaranch
A  SampleCCProject\src\main\com\javaranch\journal
A  SampleCCProject\src\main\com\javaranch\journal\cruisecontrol
A  SampleCCProject\src\main\com\javaranch\journal\cruisecontrol\Calculator.java
A  SampleCCProject\build.xml
A  SampleCCProject\build-cc.xml
Checked out revision 1.

C:\BuildServer\WorkArea>
This is the project checkout CruiseControl will later use to synchronize
with the repository and do the automated builds with. Note that I've used
a different name for the checkout directory than with the developer machines.
The reason for doing this is that while it doesn't really matter what the
developer decides to name his working copy, it is a good idea to keep
CruiseControl's working area clean by using descriptive names -- if you're
running multiple projects on CruiseControl and they're named "project1",
"project2", and so on, you're bound to have trouble with your CruiseControl
directories full of meaningless names and your CruiseControl configuration
file extra-vulnerable to copy-paste errors.
All set? Good. We've now got a project on the repository server and a
couple of developers hooked up. All we need now is the build server which
we're going to set up next!
Getting, Installing and Building CruiseControl
CruiseControl downloads are available via
SourceForge.net.
I've written this article based on version 2.1.6 of CruiseControl but you should
be able to follow through with a slightly older or newer version if you're
not afraid of hacking your way through possible differences in the configuration
file syntax, etc.
Once you've downloaded cruisecontrol-2.1.6.zip somewhere on your hard drive, unzip
its contents into our build server directory as follows:
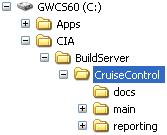
If you're wondering what those directories inside the CruiseControl distribution
are, you're in luck, because we're just about to explore them a bit further.
The "docs" directory, as you might've guessed by now, contains some CruiseControl
documentation in HTML format. These documents are not really essential, however,
since the really useful documentation is inside the other two directories, namely
"main/docs" and "reporting/jsp/docs". Feel free to take a peek but you shouldn't
need to look at them in order to get started with CruiseControl. That is,
assuming I'm doing a good job explaining the tricks of the trade in this article...
So, next up is the "main" directory. This directory contains the CruiseControl
"engine", along with all source code, tests and build scripts for building it
from a clean slate. The "main" directory contains too many directories to warrant
a detailed description for each of them so I'll just mention those you need to
know about.
| main/bin |
This directory contains a batch/shell script for launching the
CruiseControl process, i.e. cruisecontrol.bat or cruisecontrol.sh
depending on your operating system.
|
| main/dist |
This directory contains the cruisecontrol.jar, i.e. the CruiseControl
engine we're going to launch in just a few more minutes. If you can't
see such a file, back up to the "main" directory and run "ant jar" to
compile CruiseControl and to create the cruisecontrol.jar under "dist".
|
| main/logs |
This is the directory where we're going to make CruiseControl collect
all the historical build results for each project. Well, since we're
only going to put one project on CruiseControl, there will be just
one subdirectory under "logs", namely "SampleCCProject".
|
All clear? So what's the remaining "reporting" directory next to "main"?
Right now, I'll just say it contains the J2EE web application used for
reporting CruiseControl build results online after each automated build.
We'll get back to it in Part 2 of this tutorial.
Oh, did I mention that you've now "installed" CruiseControl? Well, you have.
Now we just need to configure it to build our sample project...
Configuring CruiseControl
In order for CruiseControl to be able to do anything sensible, you need to
provide a configuration file telling which projects to build and, most
importantly, how.
This configuration file, which is an XML document, is traditionally named
"config.xml" although you can use a different name using the "-configfile"
command-line argument for the cruisecontrol.bat/.sh script to point to your
custom named configuration.
Instead of going through the CruiseControl config.xml "DTD" (there's
not a real DTD document available, just an informal HTML page describing
each allowed element), I'll just throw the file we're going to use at
you and explain what each of the elements we're using mean and how you
could tweak them for slightly different behavior or for a different
environment. For more details about the possibilities provided by the
CruiseControl configuration file, please refer to the
online
documentation for config.xml.
One more thing before diving in, though, and something you might want to
keep in mind while going through the different configurations. The goal
behind all this work is to get timely feedback to the development team
about the status of the code in our source repository. If the configuration
currently in version control doesn't build at all, stumbles on a missing
library, or doesn't pass its unit tests, we want to let the developers know.
We want this feedback on two levels: high and low. The high-level feedback is
a binary answer to the question "is the build ok?" The low-level feedback is
the possibility for a developer to dig in deeper to figure out what exactly
went wrong with the build that turned out "red".
Without further delay, the config.xml for our sample project:
<?xml version="1.0"?>
<cruisecontrol>
  <project name="SampleCCProject">
    <bootstrappers>
      <currentbuildstatusbootstrapper
        file="../logs/currentbuild.txt" />
      <svnbootstrapper file="build-cc.xml"
        localWorkingCopy="../../../WorkArea/SampleCCProject" />
    </bootstrappers>
    <modificationset quietperiod="60" >
      <svn LocalWorkingCopy="../../../WorkArea/SampleCCProject"/>
    </modificationset>
    <schedule interval="60" >
      <ant antWorkingDir="../../../WorkArea/SampleCCProject"
        buildfile="build-cc.xml" />
    </schedule>
    <log dir="../logs/SampleCCProject">
      <merge dir="../../../WorkArea/SampleCCProject/reports/junit/data"/>
    </log>
    <publishers>
      <currentbuildstatuspublisher
        file="../logs/currentbuild.txt" />
      <artifactspublisher dir="../../../WorkArea/SampleCCProject/dist"
        dest="../logs/SampleCCProject" />
      <email mailhost="smtp.yourdomain.com"
        returnaddress="buildmaster@yourdomain.com"
        skipusers="true"
        reportsuccess="fixes"
        subjectprefix="[CruiseControl]"
        buildresultsurl="http://buildserver:8080/cruisecontrol/buildresults">
        <failure address="developers@yourdomain.com" />
        <success address="developers@yourdomain.com" />
      </email>
    </publishers>
  </project>
</cruisecontrol>
<cruisecontrol>
The root element of the configuration file, <cruisecontrol>, doesn't
take any attributes. In fact, it only accepts two kinds of child attributes
and that's all. The <cruisecontrol> element can have 1 or more
<project> child elements for configuring one or more projects to put
under CruiseControl's surveillance. In our case, we only have one project
to play with so we're using only one <project> configuration, the
"SampleCCProject". You can also register arbitrary
plugins for CruiseControl with the <plugin> child element.
We're not going to use any plugins for our simple example project so I'll
leave that for a future article.
<project>
The <project> element is where you tell CruiseControl what to build,
when to build, how to build, and how to report. The <project> element
accepts two attributes. The name attribute specifies a unique (within
the configuration file) name for the project configuration and is required.
The optional buildafterfailed attribute can be used to tell
CruiseControl whether it should continue trying to build the project after
a failed build even though no commits have been detected in the
repository since the last build. The default value for buildafterfailed
is 'true', which means CruiseControl will keep on trying to
do a build after one that failed, even though no further
modifications would be made into the repository.
Now, a <project> element has plenty of possible child elements, namely
<bootstrappers>, <modificationset>, <schedule>, <log>,
<publishers>, <dateformat> and <plugin>. Out of these, only
<modificationset> and <schedule> are strictly required, but in
practice you'll pretty much always going to use the five listed in our example.
<bootstrappers>
The <bootstrappers> element can be used to list bootstrappers,
which are executed before the actual build attempt. Possibly the most used
bootstrapper is the <currentbuildstatusbootstrapper> also present in
our example, which writes a "current build started at ..." entry into the
currentbuild.txt file informing external applications (such as the
reporting web application I already mentioned in passing) about a build
being in progress. Another typical use of bootstrappers is to update a
specific file from a repository prior to the build -- just like what our
configuration is doing for the build-cc.xml wrapper build script with the
help of <svnbootstrapper>. This is useful for two reasons: 1) because
your wrapper script might end up being out-of-synch with the project,
effectively skewing the build results, and 2) because it's nice to keep
the project's main build script as lean as possible.
<modificationset>
The <modificationset> element is where you specify how CruiseControl
should figure out whether a build is needed, i.e. whether someone has
committed changes into the repository (or repositories if you've
split your project into several version control systems). The
<modificationset> recognizes two attributes, both of which are optional.
The first attribute is requiremodification, which tells CruiseControl
whether it should do a build even if there are no modifications in the
repository since the last build. It defaults to 'true'. If you want a
"nightly build" regardless of whether anyone has checked in since the last
build, set this to 'false'. The other attribute is quietperiod, which
represents the duration (in seconds) CruiseControl should wait to make sure
that it doesn't start doing a build while someone is checking in his changes.
In other words, CruiseControl waits until there's a long enough period of
silence in the repository before proceeding with the build. The default value
for 'quietperiod' is '60', which should be just fine for most projects,
including ours.
In our example, we're using the <svn> modificationset task to check
whether any changes have been committed to the project associated with our
working copy. Under the hood, the <svn> task performs a 'svn log'
command to get a list of changes between the last build date and the start
of the current build cycle.
Most projects will suffice with the SCM-spesific task checking for changes
in a repository, but that's not quite all you can do with
<modificationset>. You see, there's also a nice little task named
<buildstatus> that you can use to trigger your build whenever another
CruiseControlled project has had a successful build. Again, take a look at
the
online documentation if you're interested in the nitty-gritty details.
<schedule>
We've already seen how to tell CruiseControl the 'what' and part of 'when'.
The <schedule> element is the latter half of the 'when' as this is the
element which specifies how frequent you want your build cycle to start.
<schedule> takes just one attribute, interval, which represents
a duration in seconds that CruiseControl will wait between build attempts.
The interval defaults to '300' (five minutes) which should be quite
OK for most projects. However, since we're in the learning mode, we'll set
the interval to just 60 seconds so we don't have to wait for too long after
making experimental changes (intentional compilation errors, failing tests,
that sort of stuff).
The children of <schedule> are called builders and are used for
specifying the 'how' part of our configuration. The built-in builders provided
out of the box, <ant> and <maven>, can be used to launch Ant and
Maven build scripts, respectively.
The <ant> builder used in our example tells CruiseControl to use
a build script named "build-cc.xml" (the default would be "build.xml")
in the specified working copy of our project, and to execute the default
target, whatever that is (in our case, it's "build"). If you don't want to
rely on the build script's default target, (for example when you're using
the project's main build script directly without any wrappers) you can
specify the target(s) you want to execute by using the target attribute.
In addition to these common attributes, <ant> provides
the option to specify all sorts of extra properties for the builder like setting
a timeout for the build script. Once again, refer to the
documentation for the specifics. One specific attribute I'd like to
mention here, however.
The multiple attribute can be used to tell CruiseControl to
execute the builder in question only every nth time. This comes
in handy if you have a huge project taking a long time to compile from
scratch (a "clean build" in the geek slang). In those cases, it's often
a good idea to specify two separate <ant> builders to employ
incremental compilation; one to execute the project's build script's
"clean" target every 5th (for example) time and another to execute the
project's "build" target every time. Here's an example of such a setup:
<schedule interval="60" >
  <ant antWorkingDir="../../../WorkArea/SampleCCProject" target="clean" multiple="5"/>
  <ant antWorkingDir="../../../WorkArea/SampleCCProject" target="build" multiple="1"/>
</schedule>
I lied. In fact, the <schedule> element can indeed accommodate one
non-builder task. Well, technically it is a builder since it extends the
same class as net.sourceforge.cruisecontrol.builders.AntBuilder and
net.sourceforge.cruisecontrol.builders.MavenBuilder but semantically
it's not really a builder per se. This element is <pause> and it can be
used to tell CruiseControl not to do a build during a specified time
window. Some of the common uses for the <pause> element would be to
prevent any builds from executing during the weekend or during a nightly
backup of a critical resource.
<log>
Alright. We've now gotten all modifications from the repository and
executed an automated build (if deemed necessary). What's left to do is
to interpret the results and publish them for humans to see. The <log>
element is the tool to do the former.
The <log> element accepts an attribute named dir, which
must point to the directory CruiseControl will aggregate the build
history for this particular project. In our example, this directory
happens to be "../logs/SampleCCProject" (relative to the "main/bin"
directory where we executed the cruisecontrol.bat/.sh script from).
The <log> element also accepts an encoding attribute to
allow the use of non-default encoding for the log files.
At this point, we know that all those log files are going to the
directory specified by the dir attribute. Now how do those
compilation errors and unit test results end up into CruiseControl's
log files? The answer lies in the only child elements recognized by
<log>, the aptly named <merge>.
<merge> is a task which merges the resulting log files
from running the Ant (or Maven) scripts during the build. Let's go
through the element's accepted attributes and then talk a bit about
what happens behind the curtains in this mysterious merge operation.
The <merge> element can be told to merge either a specified
XML file or all XML files (having the ".xml" suffix) under the specified
directory. These attributes are named "file" and "dir", respectively.
"All XML files?" you ask. Yes, all XML files. The way
CruiseControl works is that it wire-taps the build script recording
any output into one huge log file and lets the reporting applications
worry about picking the information they want out of the mammoth log file.
Once we've got CruiseControl running, you can take a peek at the log files
under "BuildServer\CruiseControl\main\logs\SampleCCProject" to see for
yourself what information is CruiseControl harvesting from the project's
build process.
<publishers>
The <publishers> element encapsulates actions that should happen
after a build has been attempted. Remembering the goal of having a
Continuous Integration server, their responsibility is rather obvious
-- to publish the build results to interested parties in some meaningful
way. For most projects, this "meaningful way" is probably a combination
of email and web pages, but other channels of communication can be used
as well. I'll first introduce some of the built-in publishing tasks and
then give a brief mention about other, perhaps more extreme ways to
publish build results from CruiseControl.
Probably the most common publisher is the
<currentbuildstatuspublisher> which can be used to notify external
applications -- such as the CruiseControl reporting web application --
about the latest build results being available. You just need to specify
the filename for the task to write its "build completed" message to
as we've done in our example:
<currentbuildstatuspublisher file="../logs/currentbuild.txt"/>
There's also an FTP version named <currentbuildstatusftppublisher/>
if you have a setup consisting of multiple CruiseControl servers or
for some other reason wish to update the current build status file on
a machine other than the CruiseControl server you're configuring.
Similarly, there's <ftppublisher> for copying the whole build
results log file over to another server and <scp> for copying an
arbitrary file over an SSH connection.
I already mentioned that many projects tend to use email as a channel
for publishing their build results. CruiseControl supports this with two
types of email publishers: the "link email publisher" (<email>)
and the "HTML email publisher" (<htmlemail>). The former is used
to send an email with just one link to the build results page somewhere
accessible by the team (typically the CruiseControl reporting web
application). The latter, however, takes a radically different approach
and embeds all the build results information into the very email being
sent to all configured recipients.
I've included the regular <email> publisher into our sample
application to give you an idea of how the email integration works.
Note that you must have access to an SMTP server to be able to send the
build results emails. If you don't have that access, just comment out
this particular publisher and you're good to go.
Here's the <email> publisher once again:
<email mailhost="smtp.yourdomain.com"
       returnaddress="buildmaster@yourdomain.com"
       skipusers="true"
       reportsuccess="fixes"
       subjectprefix="[CruiseControl]"
       buildresultsurl="http://buildserver:8080/cruisecontrol/buildresults">
        <failure address="developers@yourdomain.com" />
        <success address="developers@yourdomain.com" />
</email>
What the attributes of the <email> element tell us is that the
SMTP server can be found at smtp.yourdomain.com, the sender
address (and return address) CruiseControl should use is
"buildmaster@yourdomain.com", CruiseControl should skip sending the
email to those users who had committed changes since the last build,
CruiseControl should only send an email after a successful build if
it was previously failing (the other alternatives are "never" and
"always" which I doubt need any explanation) , the email being sent
should have the given prefix in the subject line (to help in
filtering/recognizing CruiseControl's emails), and that the build
results are available at the given URL (we'll come back to this when
setting up the reporting web application in the next installment of
this tutorial!).
These are not all the attributes you can specify, however. There are
plenty more, including defaultsuffix with which you can specify
the default domain name for recipient addresses picked up from the SCM,
failasimportant with which you can put the red "important" flag
up in the developers' mail client in case a build failed, a
username and password in case you need to authenticate to
the mail server, returnname which you typically use to give your
CruiseControl server a little personality, and spamwhilebroken
which CruiseControl uses to decide whether it should continue sending
"build failed" emails for subsequent failing builds.
Again, the full potential available to you is revealed in the
official documentation.
Now what about those child elements? Our little example is using two
very similar child elements for <email>, namely <failure>
and <success>. The <email> (and <htmlemail>) element
can include as many of these as you like and their purpose is to tell
CruiseControl who it should send email to in case of a failed and a
successful build, respectively. There's also a third similar child
element named <always>, which combines the two specifying a
recipient that should receive emails on both successes and failures.
Finally, the <email> element supports the <map> child
element which you can use to map the usernames in your version control
system (e.g. "lkoskela") into email addresses (e.g.
"lasse.koskela@yourdomain.com") as follows:
<map alias="lkoskela" address="lasse.koskela@yourdomain.com"/>
The "fat" version of the email publisher, <htmlemail>, adds a
few more attributes you can (or must) specify. First of all, you must
point CruiseControl to the log directory where all the build results
for your project are collected. This is done with the logdir
attribute. The rest of the additional attributes are related to
formatting the HTML email.
If you want to specify a single XSL file for transforming the
CruiseControl build results into a nice little HTML document, you point
to the stylesheet using the xslfile attribute. Alternatively,
if you don't feel like writing such a monster for a stylesheet, you can
fall back on the standard stylesheets by pointing the xsldir
attribute to the "xsl" directory holding the XSL files that came as part of
the CruiseControl distribution and by pointing the css attribute
to the CSS stylesheet in the adjacent "css" directory. Of course, you can tweak these
XSL and CSS documents as you please!
If you feel like trying out the HTML email publisher, replace the earlier
<email> configuration with this <htmlemail> version:
<htmlemail mailhost="smtp.yourdomain.com"
          returnaddress="buildmaster@yourdomain.com"
          skipusers="true"
          reportsuccess="fixes"
          subjectprefix="[CruiseControl]"
          buildresultsurl="http://buildserver:8080/cruisecontrol/buildresults"
          logdir="C:\CIA\BuildServer\CruiseControl\main\logs\SampleCCProject"
          xsldir="C:\CIA\BuildServer\CruiseControl\reporting\jsp\xsl"
          css="C:\CIA\BuildServer\CruiseControl\reporting\jsp\css\cruisecontrol.css">
  <failure address="developers@yourdomain.com" />
  <success address="developers@yourdomain.com" />
</htmlemail>
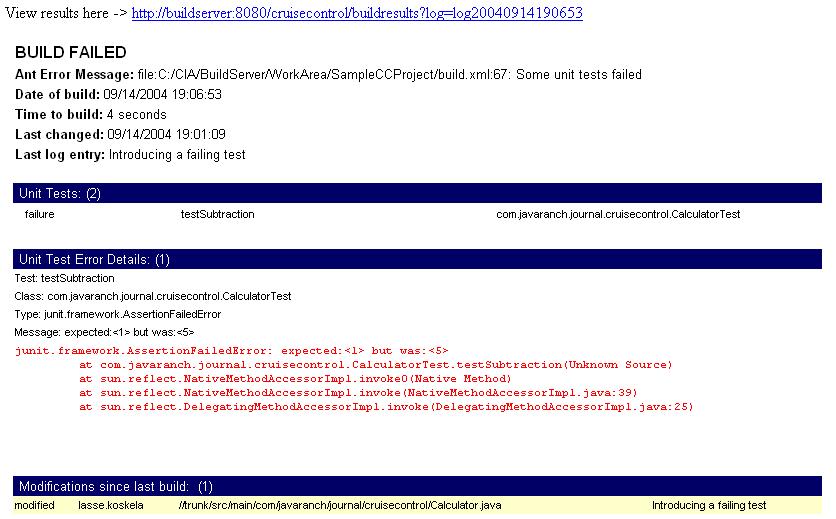
Changing the primitive link email publisher configuration to the fancier
HTML version above produces the following type of an email after
intentionally making our unit test fail:
Approximately 1 minute and 22 seconds later, after fixing that failing
test and committing my changes to the repository, I got the following
"build successful" email:
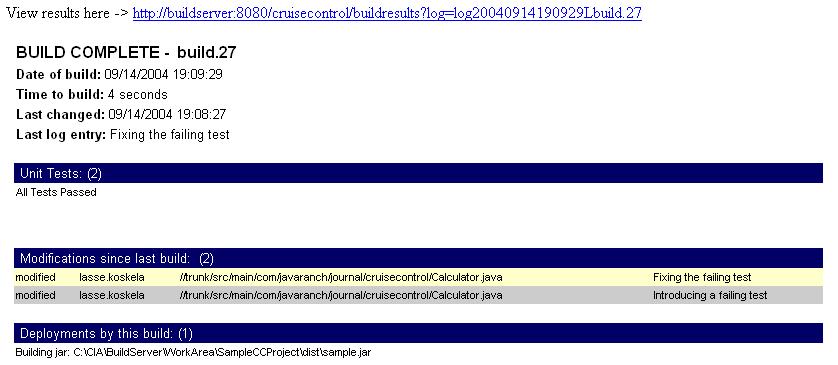
Quite nice -- and useful -- isn't it?
By tweaking the XSL stylesheets you can do pretty much customization
regarding what the email being sent out contains. However, sometimes you'd
like to make certain by-products of the build available along with the
build results. In those situations, and as I've done in our example, the
<artifactspublisher> can be used to archive build artifacts such as
JAR files, javadocs, etc. somewhere for safekeeping. In the example, the
below configuration copies everything from the "dist" directory of our
project under the particular project's CruiseControl log directory:
<artifactspublisher dir="../../../WorkArea/SampleCCProject/dist"
                    dest="../logs/SampleCCProject" />
To be more accurate, the files under "dist" end up into a subdirectory
named after the build timestamp, e.g. "logs/SampleCCProject/20040914190929".
The artifacts archived as part of the build history can be made available
for later retrieval or viewing through the reporting web application, for
example.
If none of the above publishers quite satisfy your need to publicize, you
can always plug in your own implementation or delegate to an external
program using the built-in <execute> publisher. Talking of which, I
believe I promised to talk a bit about the more exotic implementations of
a CruiseControl publisher, didn't I?
Perhaps one of the most famous custom CruiseControl publishers to date
has been the quite innovative application of
lava lamps and X10 automation electronics. What makes such a
configuration really cool isn't the fact that someone has gone through the
trouble of hooking up these seemingly remote objects -- a CruiseControl
server and two lava lamps -- but how the team in question has made use of
the "unused bandwidth" of their environment, the gentle visual signal of
the red lava lamp slowly starting to bubble when someone has broken the
build.
Another clever, although far from radical, way to publish build results
is to install an always-on client-side widget -- usually a system tray
application -- that shows the green/red state of the current build and
possibly informs the developers when the next build is due.
I know of a couple of such implementations, namely Ivan
Moore's
Python script which screen-scrapes the CruiseControl reporting
web application to figure out build status and
Dashboard which consists
of a server-side component that hooks up to CruiseControl's
AntBuilder and broadcasts build events to IDE plugins (currently
only Eclipse and
IDEA) within the local area
network over multicast.
There are similar utilities for other Continuous Integration products as
well CruiseControl and it shouldn't be too difficult to implement your
own with some spare time and willingness to dive into CruiseControl's
source code.
That's about enough talking. It's time to see our carefully crafted
CruiseControl configuration in action!
3, 2, 1, ... INTEGRATE!
With the configuration file in place under "main/bin", you can finally
launch CruiseControl with the following command:
C:\CruiseControl\main\bin> cruisecontrol
The output should look like this:
C:\CIA\BuildServer\CruiseControl\main\bin>cruisecontrol
"C:\java\j2se\bin\java" -cp "..." CruiseControl
[cc]syys-14 20:42:31 Main          - CruiseControl Version 2.1 Compiled on September 12 2004 1552
[cc]syys-14 20:42:31 trolController- projectName = [SampleCCProject]
[cc]syys-14 20:42:31 Project       - Project SampleCCProject:  reading settings from config file
  [C:\CIA\BuildServer\CruiseControl\main\bin\config.xml]
[cc]syys-14 20:42:31 Project       - Project SampleCCProject starting
[cc]syys-14 20:42:31 Project       - Project SampleCCProject:  idle
[cc]syys-14 20:42:31 BuildQueue    - BuildQueue started
[cc]syys-14 20:42:31 Project       - Project SampleCCProject started
[cc]syys-14 20:42:31 Project       - Project SampleCCProject:  next build in 1 minutes
After a few minutes, you should be looking at an output similar to mine:
[cc]syys-14 20:46:11 Project       - Project SampleCCProject:  in build queue
[cc]syys-14 20:46:11 BuildQueue    - now building: SampleCCProject
[cc]syys-14 20:46:11 Project       - Project SampleCCProject:  reading settings from config file
  [C:\CIA\BuildServer\CruiseControl\main\bin\config.xml]
[cc]syys-14 20:46:11 Project       - Project SampleCCProject:  bootstrapping
At revision 39.
[cc]syys-14 20:46:13 Project       - Project SampleCCProject:  checking for modifications
[cc]syys-14 20:46:14 Project       - Project SampleCCProject:  No modifications found, build not necessary.
[cc]syys-14 20:46:14 Project       - Project SampleCCProject:  idle
[cc]syys-14 20:46:14 Project       - Project SampleCCProject:  next build in 1 minutes
[cc]syys-14 20:47:14 Project       - Project SampleCCProject:  in build queue
[cc]syys-14 20:47:14 BuildQueue    - now building: SampleCCProject
[cc]syys-14 20:47:14 Project       - Project SampleCCProject:  reading settings from config file
  [C:\CIA\BuildServer\CruiseControl\main\bin\config.xml]
[cc]syys-14 20:47:14 Project       - Project SampleCCProject:  bootstrapping
At revision 39.
[cc]syys-14 20:47:16 Project       - Project SampleCCProject:  checking for modifications
[cc]syys-14 20:47:17 Project       - Project SampleCCProject:  No modifications found, build not necessary.
[cc]syys-14 20:47:17 Project       - Project SampleCCProject:  idle
[cc]syys-14 20:47:17 Project       - Project SampleCCProject:  next build in 1 minutes
[cc]syys-14 20:48:17 Project       - Project SampleCCProject:  in build queue
[cc]syys-14 20:48:22 BuildQueue    - now building: SampleCCProject
[cc]syys-14 20:48:22 Project       - Project SampleCCProject:  reading settings from config file
  [C:\CIA\BuildServer\CruiseControl\main\bin\config.xml]
[cc]syys-14 20:48:22 Project       - Project SampleCCProject:  bootstrapping
At revision 39.
[cc]syys-14 20:48:24 Project       - Project SampleCCProject:  checking for modifications
[cc]syys-14 20:48:25 Project       - Project SampleCCProject:  No modifications found, build not necessary.
[cc]syys-14 20:48:25 Project       - Project SampleCCProject:  idle
[cc]syys-14 20:48:25 Project       - Project SampleCCProject:  next build in 1 minutes
Notice how the same loop repeats time and time again? That's CruiseControl
idling because nobody has checked in anything since the last build. Why don't
we get some action by introducing some build failures...
Edit src\main\com\javaranch\journal\cruisecontrol\Calculator.java
in one of the developer machines' working directory by changing the
subtract() method from:
  public int subtract(int x, int y) {
    return (x - y);
  }
to:
  public int subtract(int x, int y) {
    return (x - y) + 5;
  }
Then, commit your intentional build-breaker to the repository with
C:\Developer1\workingcopy> svn commit . -m "I did it"
Sending        src\main\com\javaranch\journal\cruisecontrol\Calculator.java
Transmitting file data .
Committed revision 40.

C:\Developer1\workingcopy>
After a couple of minutes of anxious waiting, you should see output similar
to the following:
[cc]syys-14 20:58:54 Project       - Project SampleCCProject:  in build queue
[cc]syys-14 20:58:54 BuildQueue    - now building: SampleCCProject
[cc]syys-14 20:58:54 Project       - Project SampleCCProject:  reading settings from config file
  [C:\CIA\BuildServer\CruiseControl\main\bin\config.xml]
[cc]syys-14 20:58:54 Project       - Project SampleCCProject:  bootstrapping
At revision 39.
[cc]syys-14 20:58:56 Project       - Project SampleCCProject:  checking for modifications
[cc]syys-14 20:58:57 Project       - Project SampleCCProject:  No modifications found, build not necessary.
[cc]syys-14 20:58:57 Project       - Project SampleCCProject:  idle
[cc]syys-14 20:58:57 Project       - Project SampleCCProject:  next build in 1 minutes
[cc]syys-14 20:59:57 Project       - Project SampleCCProject:  in build queue
[cc]syys-14 20:59:57 BuildQueue    - now building: SampleCCProject
[cc]syys-14 20:59:57 Project       - Project SampleCCProject:  reading settings from config file
  [C:\CIA\BuildServer\CruiseControl\main\bin\config.xml]
[cc]syys-14 20:59:57 Project       - Project SampleCCProject:  bootstrapping
At revision 40.
[cc]syys-14 20:59:59 Project       - Project SampleCCProject:  checking for modifications
[cc]syys-14 21:00:00 odificationSet- 1 modification has been detected.
[cc]syys-14 21:00:00 odificationSet- A modification has been detected in the quiet period.
[cc]syys-14 21:00:00 odificationSet- Sleeping for 49 seconds before retrying.
[cc]syys-14 21:00:51 odificationSet- 1 modification has been detected.
[cc]syys-14 21:00:51 odificationSet- A modification has been detected in the quiet period.
[cc]syys-14 21:00:51 odificationSet- Sleeping for 0 seconds before retrying.
[cc]syys-14 21:00:52 odificationSet- 1 modification has been detected.
[cc]syys-14 21:00:52 Project       - Project SampleCCProject:  now building
Buildfile: build-cc.xml

update:
     [exec] U  src\main\com\javaranch\journal\cruisecontrol\Calculator.java
     [exec] Updated to revision 40.

build:

setup.properties:

setup.paths:

setup:

compile.main:
    [javac] Compiling 1 source file to C:\CIA\BuildServer\WorkArea\SampleCCProject\classes\main

compile.tests:

compile:

jar:
      [jar] Building jar: C:\CIA\BuildServer\WorkArea\SampleCCProject\dist\sample.jar

test:
   [delete] Deleting directory C:\CIA\BuildServer\WorkArea\SampleCCProject\reports\junit\data
    [mkdir] Created dir: C:\CIA\BuildServer\WorkArea\SampleCCProject\reports\junit\data
    [junit] Running com.javaranch.journal.cruisecontrol.CalculatorTest
    [junit] Tests run: 2, Failures: 1, Errors: 0, Time elapsed: 0,05 sec
    [junit] TEST com.javaranch.journal.cruisecontrol.CalculatorTest FAILED

BUILD FAILED
file:C:/CIA/BuildServer/WorkArea/SampleCCProject/build.xml:67: Some unit tests failed

Total time: 5 seconds
[cc]syys-14 21:00:57 Project       - Project SampleCCProject:  merging accumulated log files
[cc]syys-14 21:00:57 Project       - Project SampleCCProject:  publishing build results
[cc]syys-14 21:00:58 EmailPublisher- Sending mail notifications.
[cc]syys-14 21:01:02 Project       - Project SampleCCProject:  idle
[cc]syys-14 21:01:02 Project       - Project SampleCCProject:  next build in 1 minutes
Notice how at 21:00:00 CruiseControl's build loop detects our modification
in the repository, waits for a short, random time after detecting that a
modification (the same one...) has happened during the quiet period (which
we specified to be 60 seconds), and finally proceeds by executing our
build-cc.xml wrapper Ant script.
You can see from the output how build-cc.xml invokes the project's main
build script, how the CalculatorTest fails, and how CruiseControl processes
the build results by sending email, finally going back to sleep for the
specified build interval (again, 60 seconds in our example).
Also notice that CruiseControl keeps on doing builds every 60 seconds even
though no further modifications have been detected in the repository -- this
behavior is due to the fact that we omitted the buildafterfailed
attribute from our configuration file's <project> element, effectively
letting it default to 'true'. If we had set it to 'false', CruiseControl
would sit still until someone commits something into the repository.
So, now that we know CruiseControl detects our failures, let's see whether it
detects our fixes... Edit the Calculator class again, returning the
subtract() method to its valid implementation, and commit your changes
with the same command as before -- except for the commit comment, of course,
which should indicate that our edit was to fix the defect we introduced
earlier:
C:\Developer1\workingcopy> svn commit . -m "I fixed it"
Sending        src\main\com\javaranch\journal\cruisecontrol\Calculator.java
Transmitting file data .
Committed revision 41.

C:\Developer1\workingcopy>
Soon, CruiseControl should again pick up our commit from the repository and,
hopefully, verify that our "fix" was correct:
[cc]syys-14 21:16:54 Project       - Project SampleCCProject:  in build queue
[cc]syys-14 21:16:54 BuildQueue    - now building: SampleCCProject
[cc]syys-14 21:16:54 Project       - Project SampleCCProject:  reading settings from config file
  [C:\CIA\BuildServer\CruiseControl\main\bin\config.xml]
[cc]syys-14 21:16:54 Project       - Project SampleCCProject:  bootstrapping
At revision 41.
[cc]syys-14 21:16:57 Project       - Project SampleCCProject:  checking for modifications
[cc]syys-14 21:16:58 odificationSet- 4 modifications have been detected.
[cc]syys-14 21:16:58 odificationSet- A modification has been detected in the quiet period.
[cc]syys-14 21:16:58 odificationSet- Sleeping for 30 seconds before retrying.
[cc]syys-14 21:17:30 odificationSet- 4 modifications have been detected.
[cc]syys-14 21:17:30 Project       - Project SampleCCProject:  now building
Buildfile: build-cc.xml

update:
     [exec] U  src\main\com\javaranch\journal\cruisecontrol\Calculator.java
     [exec] Updated to revision 41.

build:

setup.properties:

setup.paths:

setup:

compile.main:
    [javac] Compiling 1 source file to C:\CIA\BuildServer\WorkArea\SampleCCProject\classes\main

compile.tests:

compile:

jar:
      [jar] Building jar: C:\CIA\BuildServer\WorkArea\SampleCCProject\dist\sample.jar

test:
   [delete] Deleting directory C:\CIA\BuildServer\WorkArea\SampleCCProject\reports\junit\data
    [mkdir] Created dir: C:\CIA\BuildServer\WorkArea\SampleCCProject\reports\junit\data
    [junit] Running com.javaranch.journal.cruisecontrol.CalculatorTest
    [junit] Tests run: 2, Failures: 0, Errors: 0, Time elapsed: 0,04 sec

all:

BUILD SUCCESSFUL
Total time: 4 seconds
[cc]syys-14 21:17:34 Project       - Project SampleCCProject:  merging accumulated log files
[cc]syys-14 21:17:34 Project       - Project SampleCCProject:  publishing build results
[cc]syys-14 21:17:35 EmailPublisher- Sending mail notifications.
[cc]syys-14 21:17:36 Project       - Project SampleCCProject:  idle
[cc]syys-14 21:17:36 Project       - Project SampleCCProject:  next build in 1 minutes
Alright! We've got a Continuous Integration server up and running, responding
timely and correctly to our human errors and the resulting corrective actions!
If you had the <email> or <htmlemail> publisher configured
properly while playing around with Calculator.java, you should have a couple
of emails from CruiseControl in your mailbox right now. If you decided to
comment out the email stuff, don't worry, because the next step is to set
up the reporting web application -- in Part 2...
A .zip file of the sample project.
Discuss this article in The Big Moose Saloon!

Return to Top
|


 How Tomcat Works
 Pragmatic Project Automation: How to Build, Deploy, and Monitor Java Apps
 Just Java(TM) 2 (6th Edition)
 Eclipse: Building Commercial-Quality Plug-ins
 Java Testing and Design: From Unit Testing to Automated Web Tests
 Better, Faster, Lighter Java
 Java 1.5 Tiger : A Developer's Notebook
 Whizlabs SCDJWS Certification Exam Simulator